Assignment 6-Frontal Crash Simulation Challenge
#15 // Assignment 6 / PROJECT -1 - Frontal Crash Simulation Challenge.
AIM:
Frontal car crash simulation of Dodge Neon BIW using RADIOSS solver and Pre-processing using HyperMesh / HyperCrash.
OBJECTIVE:
Frontal crash-BIW ->
- To check the unit system and either follow [Mg mm s] or [Kg mm ms].
- To create the appropriate interface, friction 0.2, and recommended parameters.
- To make sure of no penetrations and intersections.
- To correct rigid bodies if any issues.
- To create a rigid wall with friction of 0.1.
- To compare the model weight with the full-scale 300k nodes model and use added masses to reach a target weight of 700kg while getting CG about the required range.
- To create an initial velocity of 35 mph.
- To input Time-step: 0.5 to 0.1 microseconds and Run 80 ms.
Output requests:
- Sectional force in the rails at a location of indicated node 174247.
- Axial force received on the rails from the bumper.
- Shotgun cross-sectional forces.
- A pillar cross-section.
- Acceleration curve received on the accelerometer at the base of B pillar (on B pillar rocker).
- Intrusions on the dash wall 66695,66244.
THEORY:
ABSTRACT:
The crash test is a virtual reconstruction that replicates the same forces and speeds that would occur if the vehicle was to be involved in an actual crash. In this type of testing, since nothing is physically impacting the Body-in-White (BIW), no physical deformation or damage occurs to the body’s structure, allowing multiple crashworthiness tests to be conducted in succession. This type of simulation is an integral part of the design process and can help save both time and money since it can be implemented instead of costly, destructive testing programs.
For this project, the case set up and simulation are to be done in Hypermesh and Hypercrash, whereas Hyperview and Hypergraph 2D will be used for post-processing. Hypergraph will be used to plot energies, Von-Mises stresses, plastic strains, acceleration curves, and force and Hyperview will be used to view the simulation.
As part of the process, we are to create a rigid wall, check penetrations, assign an initial velocity of 35mph, carry out mass balancing to ensure the total weight comes to 700 kgs, and finally, create sections, intrusions and accelerometers as part of the output request requirements.
> Frontal Crash –>
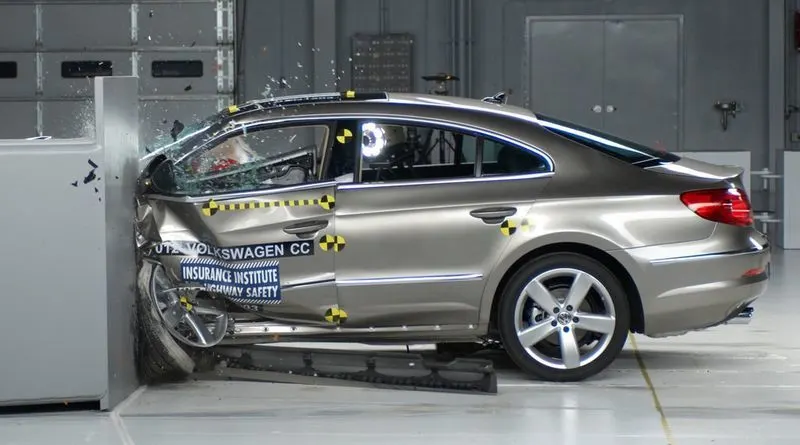
A crash test is a form of destructive testing usually performed to ensure safe design standards in crashworthiness and crash compatibility for various modes of transportation or related systems and components.
Various Crash Test
A crash test is a form of destructive testing usually performed to ensure safe design standards in crashworthiness and crash compatibility for various types of vehicles like small, medium and heavy-duty and its related systems and components for the sake of getting the performance of the vehicle under the different conditions of the crash at different angles with taking certain object like a rigid wall, cables specially three-strand cable, concrete barriers, guardrail systems, etc. It will be performed either by numerical simulations or experimentally. The figure below illustrates different types of crash tests generally used.
- Frontal Impact test- In this test a fully front structure of the vehicle collides with another object like another vehicle, rigid wall, etc. at a given speed.
- Offset Test- In this test, only a part of the front portion of the vehicle strikes some barrier usually a vehicle at a given speed.
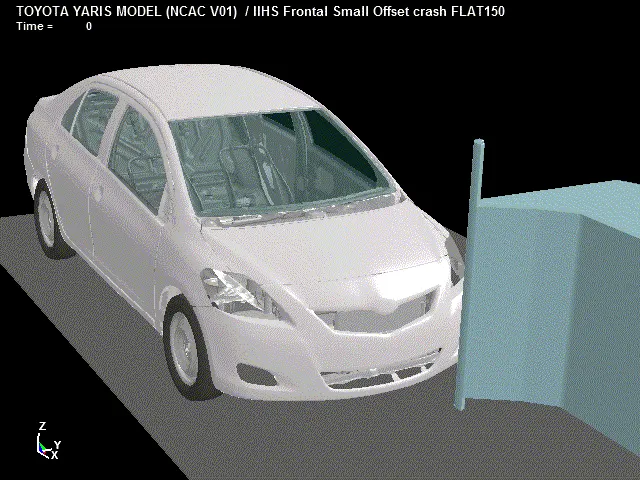
- Small Overlap Test- In this only a small portion of the vehicle strikes an object like a tree, pole, or if a car were to clip another. This situation loads a maximum value of force into the vehicle structure at a particular given speed. This test usually comprises 15% to 20% of the front structure.
- Side Impact Test- In this test sometimes the vehicle is in static condition or in dynamic and another vehicle or an object collides at the side surface having some speed.
- Roll-Over Test- In this test a vehicle is in rollover condition having a certain angle by which they test (specifically the pillars holding the roof) to support itself in a dynamic impact. It is also done for the static crash testing condition.
- Roadside Hardware- These are performed to ensure that the crash barriers and crash cushions will protect vehicle occupants from roadside hazards.
- Old Versus New- In this, an impact is done between an old car against a new car and the big car against a small car it is performed to show the advancements in crashworthiness.
Crash tests are conducted under rigorous scientific and safety standards. Each crash test is very expensive so the maximum amount of data must be extracted from each test. Usually, this requires the use of high-speed data acquisition, at least one triaxial accelerometer, and a crash test dummy, but often includes more. A crash test is much important which helps in minimizing the losses such as deaths, injuries, and property damages from vehicle crash on the roads.
In this Project, we have to perform the Frontal crash of the vehicle. Frontal impacts are the impacts undertaken against the solid barrier with precise speed. The test requires the front portion of the vehicle to impact the barrier.
In the New Car Assessment Program (NCAP), passenger vehicles crashed at 35 mph into a rigid barrier that covers the full width of the vehicle. The Institute runs offset frontal tests instead of full-width frontal tests. In an offset crash only one side of a vehicle’s front end, not the full width, hits the barrier.
> HOW CRASH TESTING WORKS ->
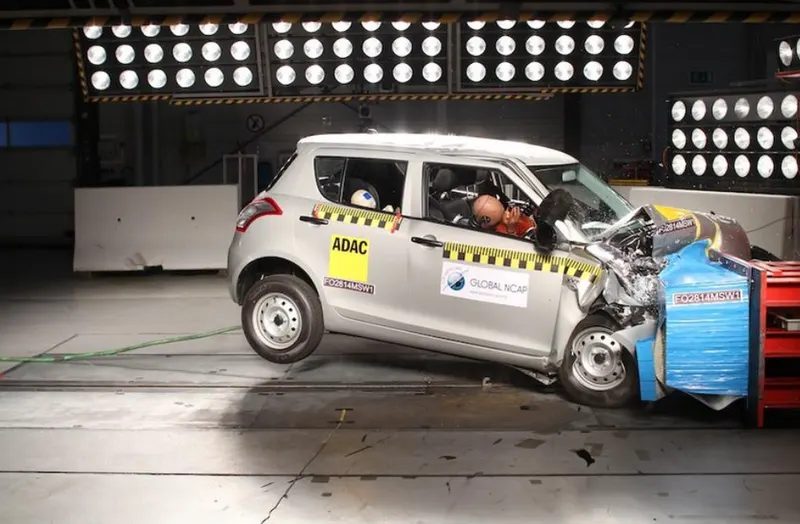
A crash test is a form of destructive testing usually performed to ensure safe design standards in crashworthiness and crash compatibility for various modes of transportation-related systems and components.
Crash test dummies have been the subject of public service announcements, cartoons, parodies, and even the name of a band. Real crash test dummies, however, are true life-savers as an integral part of automotive crash tests. Even though cars get a little safer each year, and fatality rates are declining, car crashes are still one of the leading causes of death and injury in the United States.
One of the reasons cars have been getting safer is because of a well-established testing program.
The dummies contain three types of instrumentation:
- Accelerometers
- Load sensors
- Motion sensors
Accelerometers ->
These devices measure the acceleration in a particular direction. This data can be used to determine the probability of injury. Acceleration is the rate at which speed changes. For example, if you bang your head into a brick wall, the speed of your head changes very quickly (which can hurt). But, if you bang your head into a pillow, the speed of your head changes more slowly as the pillow crushes (and it doesn't hurt).
The crash-test dummy has accelerometers all over it. Inside the dummy's head, there is an accelerometer that measures the acceleration in all three directions (fore-aft, up-down, left-right). There are also accelerometers in the chest, pelvis, legs, feet, and other parts of the body.
Load Sensors ->
Inside the dummy are load sensors that measure the amount of force on different body parts during a crash.
Movement Sensors ->
These sensors are used in the dummy's chest. They measure how much the chest deflects during a crash.
- Crashworthiness Requirements
The vehicle structure should be sufficiently stiff in bending and torsion for proper ride and handling. It should minimize high-frequency fore-aft vibrations that give rise to harshness. In addition, the structure should yield a deceleration pulse that satisfies the following requirements for a range of occupant sizes, ages, and crash speeds for both genders: Deformable, yet stiff, front structure with crumple zones to absorb the crash kinetic energy resulting from frontal collisions by plastic deformation and
prevent intrusion into the occupant compartment, especially in case of offset crashes and collisions with narrow objects such as trees.
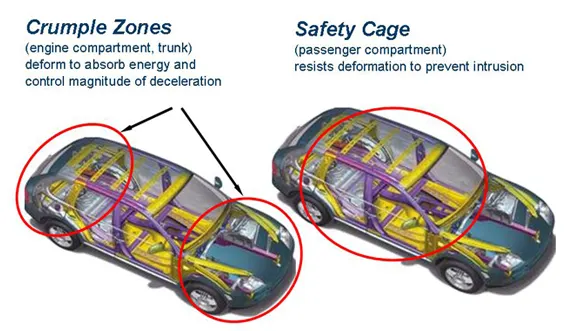
- Short vehicle front ends, driven by styling considerations, present a challenging task to the crash-worthiness engineer.
- Deformable rear structure to maintain the integrity of the rear passenger compartment and protect the fuel tank.
- Properly designed side structures and doors to minimize intrusions in side impact and prevent doors from opening due to crash loads.
- Strong roof structure for rollover protection.
- Properly designed restraint systems that work in harmony with the vehicle structure to provide the occupant with an optimal ride down and protection in different interior spaces and trims.
- Accommodate various chassis designs for different power train locations and drive configurations.
PROCEDURE:
- Check for UNIT SYSTEM.
- Import model in HYPERCRASH.
- Check for penetration and intersection.
- Add masses to reach a target weight of 700kg.
- Export changes file and import in HYPERMESH.
- Create Interface contact's.
- Create interface contact between the component and bumper.
- Create a rigid wall.
- Add velocity to the nodes.
- Create cross-section's.
- Create acceleration nodes.
- Create springs to check deflection.
- Assign property to springs.
- Create TH for section forces, intrusion springs, and interface contacts.
- Create cards.
- Model checker.
NOTE: - Simulation Follow Chart – >
- Parts. -> (Materials cards, Mesh)
- Interaction. -> (Contacts/ interfaces, joints, welds)
- Boundary Condition -> (Kinematic- motions of parts, velocity, acceleration, etc.),
(Loading Condition- Force, pressure. Etc.)
- Control Cards. -> (Time, Time-step.)
- Outputs. -> (Stress-strain curve, Deformation.)
CHECK FOR UNIT SYSTEM:
In the data, we have two files-
- Neon_front_0000.rad (starter file) stores information about:
- Nodes
- Load Conditions
- Velocity
- Boundary Conditions, etc.
- Basically, it is an ASCII (American Standard Code for Information Interchange) file that contains the model information.
- The starter file should always end with “0000.rad”.
- Neon_front_0001.rad (engine input file)
The engine File stores information about:
- Simulation Runtime
- Simulation Speed control parameters, such as No. of Animation Files, No. of Time History Files, Size of the history file and Animation frequency, etc.
- Basically, it is an ASCII (American Standard Code for Information Interchange) file that describes the run controls.
- We can also edit the Engine File directly through the Control Cards.
- The starter file should always end with “0001.rad”.
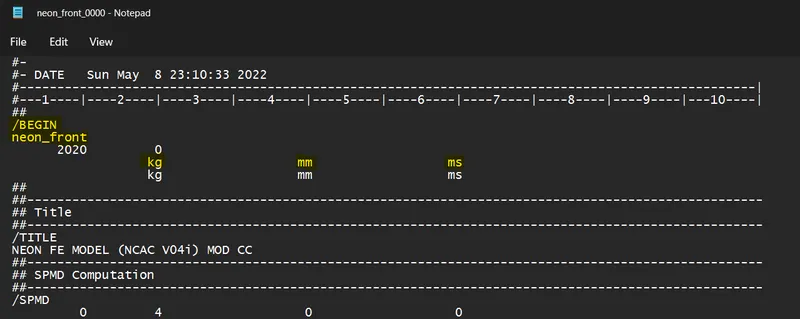
1. Checking the unit system and either following [Mg mm s] or [Kg mm ms]. ->
STEP 1: Open the starter file neon_front_0000.rad file,
go to Menu bar > file > import > solver desk > select 0000.rad file > import.
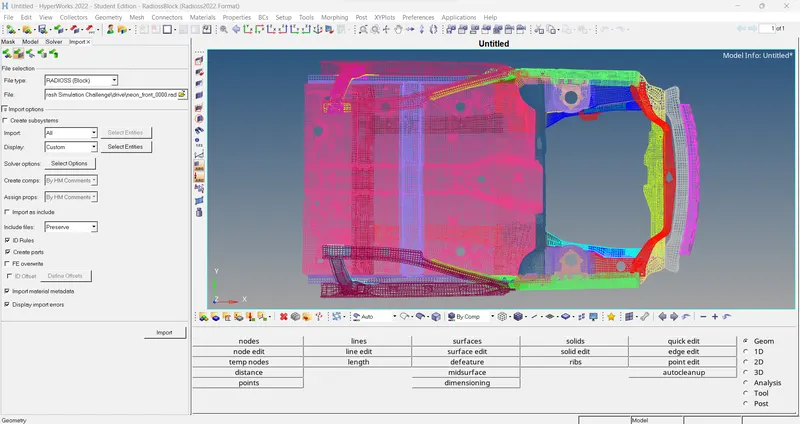
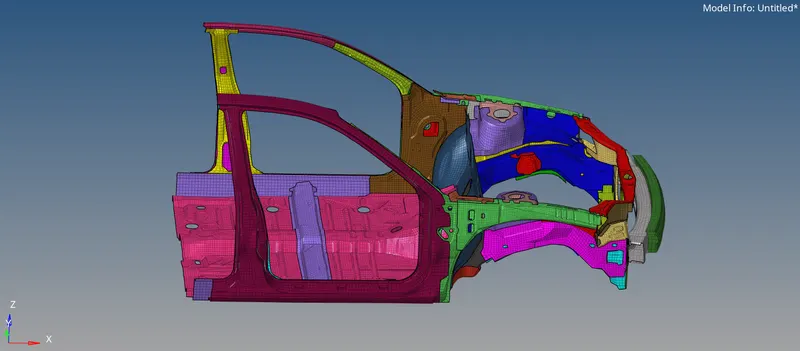
STEP 2: Checking the unit system of the model.
go to Model browser > cards > begin card.
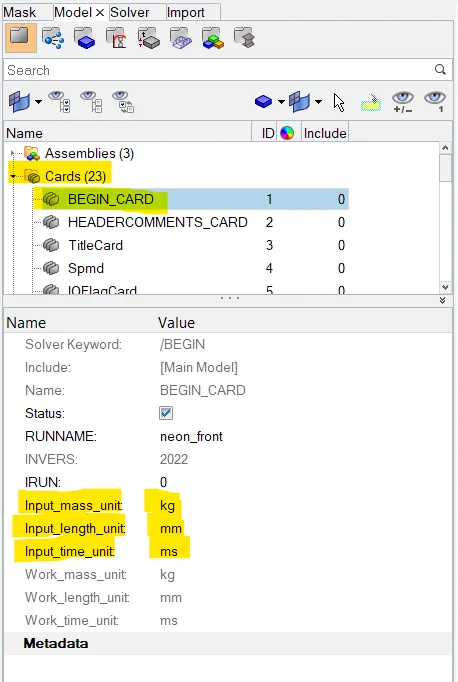
/ Note-
Or we can check units in system stater "0000.rad" file.
Go to Neon_front_0000.rad file > Open > check the unit system.
 /
/
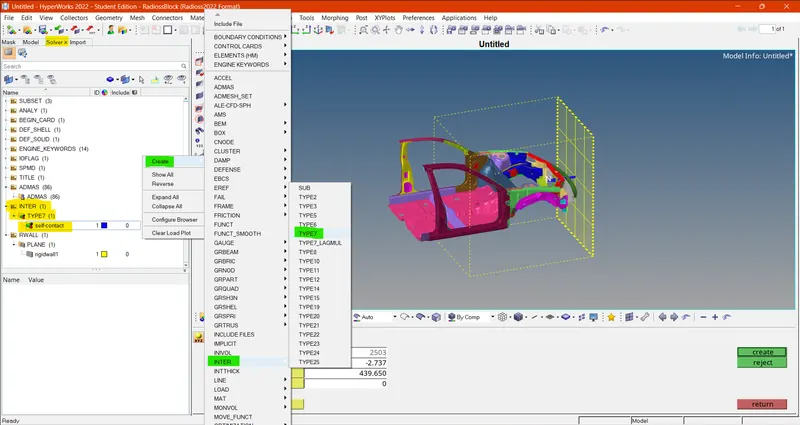
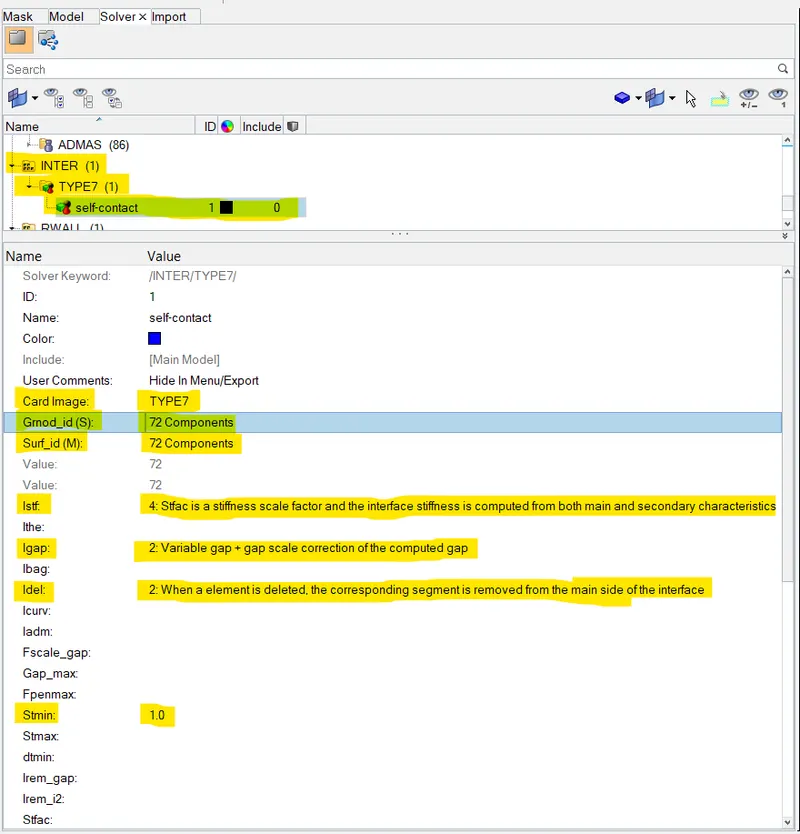
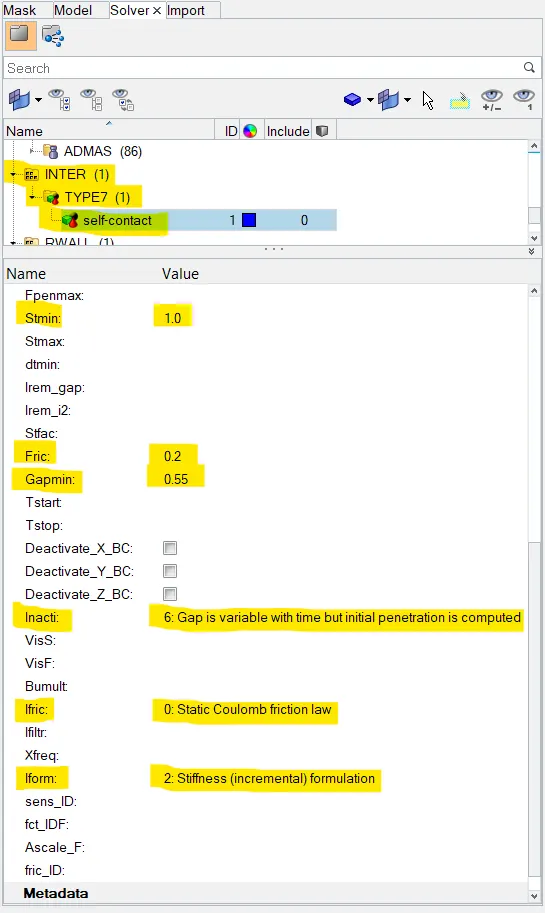
2. Creating the appropriate interface, friction 0.2, and recommended parameters. ->
Go to Solver browser > INTER > Type7.
3. There should be no penetrations and intersections. ->
Go to Menu bar > Tools > Penetration Check > select group > check.
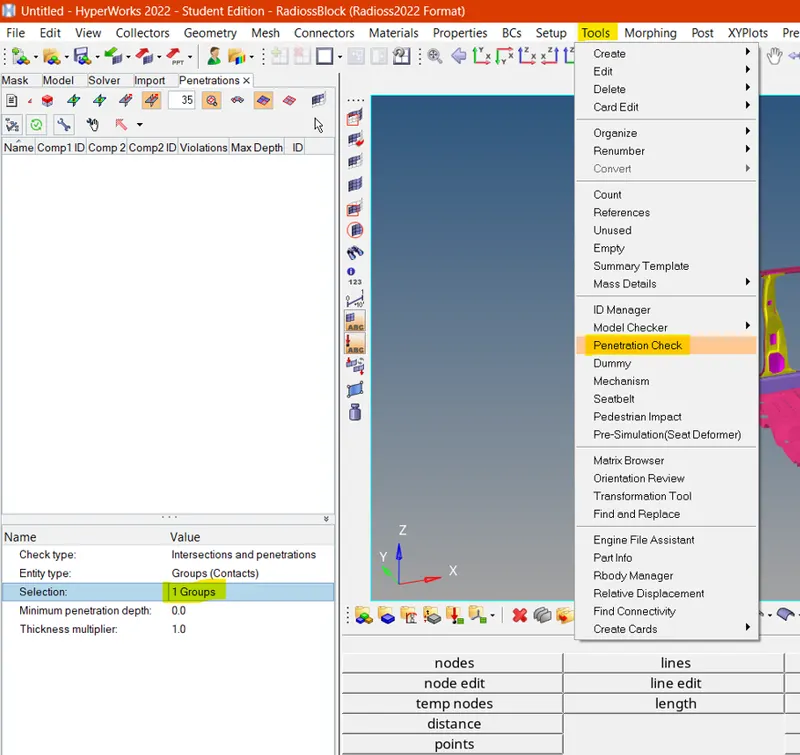
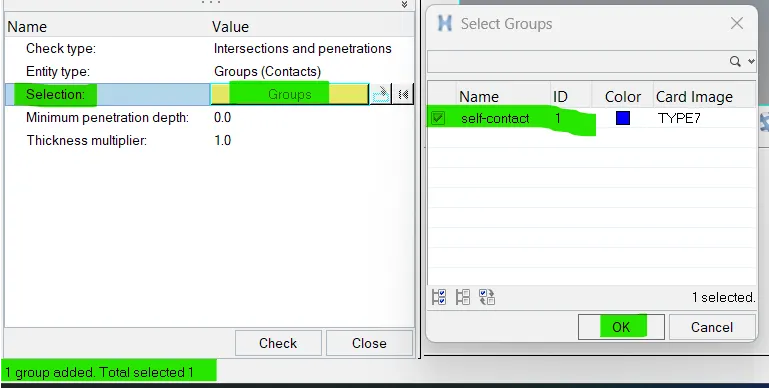
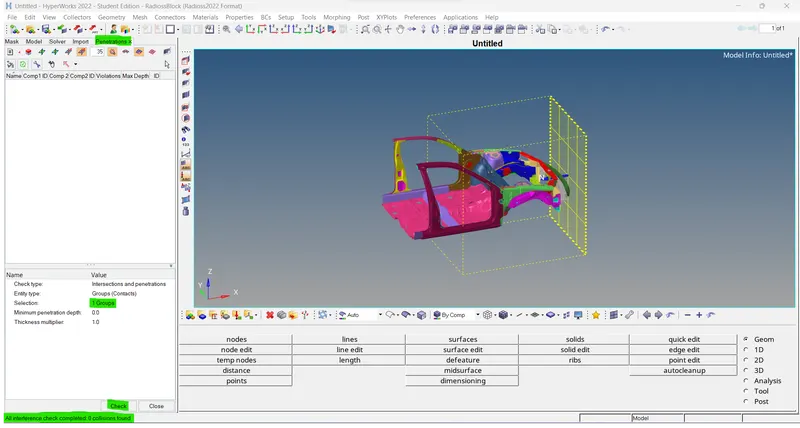
4. Correct rigid bodies if any issues.
To check, rigid bodies go to the options panel > Tools > Find Connectivity.
(If any free parts are there, then manually fix them by creating rigid connectivity in that region.)
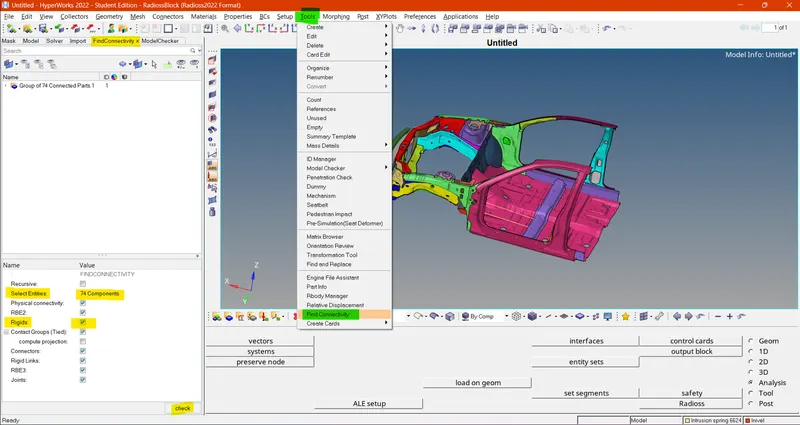
5. Creating a rigid wall with friction 0.1. ->
For creating RWALL.
Go to solver model > create > RWALL > PLANE.
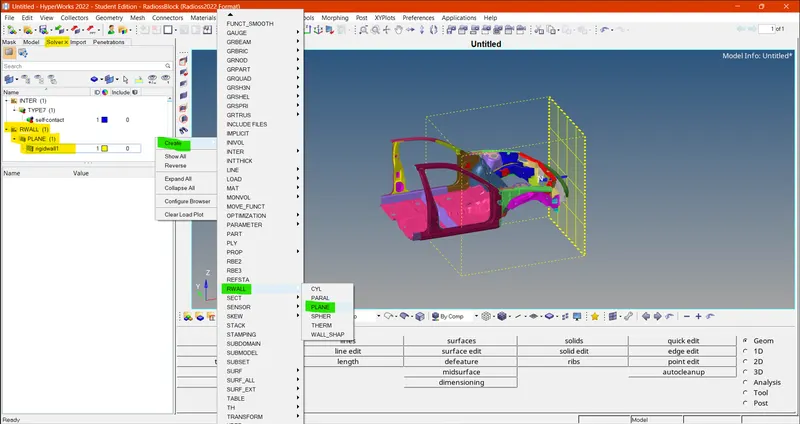
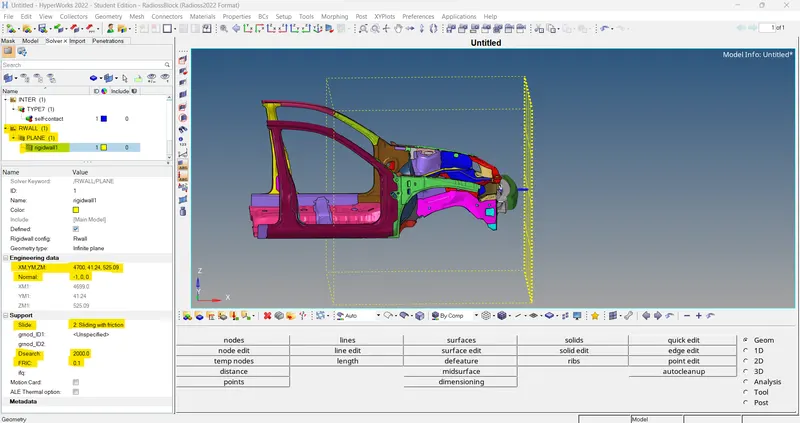
In order to select a position, the outermost and center node on the bumper part is selected.
A small approx gap of 20mm is added to the x coordinate to create a wall a little away from the model. Since the normal of the wall is in negative X-direction, -1,0,0 is defined in the Normal tab.
'Dsearch' is defined till 2000mm.
'Slide' is set to 2 to incorporate friction of 0.1 as specified.
6. Adding masses to reach a target weight of 700kg while getting CG about the required range. ->
- Opening mass summary -
Go to Menu bar > tools > mass details > mass, cog, inertia.
We can see that the mass is less as it should be around 700 kg.
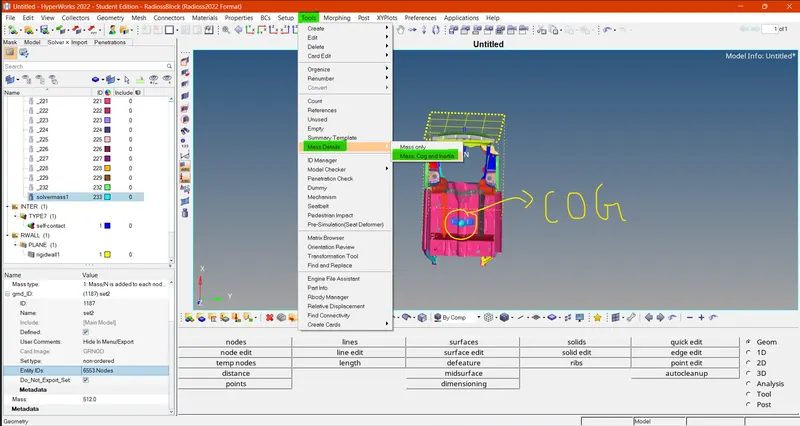
Also, the position of COG is currently closer to the dashboard region whereas it should be near to the driver seat region.
Now to shift the COG to the desired area, some masses are added to the rear part.
The added mass will account for the fuel tank, passengers’ weight, additional luggage load etc.
- To Add mass, ADMAS option is used under the solver browser,
- Go to Create > ADMAS.
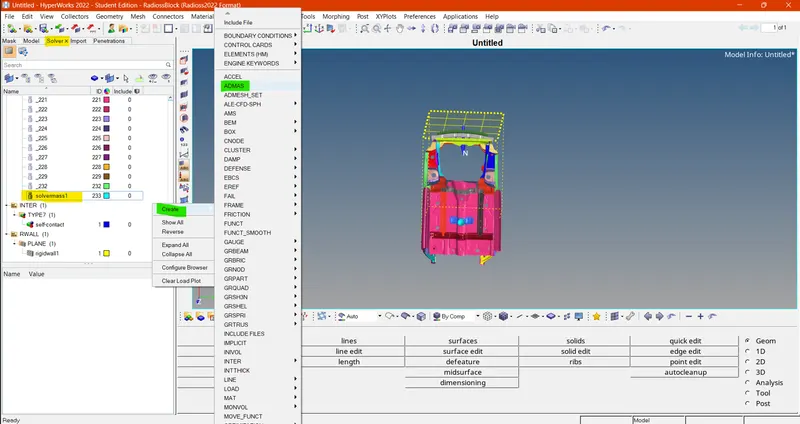
- STEP 3: Adding mass to increase the overall weight of the car.
Go to Solver browser > ADMAS > create > extra mass > give GRNODE ID > give mass value.
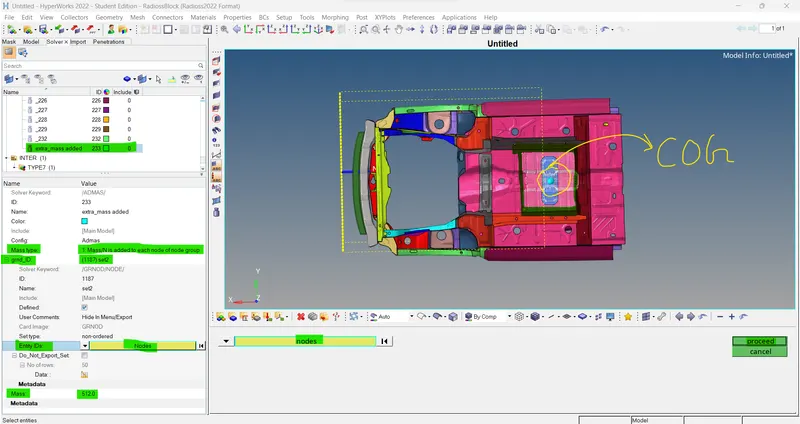
/ Note- right click on "grnd_ID" to create GRNOD, Then select nodes under "Entity IDs" & proceed. I select "Mass type" as "1. Mass/N is added to each node of node group". So, I simply add 512kg to make it a 700kg target weight. /
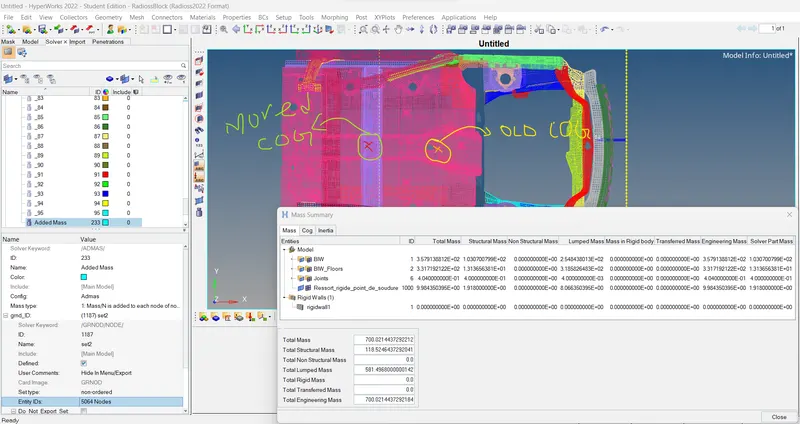
Then, the mass and COG is checked in Hypermesh. To view the COG position, a point is created with the obtained COG coordinates.
Hence the mass is corrected to 700kg to represent a real-life mass of a vehicle, and also the position of COG is now relocated to the desired position.
7. Defining Initial Velocity. ->
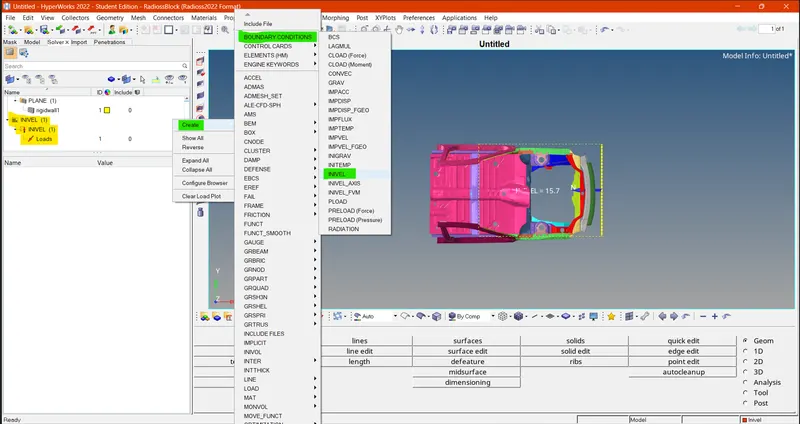
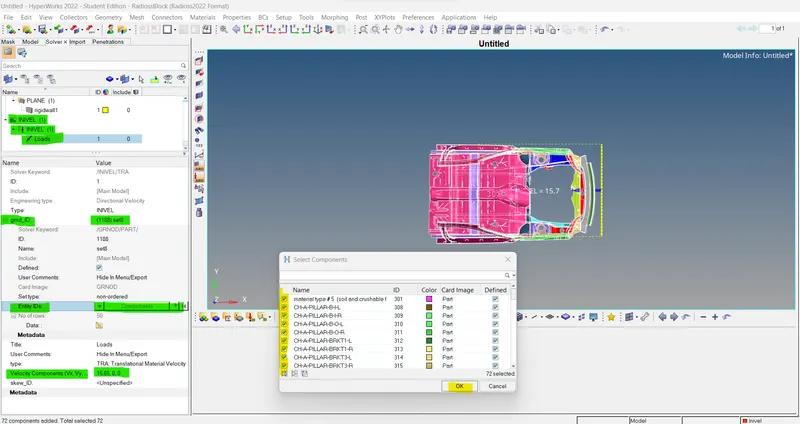
To define an initial velocity of 35mph (15.6464 mm/ms) under solver browser:
Go to Create > Boundary Conditions > INIVEL.
/Note- right click on "grnd_ID" to create GRNOD, Then select nodes under "Entity IDs" & (all Components) proceed. /
8. Use model checker to ensure good quality. ->
Go to Tool > Model Checker > RadiossBlock > Run > fix (if any error).
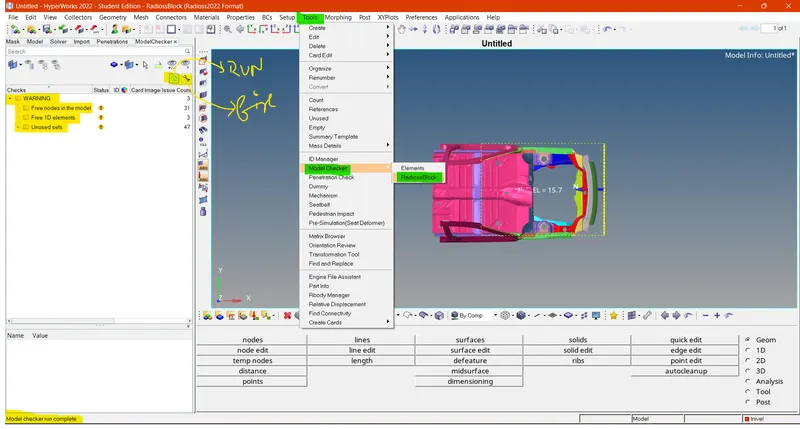
9. Create Time-step: 0.5 to 0.1 microseconds. ->
CASE_1 -> Go to Model browser > Cards > ENG_ANIM_DT > Tfreq = 5.0
CASE_2 -> Go to Model browser > Cards > ENG_DT_NODA > Tmin = 5.0/1000 = 0.0005 // (> Tscale=0.9)
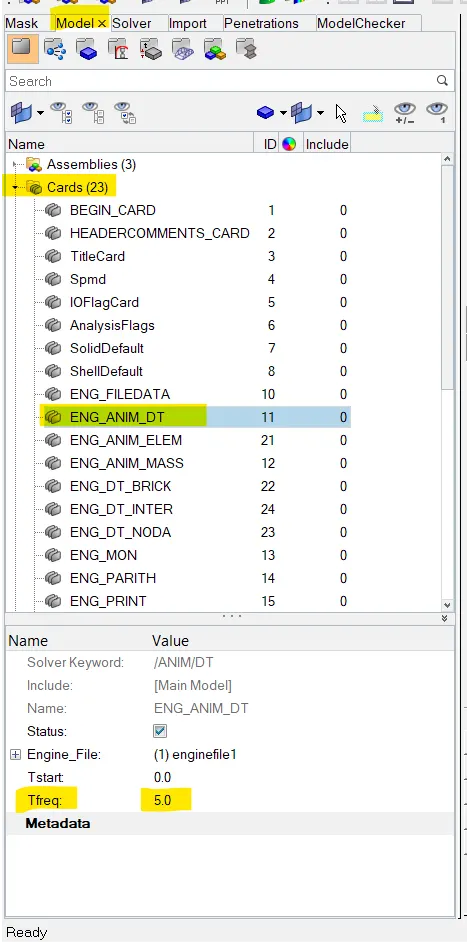
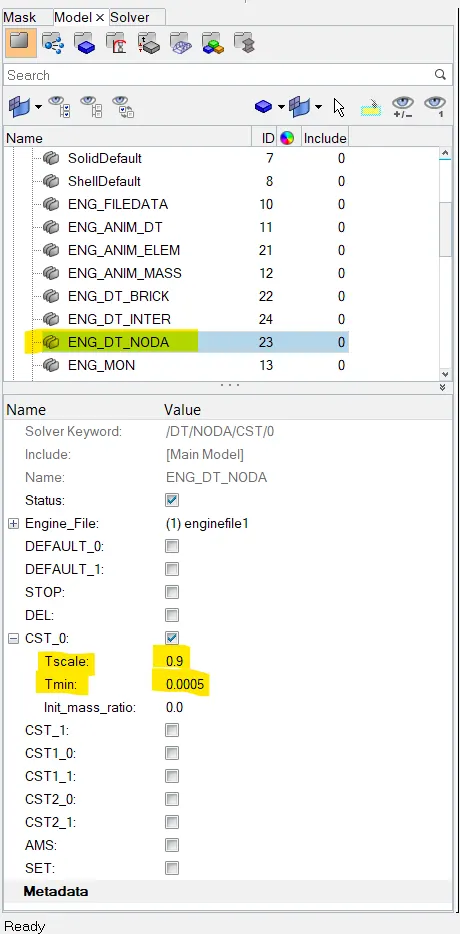
// NOTE- we convert the Time-step value 0.5 microseconds to 0.5 / 1000 = 0.0005 ms. & put it in Tmin. /
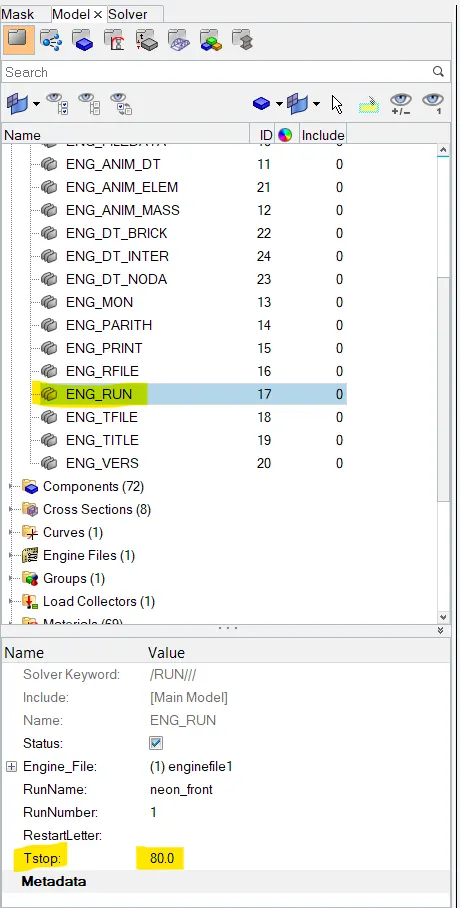
10. Running 80 ms. ->
Go to Model browser > cards > eng_run > Tstop= 80.0
Output requests: ->
Now before moving into the simulation, in order to observe the outputs required, we have to create cross sections on Rail, Shotgun, and A-Pillar, create an accelerometer, and an intrusion on dash wall specified nodes.
To view cross-sectional force on the moving model, a frame that is movable should be created which acts as a reference to the cross-section at which forces are to be computed.
To create a movable frame under the solver browser using,
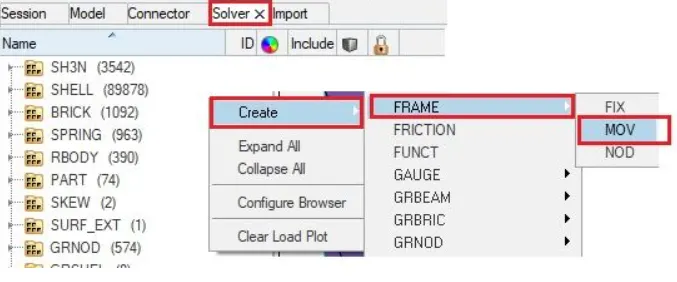
Go to Create > Frame > MOV.
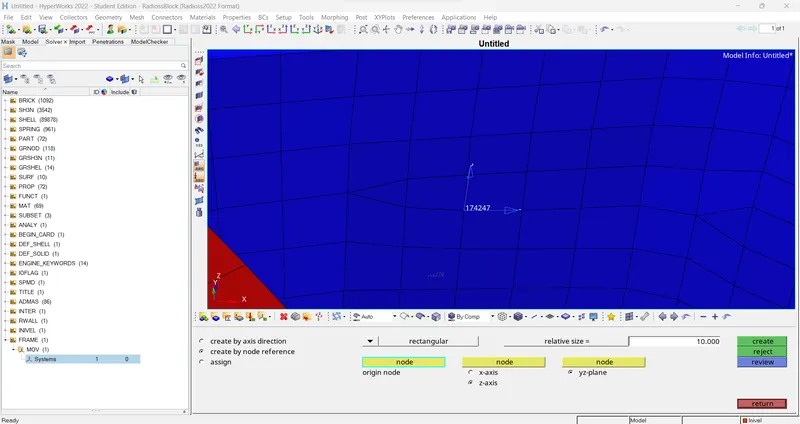
In the frame creation window, we should select the origin nodes and also the global axis directional nodes which can be created by the translate tool and translating the duplicate of the origin node to X and Y directions. Clicking on create after selecting nodes, creates a new frame with a specific ID.
After the Frame is created, now a section should be created for this frame which is created under the solver browser:
Go to Create > SECT > SECT.
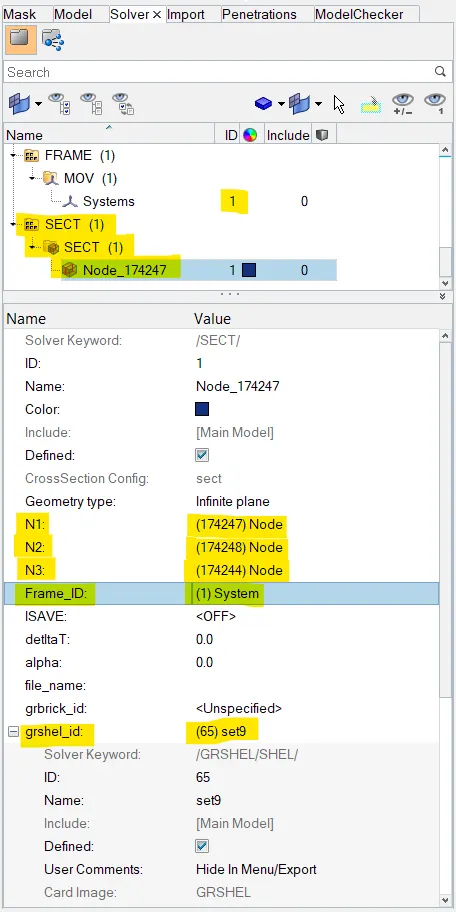
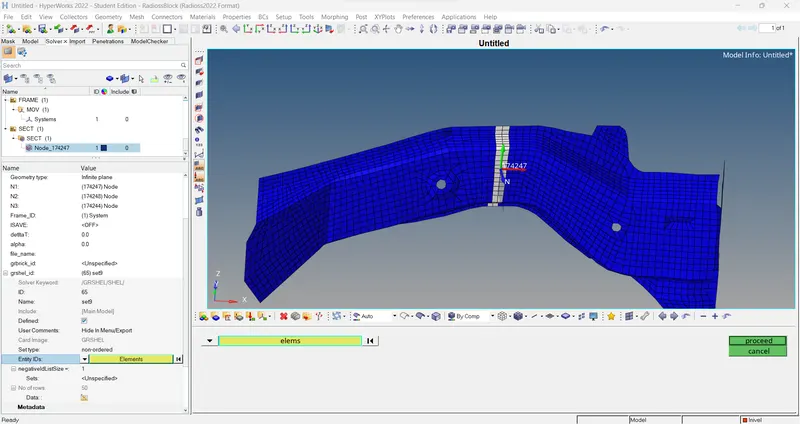
In the newly created section, the elements are selected under “grshel_id” and the reference frame created is defined by the Frame ID.
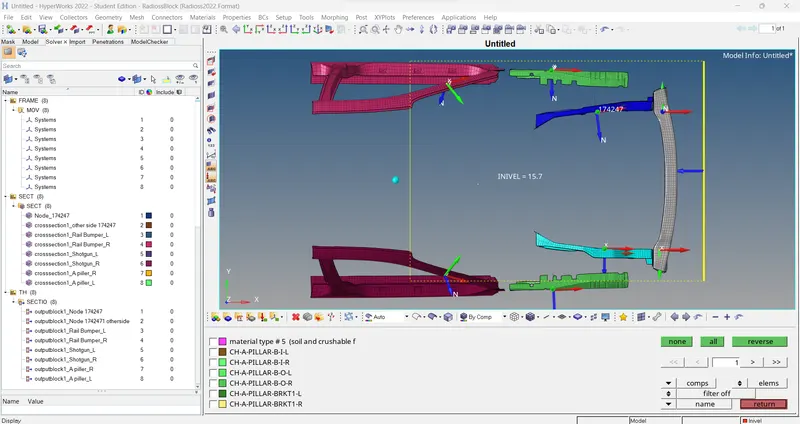
Similarly, the frame and sections are created at all positions as recommended; Rails, Shotgun, Bumper -Rail, and A-Pillar.
1. Adding a sectional force in the rails at the location of indicated node 174247. -->
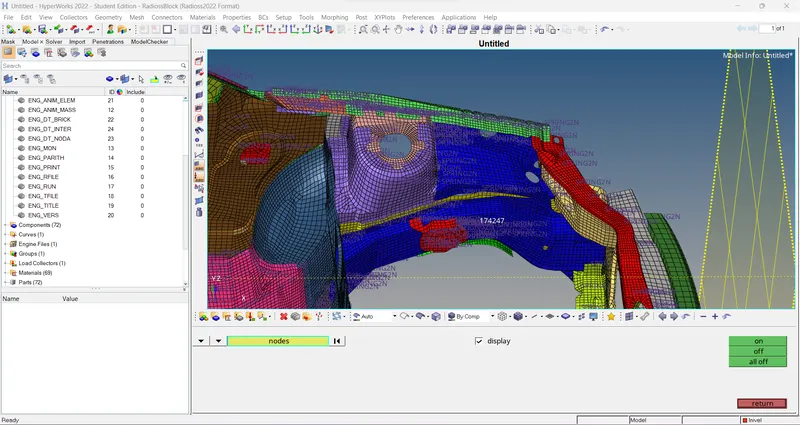
STEP 1: Displaying node 174247
Go to Tools > numbers > by id > type node number > display > on.
STEP 2: Create FRAME card in the solver browser.
STEP 3: Giving Parameters to FRAME > MOV
Go to Solver browser > FRAME > MOV > give origin, axis, plane node > create.
 \
\
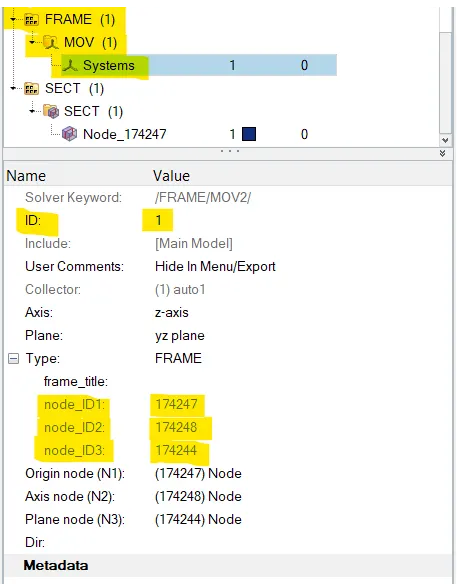
STEP 4: Create a SECT card in the solver browser.
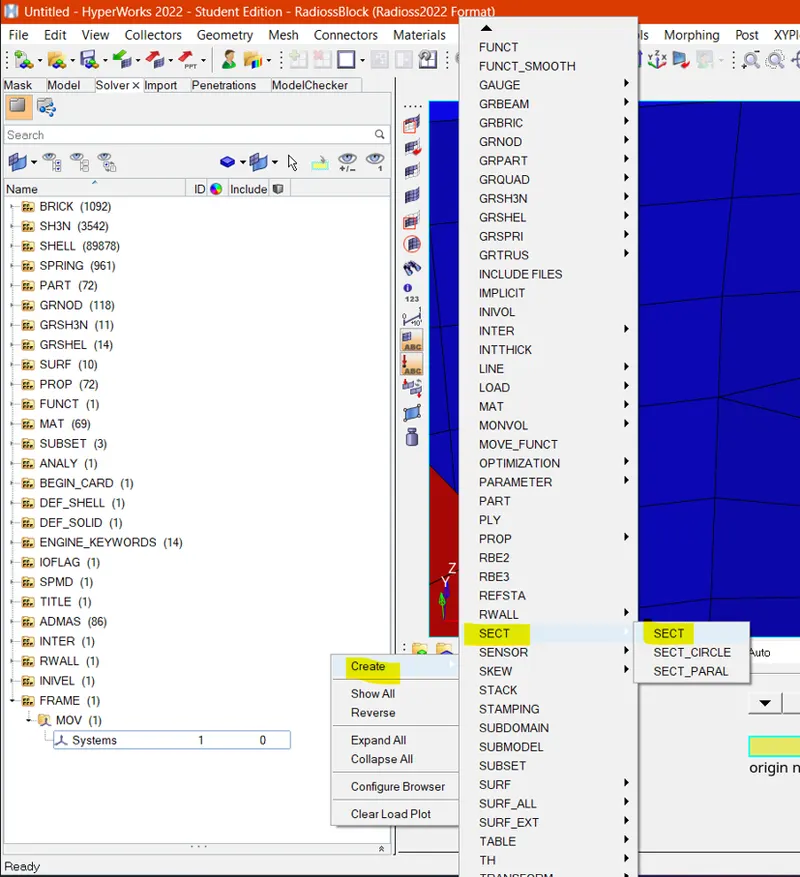
STEP 5: Giving parameters to SECT card.
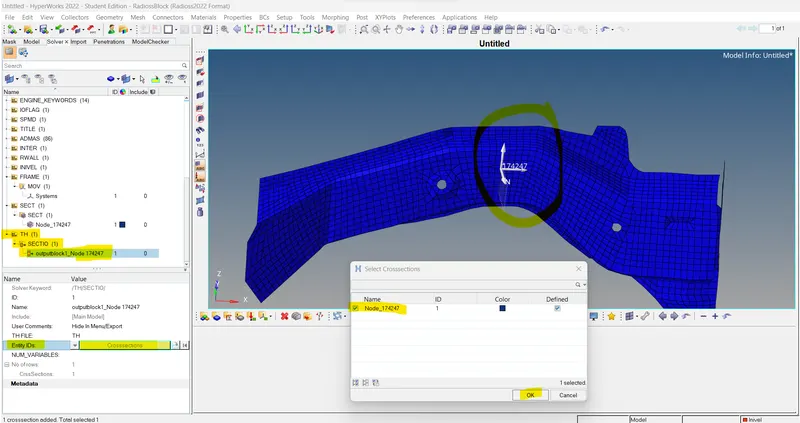
> Now, In SECT we assign N1, N2, N3 Value & Frame_ID form 'FRAME 1' systems node_IDs.
> Now, right click on grshel IDs > Create > Entity IDs > select nearby elements > proceed.
STEP 6: Giving Output Request in Model Browser Time History file (TH).
Go to Solver browser > Create > TH > SECTIO.
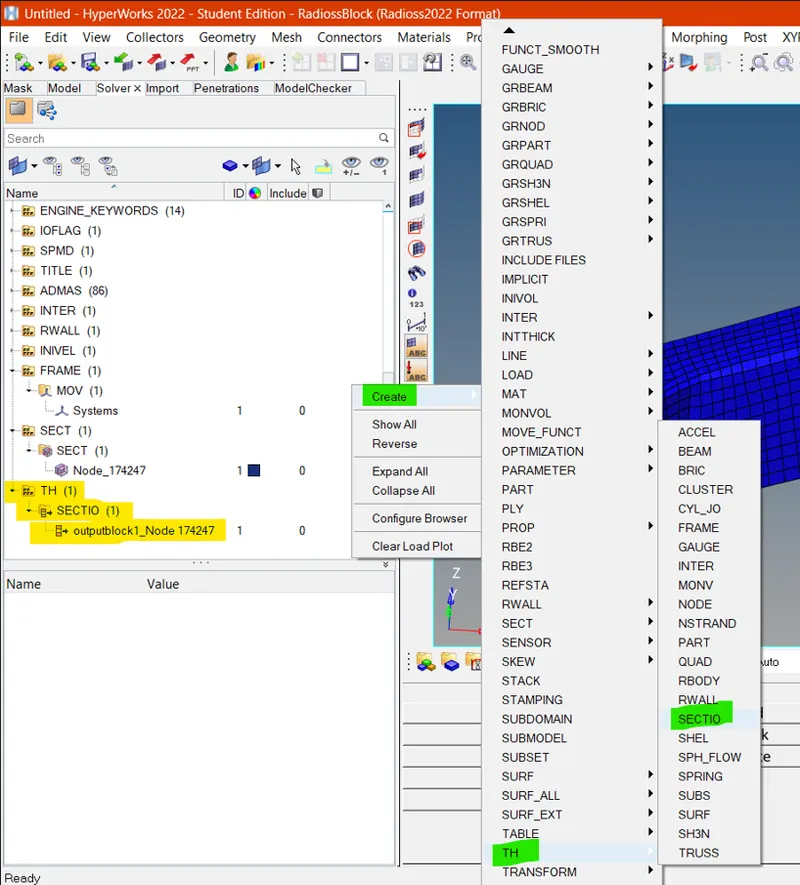
Now, Assign the Cross-section under Entity IDs.
Do the same things for others' cross sections.
2. Acceleration curve received on the accelerometer at the base of B pillar (on B pillar rocker).
Creating Accelerometer on both sides of the car.
Accelerometer:
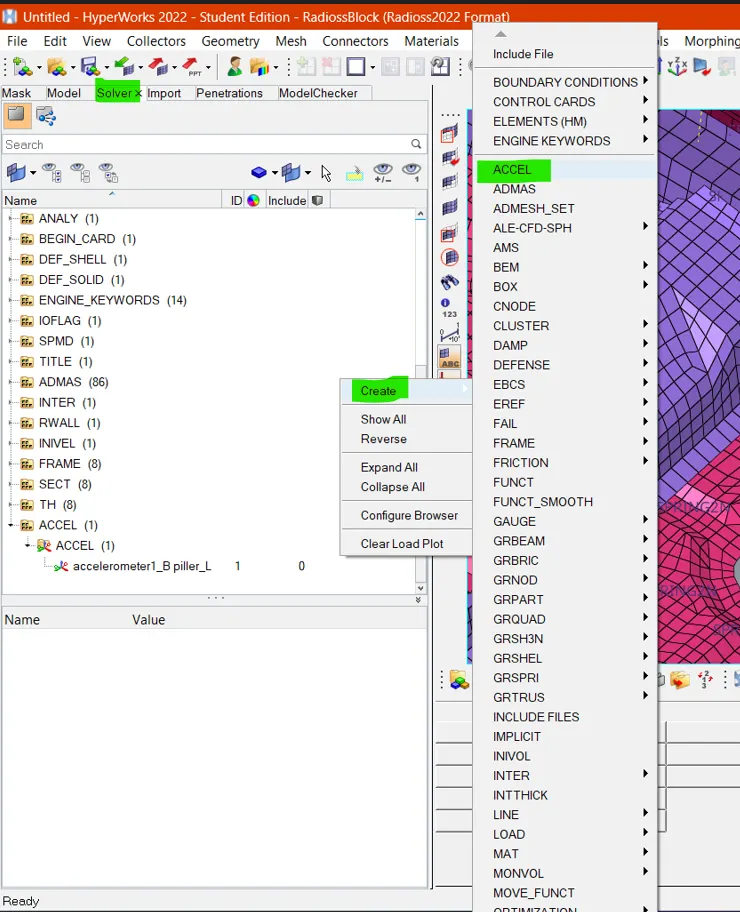
At the base of B-Pillar, an accelerometer is created under the solver browser by:
Go to Solver Browser > Create > ACCEL.
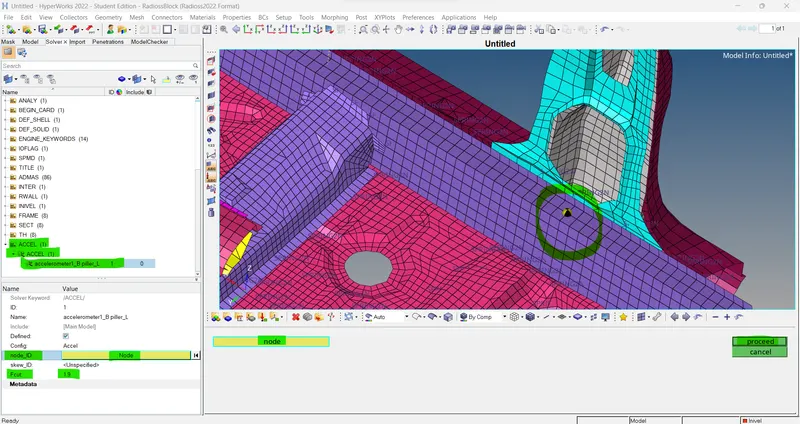
The node at which the accelerometer is to be placed is also selected.
STEP 1: Create ACCEL card in the solver browser.
> Select node under node_ID > proceed for accelerometer. And put Fcut as 1.9
STEP 2: Giving Output Request in Model Browser Time History file (TH).
Go to Solver browser > Create > TH > ACCEL.
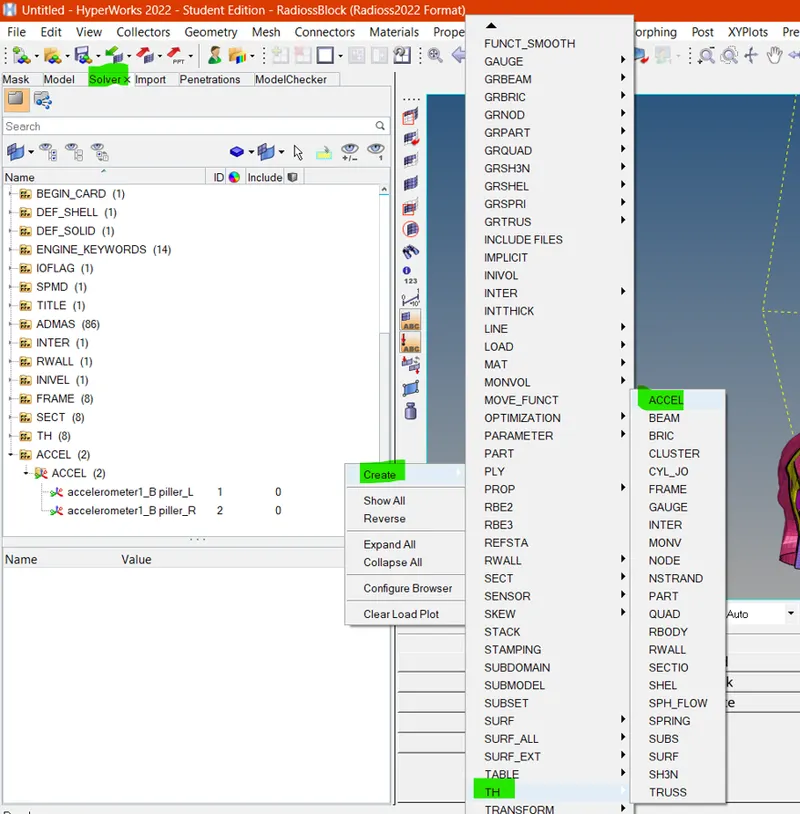
> In Entity IDs select the appropriate accelerometer for TH outputs.
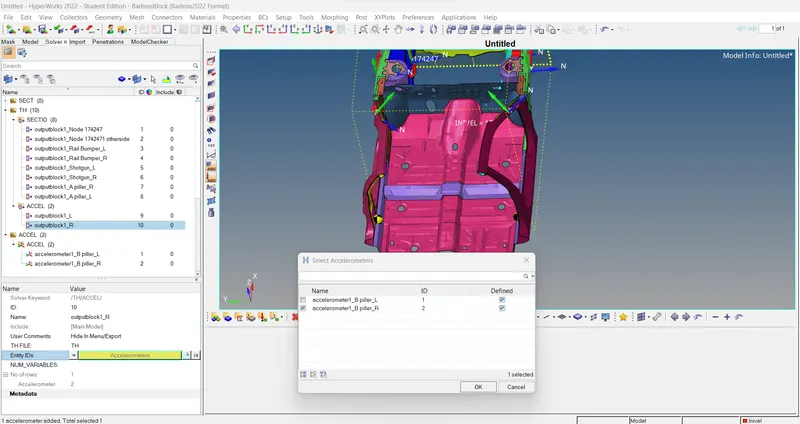
3. Intrusions on the dash wall 66695, 66244. -->
Intrusions:
To find the intrusion on the dash wall at nodes, 66695 and 66244, a frame for reference is created. Then under TH block, the node is selected as Entity ID.
Step_1: First find those node ids by using Tool > Numbers > by ID > put node IDs > enter > on.
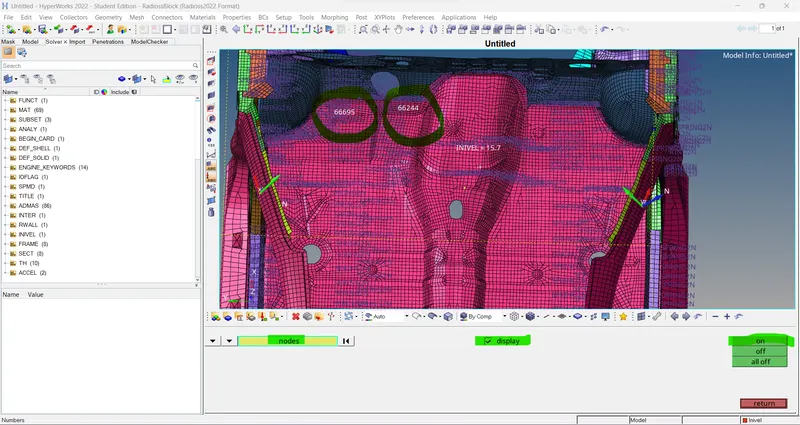
Step_2: Then Go to 1D > springs > select two nodes under spring2.
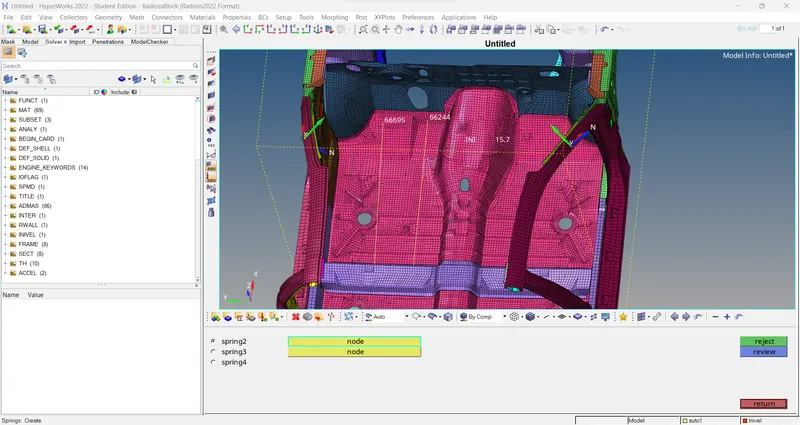
Step_3: Create a property card for spring under the model browser & put low mass / stiffness value(K).
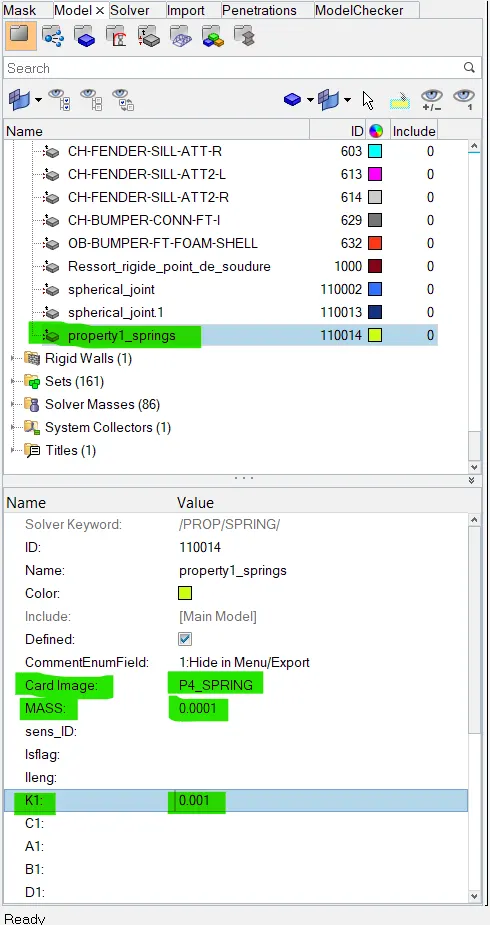
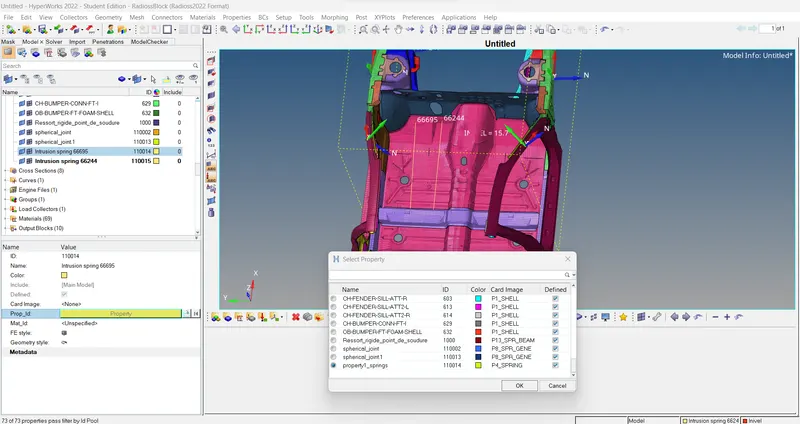
Step_4: Assign spring properties to spring components.
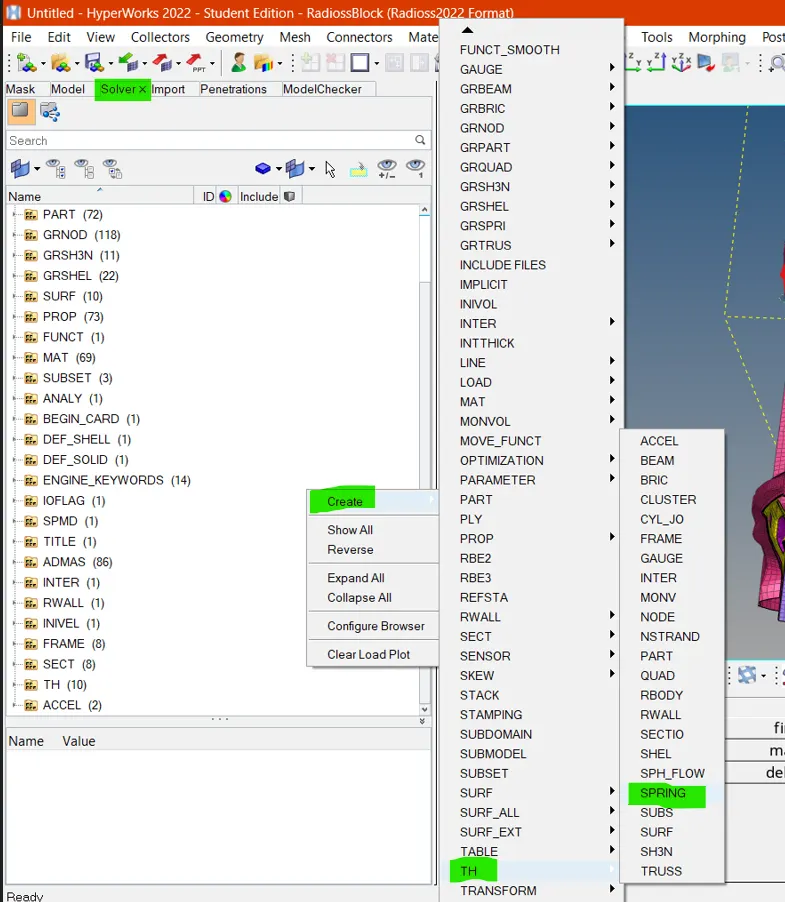
STEP 5: Giving Output Request in Model Browser Time History file (TH).
Go to Solver browser > Create > TH > SPRING.
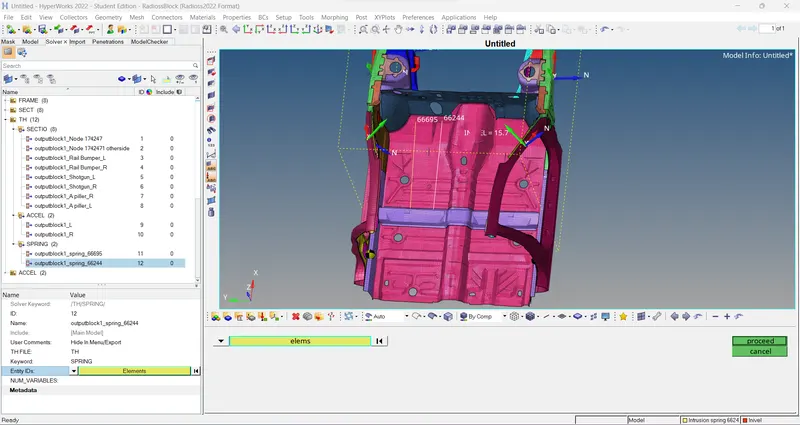
> Now go to Entity IDs > Elements > selects springs > proceed.
Model Checker:
To check for any error in the model,
Go to Option panel Tools > Model Checker > RadiossBlock.
After the model checker tab opens, Run Checks option is clicked, and then the auto correct option is clicked, which will rectify the errors and warnings.
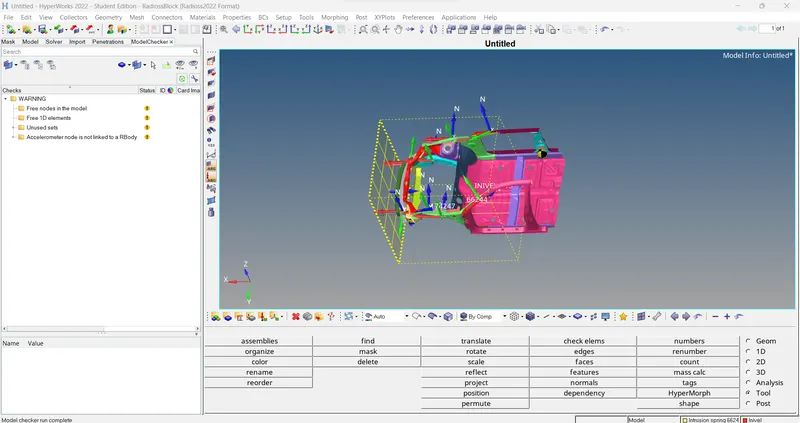
After all the above formulations are done, we can now perform a simulation of the model to review the crash results.
Simulation:
The simulation is run using Radioss Tool under the Analysis tab.
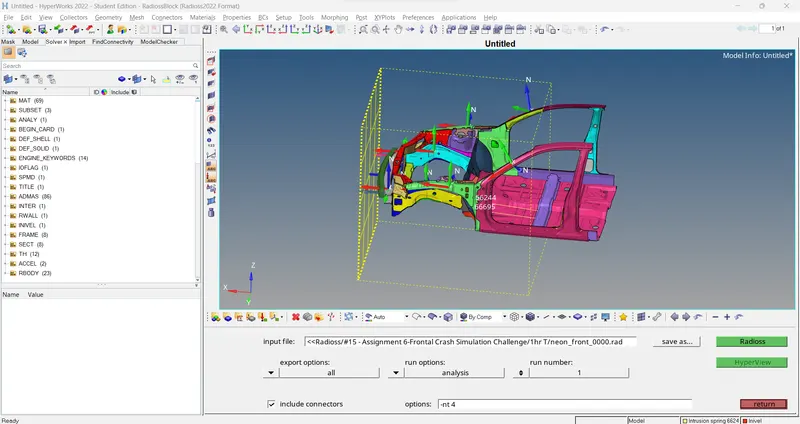
Once the analysis is done, the frontcrash_0001.out file is observed to check the stability of the model.
> From the “0001.OUT” file,
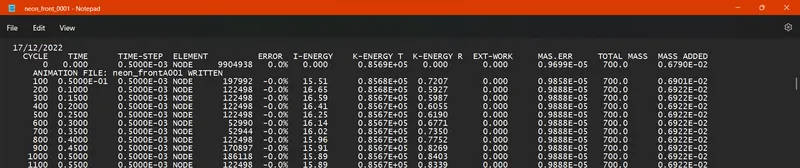
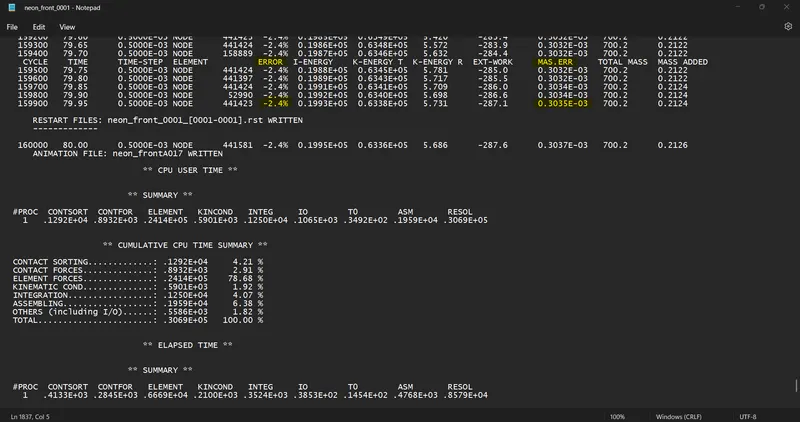
Energy error: 0% to -2.4%
Mass Error: 0.9699E-05 to 0.3035E-03.
Hence Energy and mass error are within stable limits.
Now the time for simulation and the number of cycles taken to complete the simulation is also noted from the OUT file.
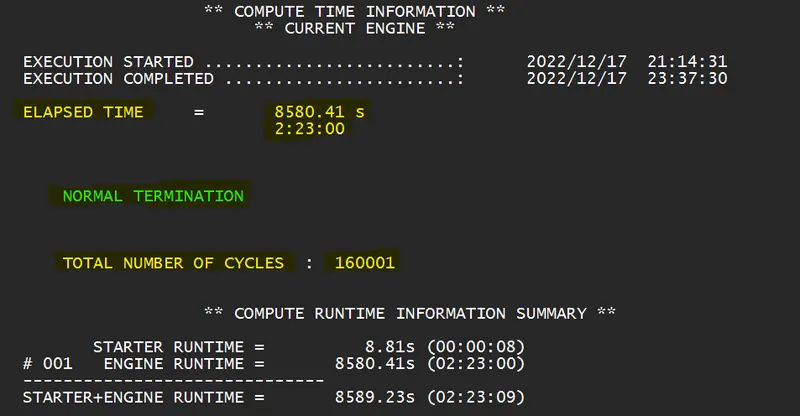
> Plotting the energy curves using Hypergraph 2-D with the help of T01 File:
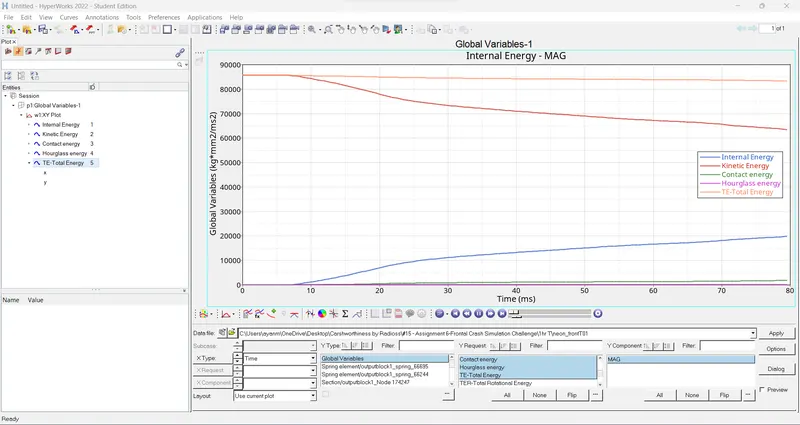
Internal energy, Kinetic energy, and Total energy curve are plotted. It is observed that there is an increase in the internal energy in the model with the progress in simulation. With the increase in Internal energy, there is a proportional decrease in kinetic energy in the model.
Hourglass energy remains negligible throughout the simulation and a slight increase in contact energy.
Hence Total energy remains constant roughly due to compensation between kinetic and internal energy. Total energy shows a slight decrease due to a slight increase in contact energy as shown in the above graph.
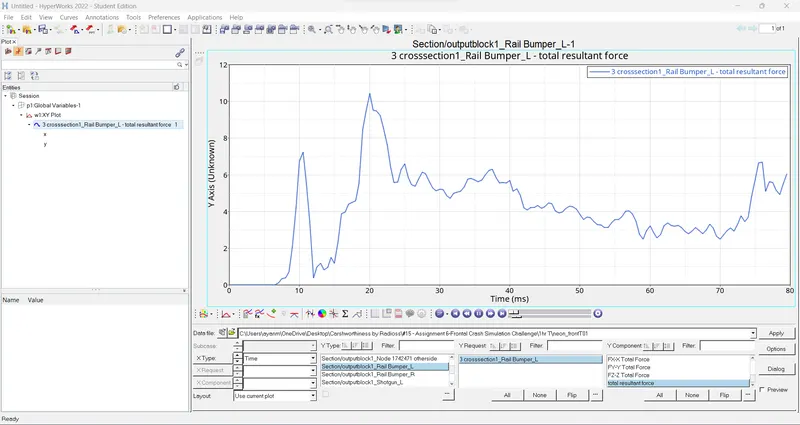
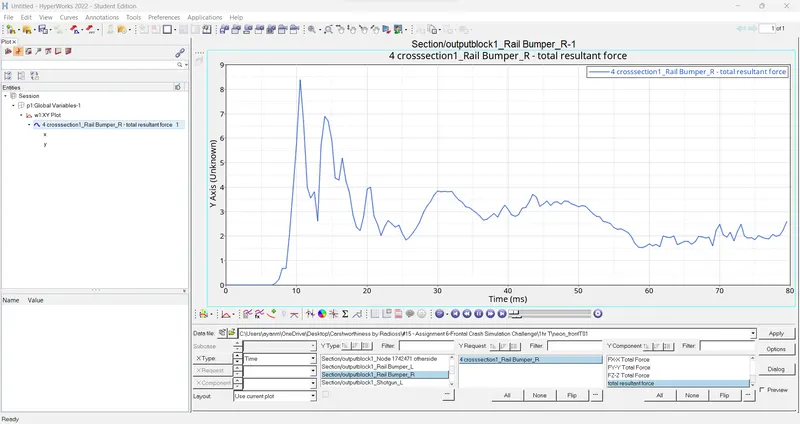
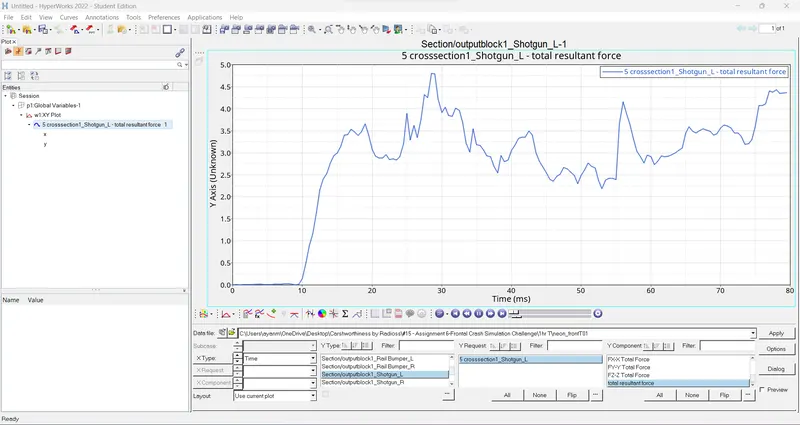
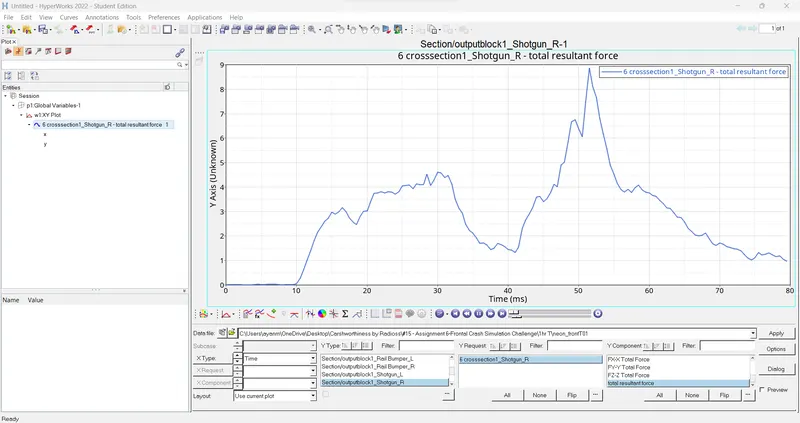
> Plotting the Cross-Sectional forces using Hypergraph 2-D with the help of T01 File:
1) Sectional force in the rails at the location of indicated node 174247.
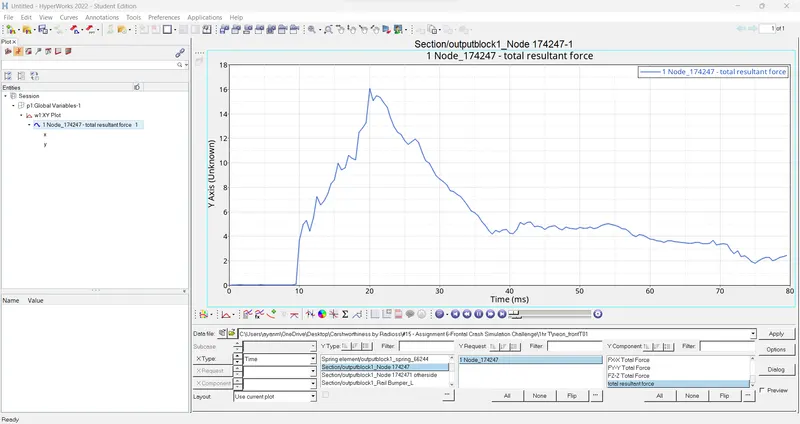
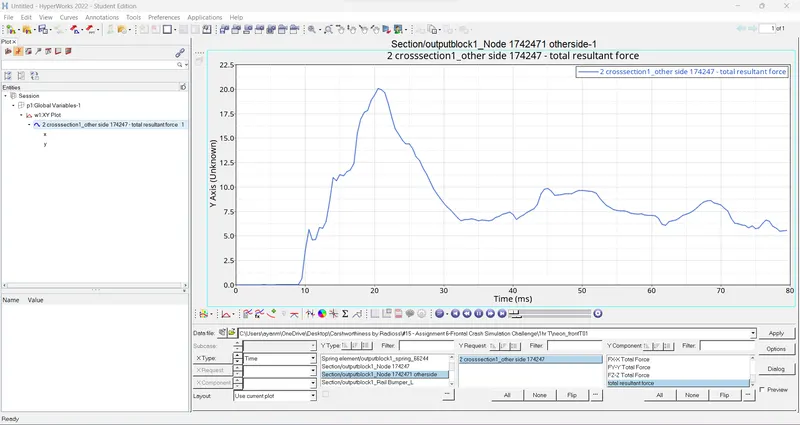
2) Axial force received on the rails from the bumper:
3) Shotgun cross-sectional forces:
4) A-pillar cross-section:
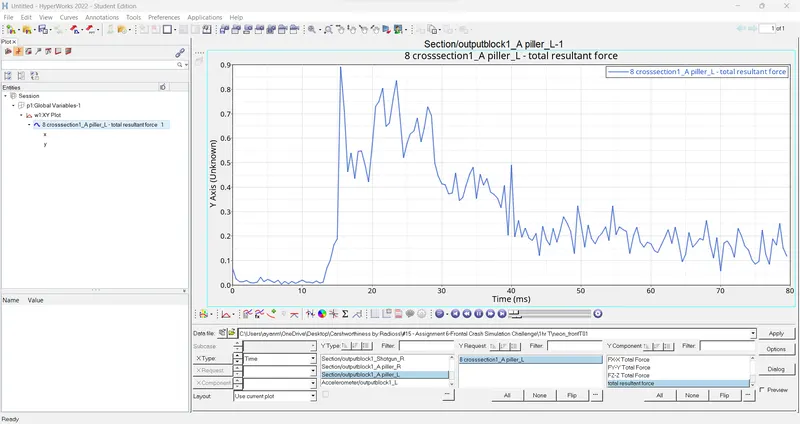
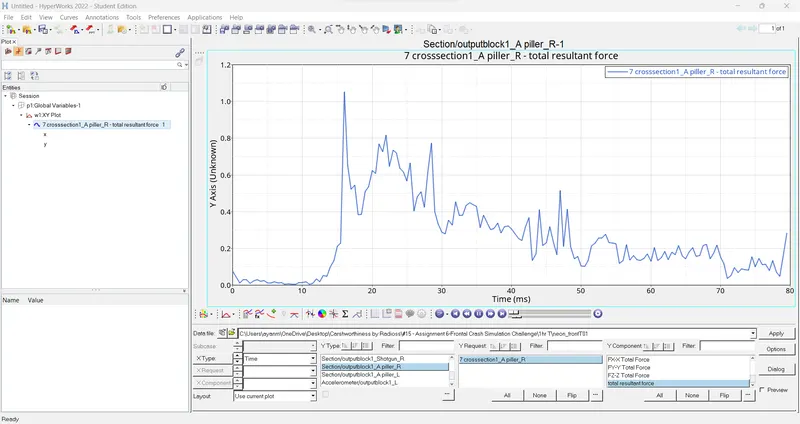
5) Acceleration curve received on the accelerometer at the base of B pillar (on B pillar rocker):
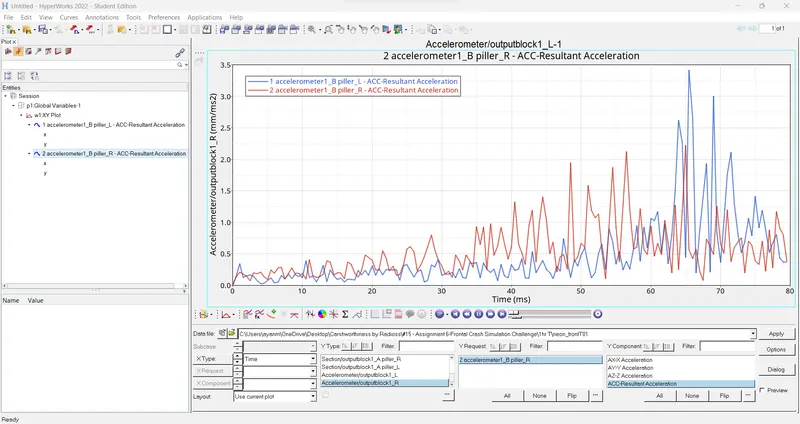
Accelerometer readings at the base of the B-Pillar are plotted. Accelerometer is used to measure the acceleration forces at the base of the B-Pillar.
It can be seen that there are many spikes in the graph which show sudden movement at the specified region. The highest impact is recorded at around 2.22 mm/ms2 for B_piller_R & 3.41 mm/ms2 for B_piller_L of the simulation.
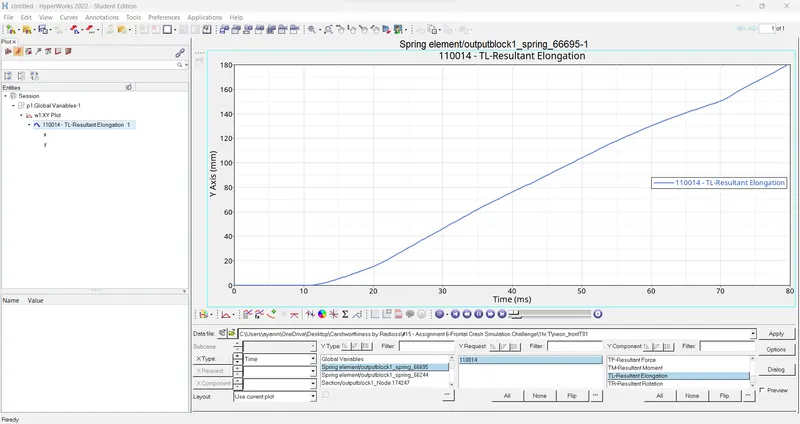
6) Intrusions on the dash wall 66695,66244:
> Node 66695 ->
> Node 66244 ->
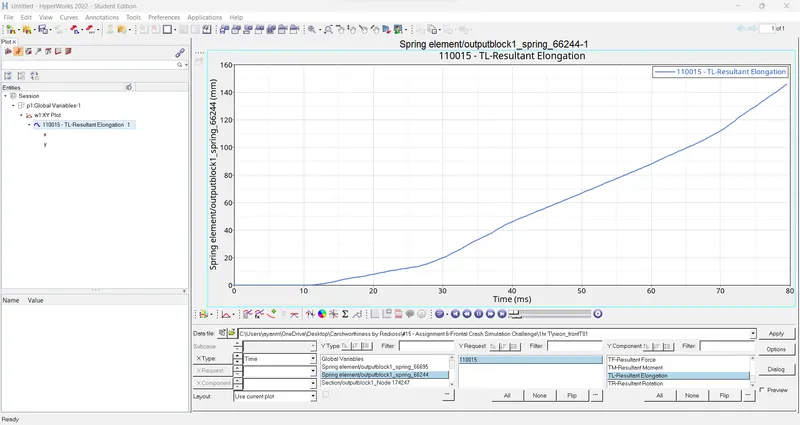
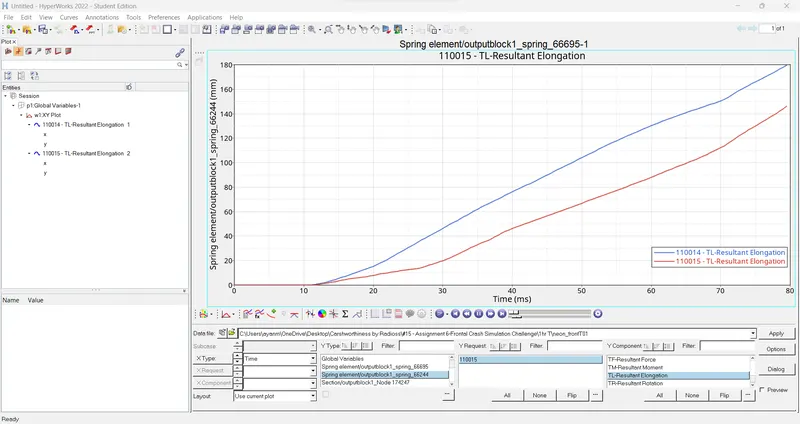
It is observed that, there is a maximum Elongation of about 146.15mm on the 66244 node and 179.74mmthe on 66695 node.
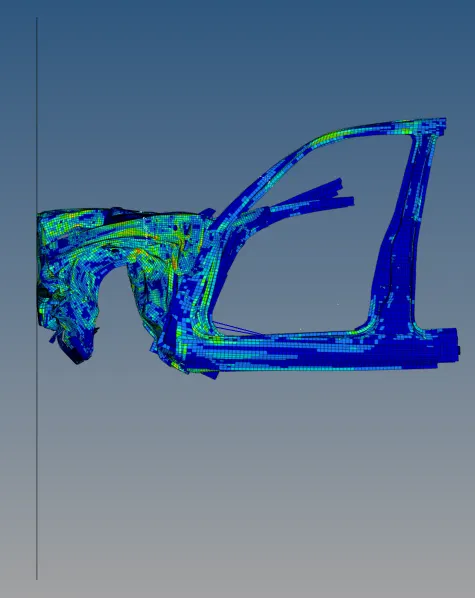
Animation and Contour plot of the simulation is obtained under Hyperview using the h3d file saved in the directory:
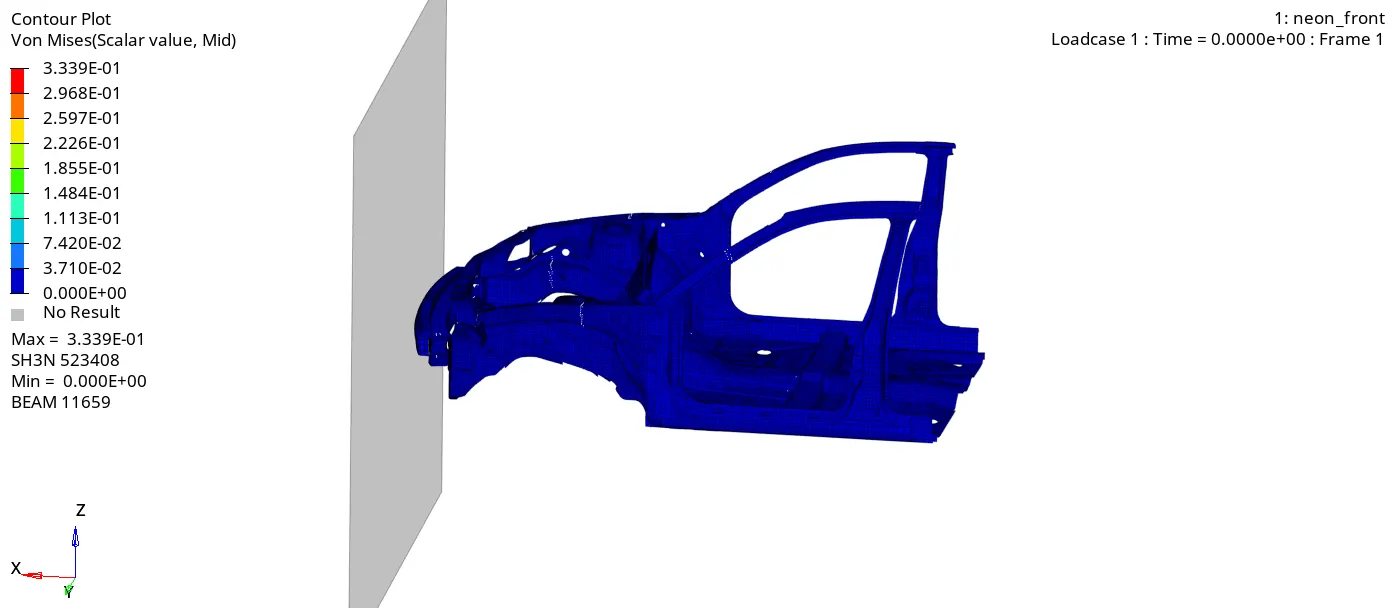
At the start, it is observed that the bumper absorbs most of the energy during the crash.
Further simulation shows that the forces due to the crash is distributed throughout the model components with very less stress concentration at specific locations.
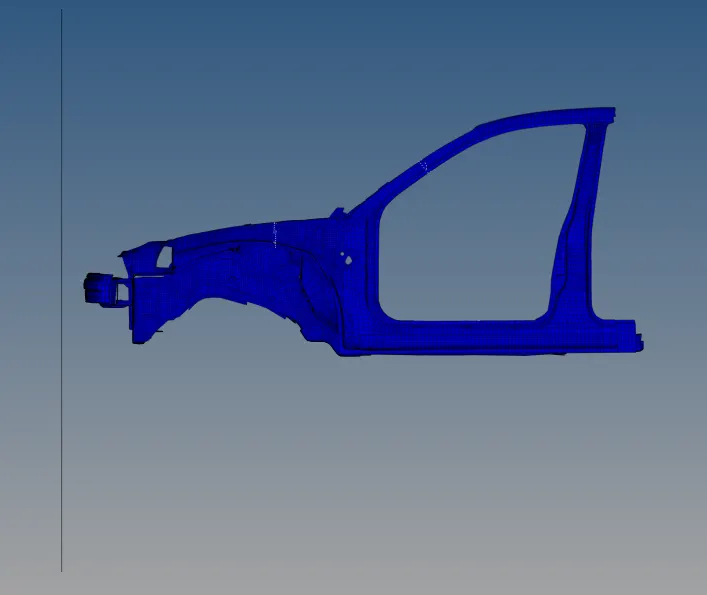
Being a scaled model, the rear part of the model under simulation is found to bend inwards which is not desirable.
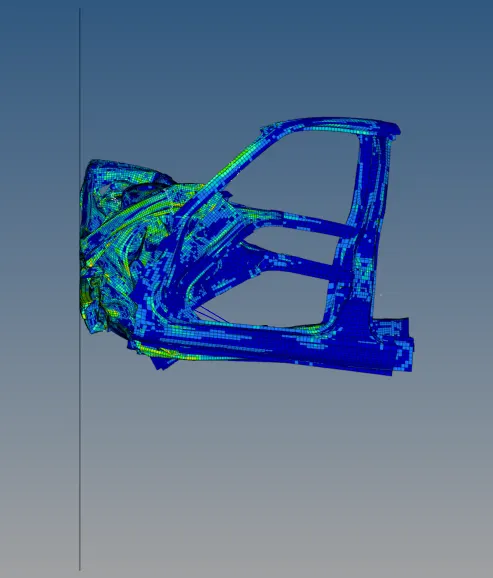
Initially bumper deforms, then the forces are transmitted through rails to the rest of the model components. The front part of the model gets lifted due to the crash which shows the real-life scenario to a certain extent. But since there are no tyres, engine, and associated parts in the model it cannot be compared fully with a real-life crash. Also, the rear passenger seat part bends inwards which will be due to the load applied to correct the mass and might be due to the position of the Centre of Gravity.
CONCLUSIONs:
The given frontal crash model is analyzed for a frontal crash scenario and the requested output aspects are observed.
The forces and energy curves at the specified locations are observed.
 >
>  >
>