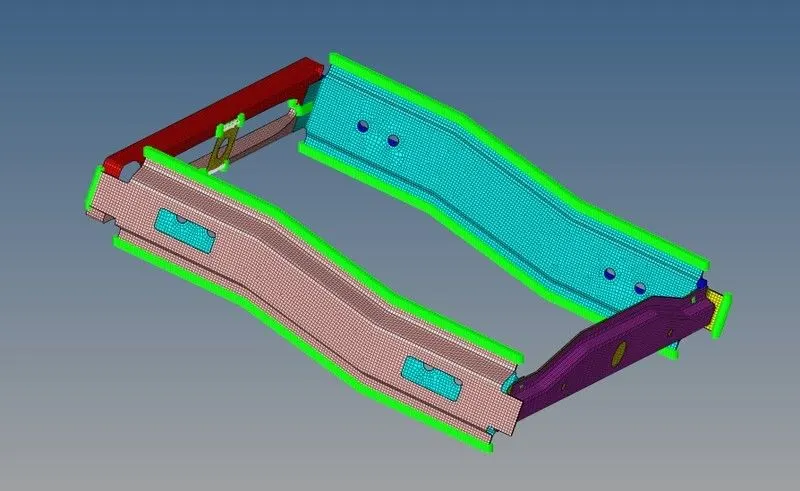
Week 9-Creation of 1D Connectors Challenge
Week 9 - Creation of 1D Connectors Challenge
AIM:
Meshing of the given geometry. Provided below are the quality parameters that you have to follow.
Create connector and Attach the various parts of the given model:
- Right_Rail_2 & Front_truss_1: (Seam-Quad(angled + capped + L))
- Left_Rail_2 & Front_truss_1: (Quad elements)
- Front_truss_2, Front_truss_1 & Right_Rail_1: (Spot weld with 2 Layers and 5 mm Diameter)
- Front_truss_2, Front_truss_1 & Left_Rail_1: (Hexa (Adhesive))
- Rear_truss_2 & Right_Rail_2: (Bolt Connector)
- Rear_truss_2 & Left_Rail_2: (Bolt Connector)
- Right_Rail_1 & Right_Rail_2: (Spot-weld with Rigid Elements)
- Left_Rail_1 & Left_Rail_2: (Spot-weld with Spring Elements)
- Rest all the component left Join them with suitable connectors
Procedure:
- Importing the model:
- At first we need to Import the Model File>>Import>>Model>>Select the model>>Import.
- 2D Meshing:
- To generate mesh go to 2D>>automesh>>Element size=5>>mesh type Mixed>>Select the surface>>mesh.
- To get a proper flow edit the mesh by selecting the elements and click on mesh.
- If any element is failing for Quality criteriia Then we can use the cleanup tools in qualityindex and we can use translate tool on some areas.
- Creating Connectors:
- Seam Weld connections :
- Hide all the components expect Right Rail 2 & Front Truss 1.
- 2D<Connectors<Seam<Type=Seam-Quad(angle + capped + L).
- Select the node list and give Spacing value as 5.
- Select the components and give tolerance value as 10 click create.
- Remesh the required areas for proper mesh flow.
- Quad elements:
- Hide all the components expect Left Rail 2 & Front Truss 1
- 2D<Connectors<Seam<Type=Quad.
- Select the node list and give Spacing value as 5. .
- Select the components and give tolerance value as 10 click create.
- Remesh the required areas for proper mesh flow.
- Spot Weld:
- Hide all the components expect Front Truss 2 & Front Truss 1 & Right Rail 1.
- 2D<Connectors<Spot<Type=Weld.
- Select the node list and give Spacing value as 5.
- Select the components and give tolerance value as 20 click create.
- Select the number of layers as 2 and diameter as 5.
- Remesh the required areas for proper mesh flow.
- Hexa (Adhesive):
- Hide all the components expect Front Truss 2 & Front Truss 1 & Left Rail 1.
- 2D<Connectors<Seam<Type=Hexa (Adhesive).
- Select the node list and give Spacing value as 5.
- Select the components and give tolerance value as 20 click create.
- Remesh the required areas for proper mesh flow.
- Bolt Connector:
- Hide all the components expect Right Rail 2 & Rear Truss 2.
- 2D<Connectors<bolt<Type=bolt(general).
- Select the node list.
- Select the components and give tolerance value as 50 click create.
- Remesh the required areas for proper mesh flow.
- Similar steps for bolt connector repeat the same for Rear Truss 2 & Left Rail 2
- Spot Weld with Rigid elements:
- Hide all the components expect Right Rail 1 & Right Rail 2.
- 2D<Connectors<Spot<Type=Rigid.
- Select the node list and give Spacing value as 5.
- Select the components and give tolerance value as 20 click create.
- Remesh the required areas for proper mesh flow.
- Spot Weld with Spring elements:
- Hide all the components expect Left Rail 1 & Left Rail 2.
- 2D<Connectors<Spot<Type=Spring.
- Select the node list and give Spacing value as 5.
- Select the components and give tolerance value as 20 click create.
- Remesh the required areas for proper mesh flow.
- Remaining components are connected using Spot Weld and Seam Welds by following the above mentioned steps.
CONCLUSION:
Hence every components have been meshed and required connections have be defined and sucessfully realized. Finally the entire connections and meshed components are shown below.