Week 4-1D Element Creation Challenge

Introduction
1D elements are used for modeling line-type members such as columns, piers, beams or poles. 2D elements are commonly used for plate-type members such as walls, slabs, shells, bridge abutments, tanks, domes. 3D elements are used for structure with complex geometry which cannot be simplified for analysis.
While working with 1D elements we come across the following element types:
- CROD
- CBAR
- CBEAM
CROD:
- CROD elements support (allow) tension and compression only.
- The nodes of a CROD element only have translation degrees of freedom (still this element has a torsional stiffness).
CBAR:
- CBARS elements support (allow) tension, compression and bending as well.
- A CBAR element is a kind of simplified CBEAM element and should be used whenever the cross-section of the structure and its properties is constant and symmetrical.
- The CBAR element requires that its shear center and the neutral axis coincide. Due to this requirement CBAR elements are not useful for modeling structures that may warp, such as open channel-sections.
CBEAM:
- CBEAMS elements support (allow) tension, compression and bending as well.
- CBEAM elements are used to model more “complicated” geometries with varying cross-sections.
- In CBEAM elements the neutral axis and shear center are non-coincident.
Apart from above 1D Elements, there are different types of 1D Elements used to connect the nodes, which are called Rigid Links.
- RBE2
- RBE3
RBE2:
- RBE (Rigid Body Elements) is the most simple of 1D elements and simply connect two or more nodes together.
- In the case of an RBE2, one node serves as the Independent and the other(s) the Dependant node(s). The Dependant node(s) simply “follow” the motion of the Independent node in the Degrees of Freedom that have been linked. These elements are useful to simply represent welds or to tie together two dissimilar meshes. One word of caution though is that RBE2 elements, as they rigidly link nodes together, can induce stiffness to the model that may not be desired.
RBE3:
- RBE3 elements, on the other hand, serve to distribute loads without inducing unwanted stiffness. It is not an element to be used to model a connection, but rather an element to induce a motion in a node as a function of the weighted average of other nodes.
- RBE3 elements are similar to RBE2 with the only changes being the reversal of the Independent and Dependant nodes and the addition of a weight field.
________________________________________________________________________________________________________
Meshing & Creation of 1D Elements:
Here first of all we will generate the Mesh on the component and then create different types of 1D elements on it which will be connected through Rigid links.
Geometry:
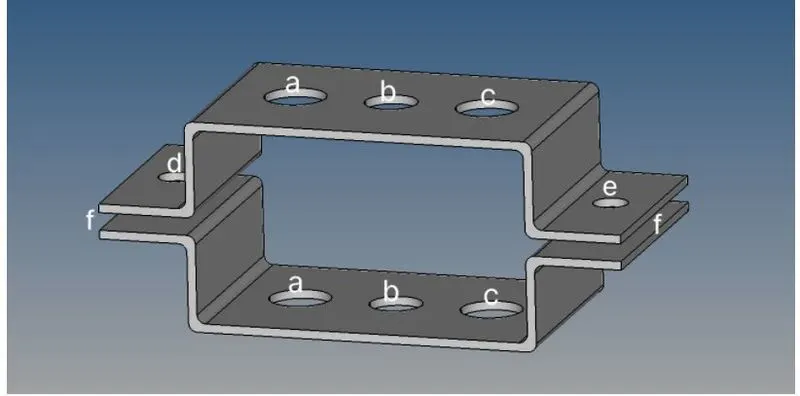
Procedure for Meshing:
- First of all import the “Parallel_Bracket” model in HyperMesh (Optistruct).
- Remove unnecessary lines, solids and perform cleanup operation on the model as shown below:
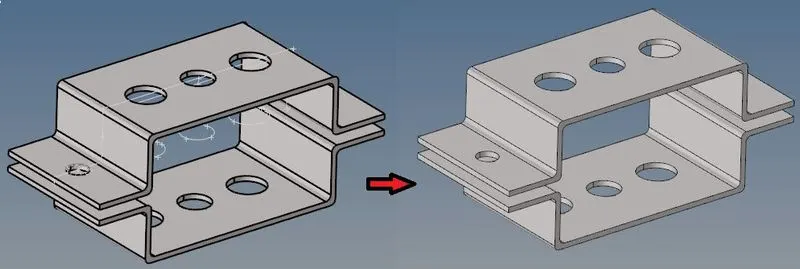
- After Cleanup, extract the “Midsurface”.
- Go to Geom -> midsurface -> (select the all surfaces) ->Extract.
- Make sure that the extraction is set to “Auto Extraction” and for extraction options, “offset + planes” is selected so that we can get all edges near fillet properly as shown below:
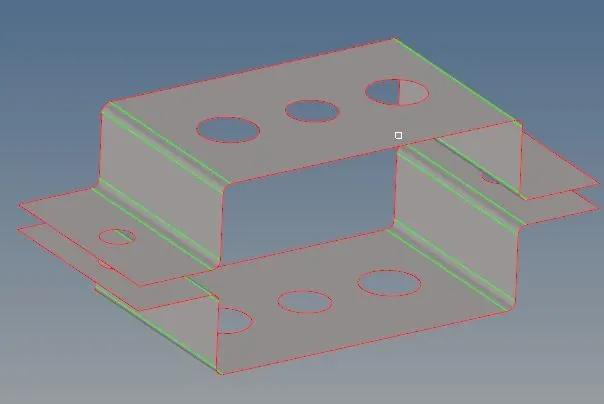
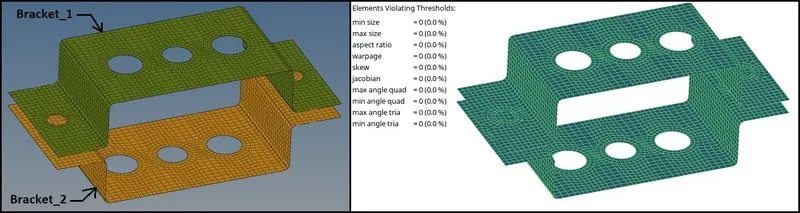
- Create two different components as “Bracke_1 and “Bracket_2” for both midsurfaces.
- By doing “Autocleanup” or with help of Washer surfaces, we can create washers around holes.
- Here the Geometry is plane symmetric, so only quarter portion is meshed as shown in image below
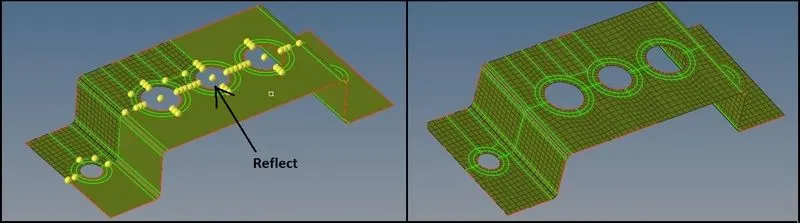
- Make sure that the Target size for the elements is set to 5.
- After meshing the one portion of the Bracket, elements are reflected on the other side with help of “Reflect” option in tools.
- Also for the “Bracket_2”, elements are reflected by creating a node between two geometries as shown below:
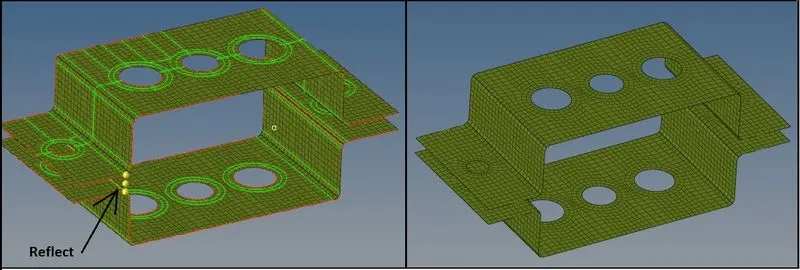
- Thus, by “Reflect” option, entire Mesh can be created very easily.
- The elements reflected for the bottom midsurface are moved to “Bracket_2” with help of “organize” option in Tool panel. After moving the reflected elements to “Bracket_2”, we can see the color difference.
- Remove unwanted nodes and lines and free edges.
- Make sure that the elements are in proper connection by checking the equivalence between them.
- Also check the “Quality Index” for the quality of the mesh as given below:
_____________________________________________________________________________________________________________________
Procedure for creation of 1D Elements:
Rigid Links:
- Now first of all we have to create Rigid Links by connecting the nodes at the holes on Bracket_1 and Bracket_2 with help of RBE2 and RBE3 elements.
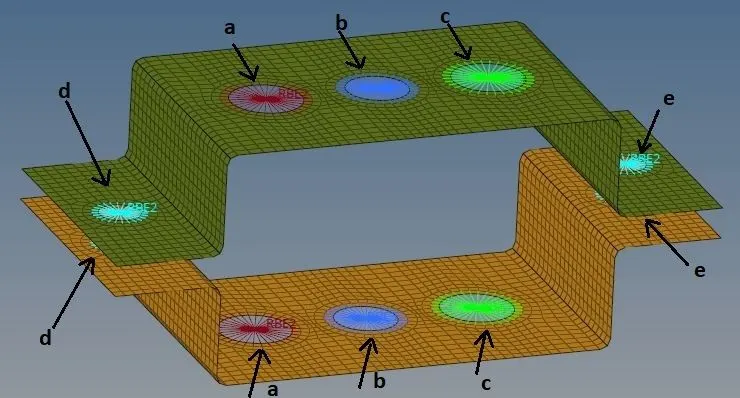
RBE2 Link:
- Go to 1D -> Rigids -> select nodes (nodes on Washer surfaces) -> Create.
- Similarly create RBE2 links at locations “a”, “d” and “e” for Bracket_1 & Bracket_2.
- Keep all the degrees of freedom constrained in X, Y and Z Translation direction for the links at “a”.
RBE3 Link:
- Go to 1D -> rbe3 -> select nodes (nodes on Washer surfaces) -> Create.
- Similarly create RBE3 links at “b” and “c” for Bracket_1 & Bracket_2.
- Keep all the degrees of freedom constrained only in X, and Y direction for the links at “c” and constrained all degrees of freedom in X, Y and Z direction for links at “b”.
Rod, Beam and Bar Elements:
- Now to create the Rod, Beam and Bar elements, first of all we have to create the cross-sections for the elements.
Cross-Sections for the different elements are as given below:
For Cross section, Go to -> 1D -> HyperBeam -> Standard Section -> Create.
see the image of panel options as below:

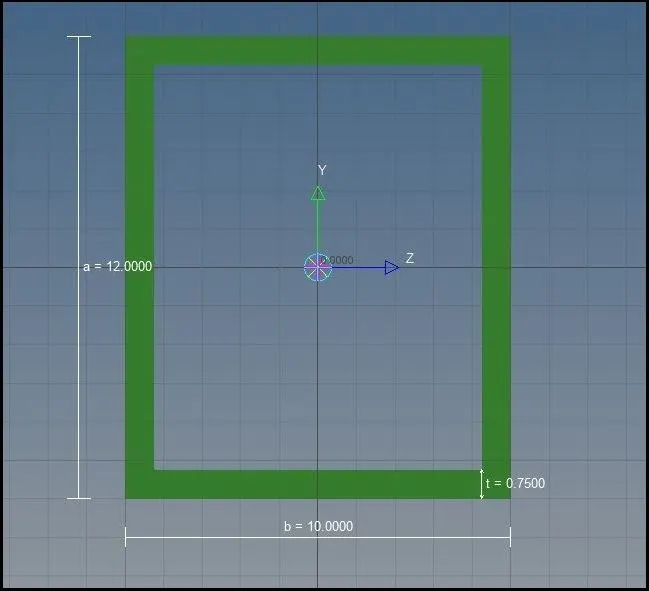
(1) Rod Element: (With only Translational DOF and RBE2 Link):
Cross-Section: BOX:
Dimension a = 12 mm
Dimension b = 10 mm
Thickness t = 0.75 mm
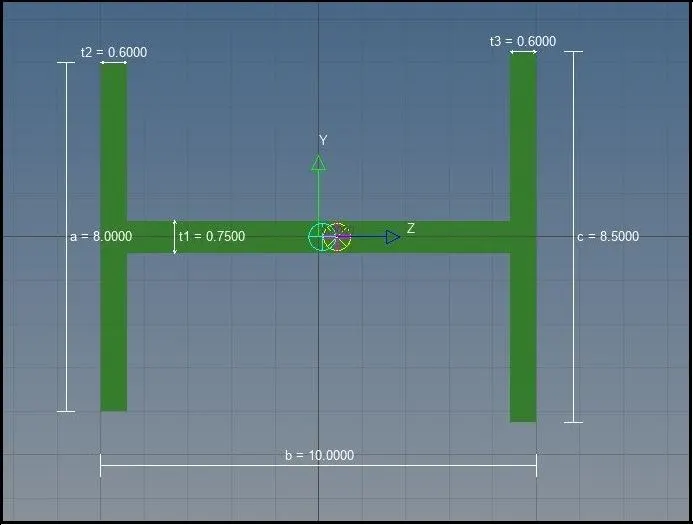
(2) Beam Element: (With all DOF and RBE3 Link):
Cross-Section: I-Section:
Dimension a = 8 mm
Dimension b = 10 mm
Dimension c = 8.5 mm
Thickness t1 = 0.75 mm
Thickness t2 = 0.6 mm
Thickness t3 = 0.6 mm
(3) Bar Element: (With only X & Y DOF and RBE3 Link):
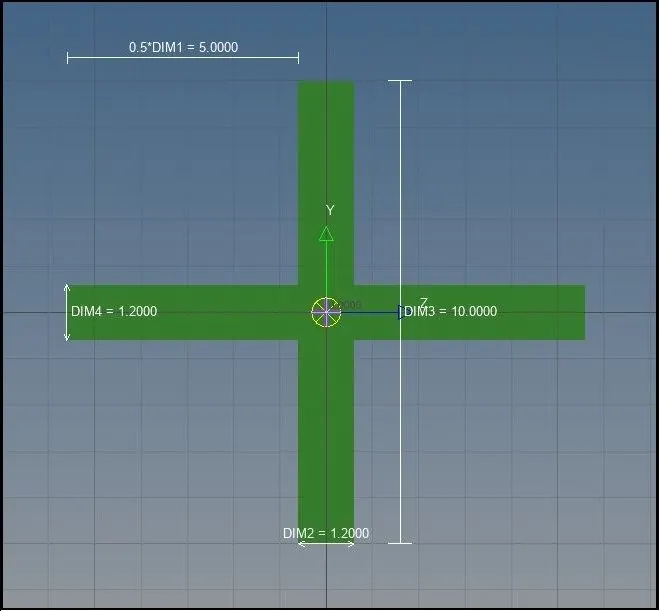
Cross-Section: CROSS Section:
Dimension DIM1 = 5 mm
Thickness DIM2 = 1.2 mm
Dimension DIM3 = 10 mm
Thickness DIM4 = 1.2 mm
- Now create 1D elements as per above description by linking RBE2 and RBE3 at different locations as per given location.
- For creation of different elements and links as well as mass , see the image of panel as below:

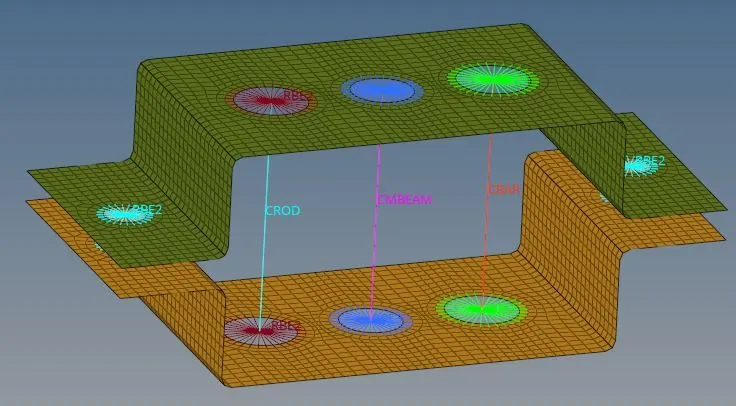
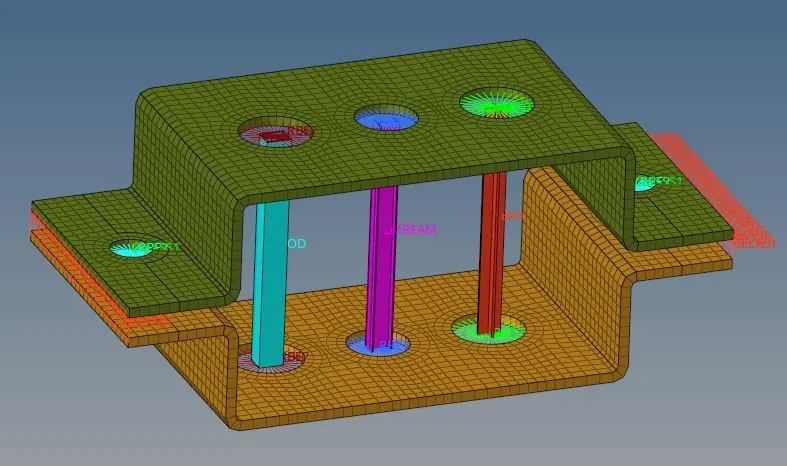
- We can see Rod, Beam and Bar elements with RBE2 and RBE3 link in above image.
- Make sure that all the elements are created with different components.
Mass:
- Apply mass to the Master node of RBE2 links at “d” and “e” for Bracket_1 and Bracket_2.
- Go to 1D -> Masses -> select node -> Mass= 10 -> Create.
- Apply mass of 10 units to each RBE2 link master node at “d” and “e” for Bracket_1 and Bracket_2.
Spring elements:
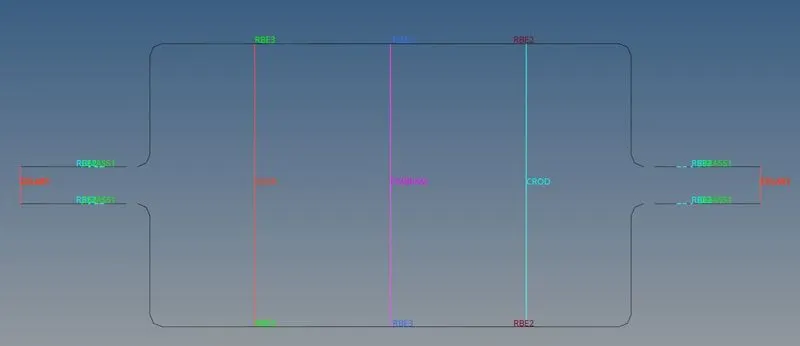
Create spring connection between Bracket_1 and Bracket_2 at location “f”.
- Spring elements are generally used to connect two different geometries.
- Go to 1D -> Spotweld -> using nodes -> select nodes of bracket_1 for “indep” and nodes of bracket_2 for “dep” -> Create.
- We can see that spring elements “CELAS1” at location “f” will be created.
All 1D elements, masses and springs are shown as below:
_____________________________________________________________________________________________________________________
Assigning the properties to all elements:
- Apply the Material and property to the Bracket_1 and Bracket_2 as well as all 1D elements.
Properties for different the Elements are given as below:

- Assign all the properties according to element types and update all the elements.
- Apply thickness in the property of Bracket_1 and Bracket_2 as 5 units as the geometry has 5 units of thickness.
Detailed Element representation for the entire assembly of different types of elements can be shown as given below:
_____________________________________________________________________________________________________________________
Inference:
- There are so many learning outcomes related to Preprocessing in Hypermesh.
- By using HyperMesh, we can create different types of 1D, 2D as well as 3D elements.
- We can create Bars and Rods in detailed form.
- We can create different beams of symmetric as well asymmetric cross sections.
- Specific rigid links with RBE2 and RBE3 can be created.
- Above 1D elements and Rigid links as well as springs are very useful creations to decrease the complexity of the model and they can be better representation for complex problems.
- For each element, we can assign properties and mass etc.
- HyperMesh has very large verity of elements.
- By Using HyperMesh, we can create different types of elements, very quick and easily.
- Apart from creation of elements, we can do geometry cleanup, and different 2D and 3D Meshing with very good quality and also can preprocess for analysis.
- Thus, HyperMesh is very essential and useful for accurate Preprocessing.
_____________________________________________________________________________________________________________________
Thanks & Regards,
Dharmesh Joshi