Week 2- 2R Robotic Arm Challenge
AIM:-To find write a programme to find the workspace of a 2R Robotic arm using forward kinematics.
Understanding:- The term forward kinematics and Inverse kinematics comes from robotics, where engineers try to figure out how to move and rotate the joints(links) in order to get the end effector/manipulator/tool in the required position.
Let us understand it better from the below figure.
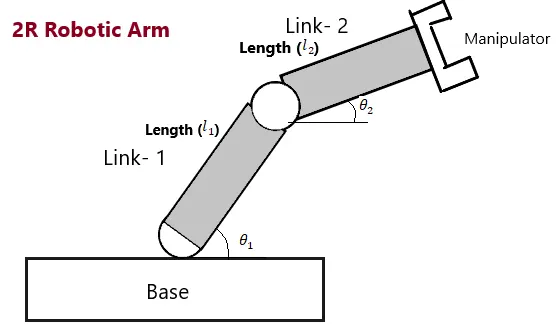
If the link-1 is moved than link-2 will be moved along with the manipulator because the end point of link-1 is the starting point of link-2. Thus in order to determine the position of the manipulator we have to first determine the position of link-1 and link-2. This approach is known as forward kinematics.
Now, the inverse kinematics is completely opposite of that. If the position of the manipulator is first know than the position of the link-1 and link-2 can be calculated. This approach is known as inverse kinematics.
Summary:-
Here, I have find the workspace of 2R Robtotic arm using forward kinematics. So, following are the codes and its explanation
CODE:-
% Forward kinematics of 2R Robotic arm
clear all
close all
clc
%inputs
l1=2 %length of link 1
l2=1.5 %length of link 2
theta1= linspace(0,90,10); %postion of link 1
theta2= linspace(0,90,10); %postion of link 2
%For loop
ct=1 % create a frame countor
for i=1:length(theta1);
    THETA1=theta1(i);
    for j=1:length(theta2);
        THETA2=theta2(j);
        %coordinates
        x0=0; % fixed base
        y0=0; % fixed base
        % x0,y0,x1,y1 will give the postions of the link1
        x1=l1*cosd(THETA1);
        y1=l1*sind(THETA1);
        % x1,y1,x2,y2 will give the postions of the link2
        x2=x1+l2*cosd(THETA2);
        y2=y1+l2*sind(THETA2);
        %plotting
        plot([x0 x1],[y0 y1],'color','b','linewidth',3);
        hold on
        plot([x1 x2],[y1 y2],'color','g','linewidth',3);
        hold off
        title('Workspace of a 2R Robotic arm');
        axis([-0.5 3.5 0 3.5])
        xlabel('x');
        ylabel('y');
        pause(0.03);
        M(ct)=getframe(gcf) %taking the snapshot/ it will capture the frame
                            %and save it in the variable M
        ct=ct+1 %incrementing the frame countor
    end
end
 % Creating a Movie
       movie(M)
       videofile = VideoWriter('Workspace of 2R Robotic arm.avi','uncompressed AVI');
       open(videofile);
       writeVideo(videofile,M);
       close (videofile)
Code Explanation:-
Step 1- Writing the close all, clear all, clc commands to clear the previous data.
Ste 2- Defining lengths of the link 1 and link 2 as l1,l2.
Step 3- Giving position and orientation of the link-1 using linspace commands which will generate 10 variables between 0 to 90 degree i.e.=theta1
Step 4-Similarly defining the position and orientation of the link2 i.e. theta2 using linspace command.
Step 5- Using nested for loop to generate the data which is different position and orientation of link2 for different position and orientation of link1.
Step 6- Within these for loop we are plotting graphs. After each plot we are using the ‘hold on’ command so that the new coordinates are plotted on the existing figure. At the end it is necessary to write ‘hold off’ command otherwise all the lines will remain visible which is not feasible for us. Using the pause() command will pause the plotting for a certain time example: plot(3) will pause for 3 seconds. Also giving title to our plot by title() and setting up limits for our axis using axis() command.
Step 7- Now, in order to make a animation of our plot, we need to display a set of images or photos one after another to make it as a continuous movie. So, here comes the getframe() command which will basically take snapshots for each value of plot. Also in getframe(gcf) gcf stands for current figure it will take the snapshots of the current figure.
What is happening in Movie(ct)=getframe(gcf) ?
Simply it will take snapshots and will store into the object Movie(ct), but we do not have to take snapshot of a single plot, that’s why we have introduced a countor variable ct at starting of the for loop and its value has to be increment in order to capture the frame upto the last plot happens that’s why it is introduced as ct=ct+1 below the getframe command.
In short it will capture the movie frame from each and every current figure.
Step 8- Here, we are creating the movie/video of our plot. Starting with the command movie(M) will play the movie frames in array M once.
Step 9- In this step we will create a video file from an array of matlab movies M using the videowriter function where we can specify its properties such as giving the name to our video file and in which file type we want to save video such as avi,mp-4 etc.
Step 10- Now, in the final step we have open the video file by using open(videofile) command we will write the data M to the file using writevideo() function and close the video file by close(videofile).
Erors faced while programming:-
1-Whenever I was trying to create a videofile using mp4 format I was getting the below warning.
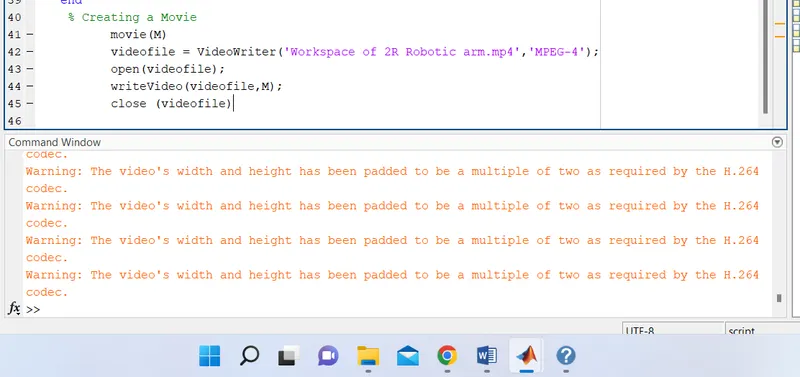
Solution-I didn't understand why it was showing such warning, so I went for a AVI file which went smoothly.
Please you can know me in the comment section.
2- The second eror I get was regarding the case sensitive, since Matlab is a case sensitive programming language.
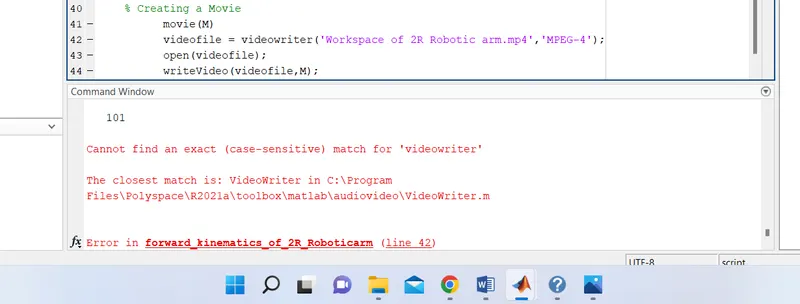
Solution:-I accidentaly typed 'videowriter' instead of 'VideoWriter'. So, I corrected it and it worked fine.
Animation Video Link:-
Here, is the link of the video of my project
Conclusion:-
From this project I understand the basic fundamentals of the robotics and how it is realted to kinematics and how we can use the matlab to create a video/moviefile.