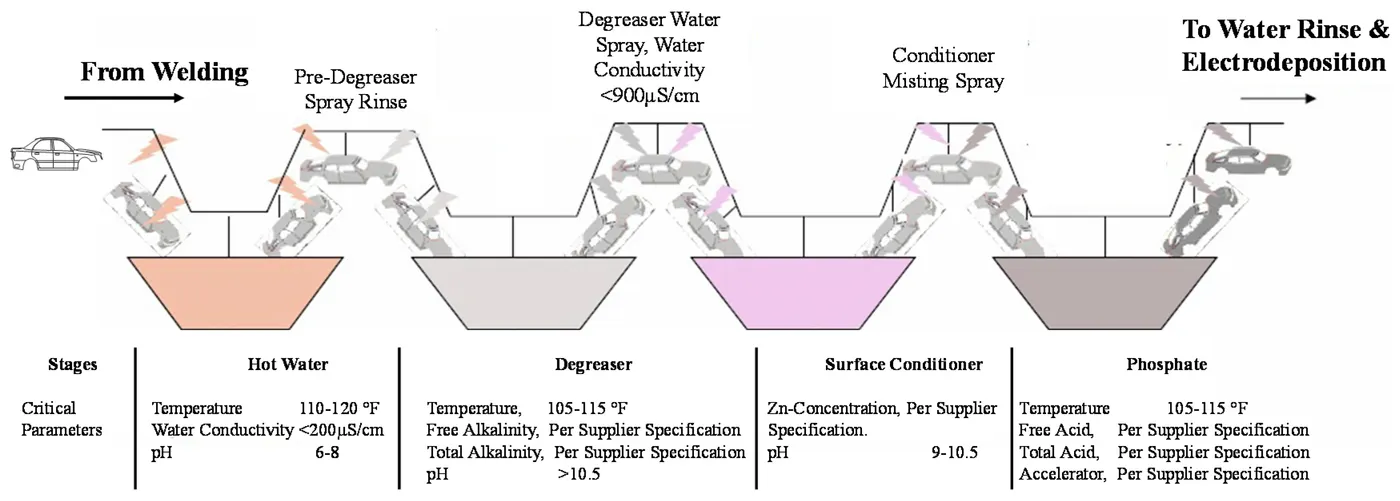
When the automobile body sheet metal components are welded together, the resulting structure is referred to as the body-in-white (BIW). The first sequence in preparing the BIW for subsequent coating is pretreatment—see Figure 3. Pretreatment consists of cleaning the body surface to remove remaining oils from the stamping process and welding residues through three primary liquid dip processes of degreasing, conditioning, and phosphating. An additional pretreatment cleaning that employs ~pH 9 hot water can also be used. Pretreatment helps the primer to bond onto the metal. A phosphate treatment applies an inert layer of metal phosphate, providing resistance to corrosion spread. The degreasing solution is composed of alkaline salts and surfactants and can include caustic soda, trisodium phosphate, and sodium carbonate. The surfactants are types of detergents for emulsifying oils and lubricants on the BIW. The degreasing zone typically consists of at least two sequences, including a spray stage known as knock-off-degrease (KOD) and a dip sequence. The advantage of using these two is that a significant portion of the oil and dirt will be removed by the high-pressure spray, thereby leaving a relatively lower load for the dip sequence to clean.
Figure 3. Pretreatment sequences for the body-in-white.
-- ELECTRODEPOSITION -
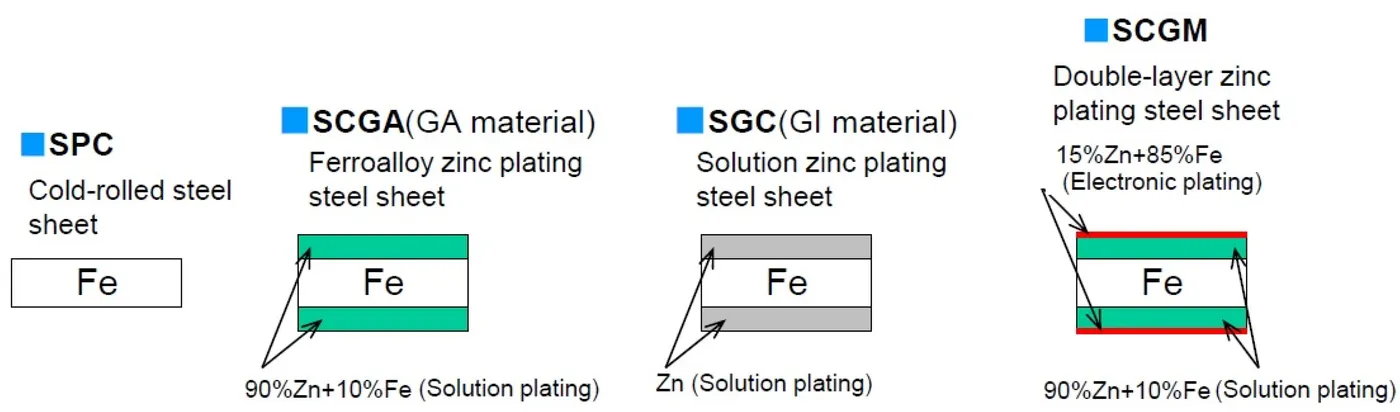
The metal underbody and frames of automobiles are coated to prevent corrosion, whereas other areas like the roof are not rust-proofed. When not coated to prevent corrosion, the structural metals (or other materials) are primed before applying additional coatings. Figure 4. displays types of corrosion protection coatings for cold rolled steel.
Figure 4. Various types of steel sheets for car body.
-- RUST-PROOF MATERIAL: SEALER/PVC -
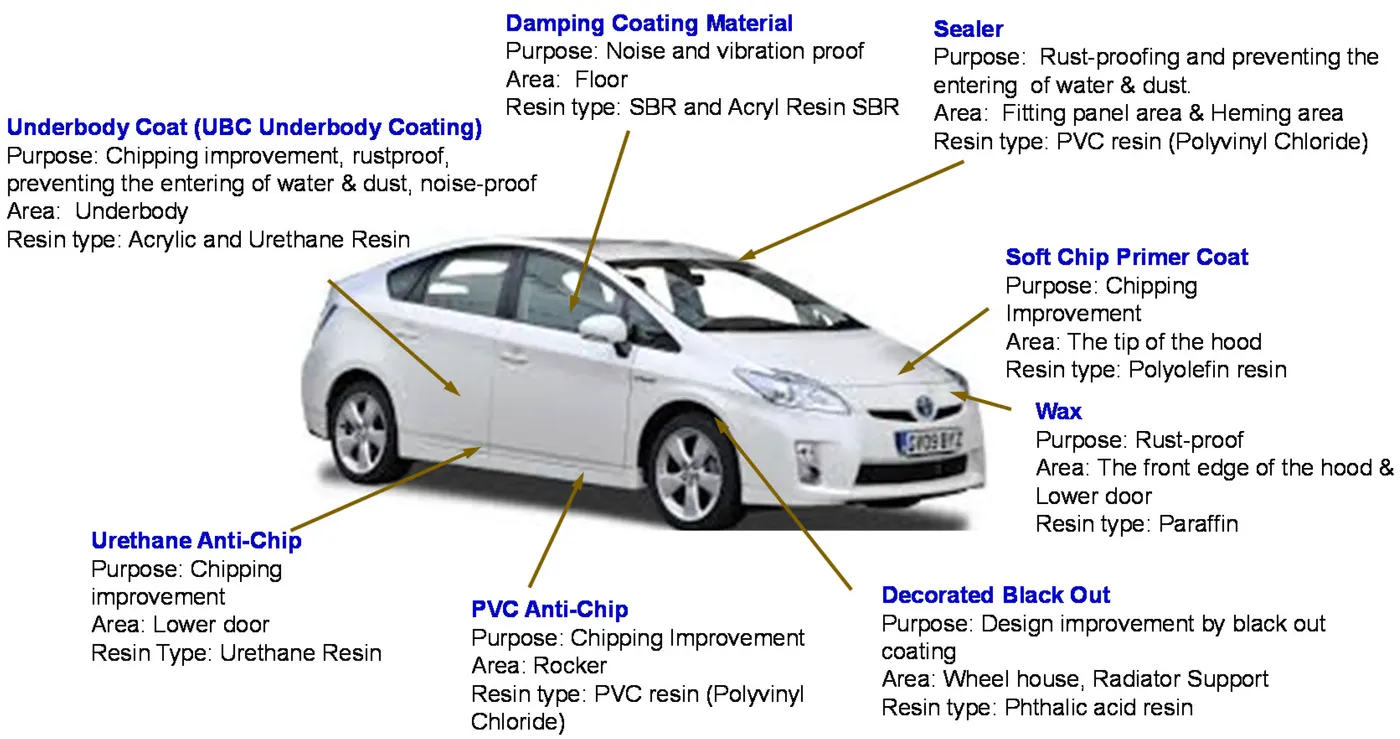
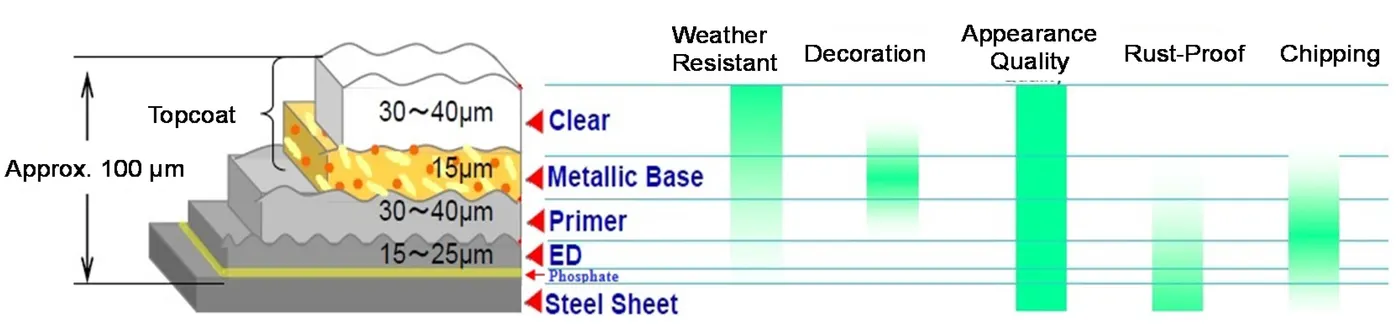
The third step is underbody coating (UBC) and seam sealing using PVC (Polyvinyl Chloride) and urethane. This sealing has multiple purposes, The sealant is applied around and inside the doors, hood, trunk, and front dash, and onto the exterior and interior of metal joints and outer area of the back wheel well; application of the sealant is accomplished either manually or with robots and prevents air and water ingress and inhibits rust formation. Recently, PVC and acryl/urethane sealants have also been used in the underbody areas, a process called the Dampening Coat (DC), to impart noise-proofing and vibration-deadening. The noise and vibration are transferred from the engine, drive train, suspension system, road noise of the tires, and flowing air, and the underbody sealants reduce noise transfer into the passenger compartment of the automobile. The underbody coating also provides anti-corrosion and chipping protection; typically, it is accomplished using robots equipped with airless sprayers. Figure 5. displays the lower door sections and rocker panel locations where PVC or urethanes are applied as an anti-chipping protection, and shows the cross section of this layer with respect to the other coatings on the body parts.
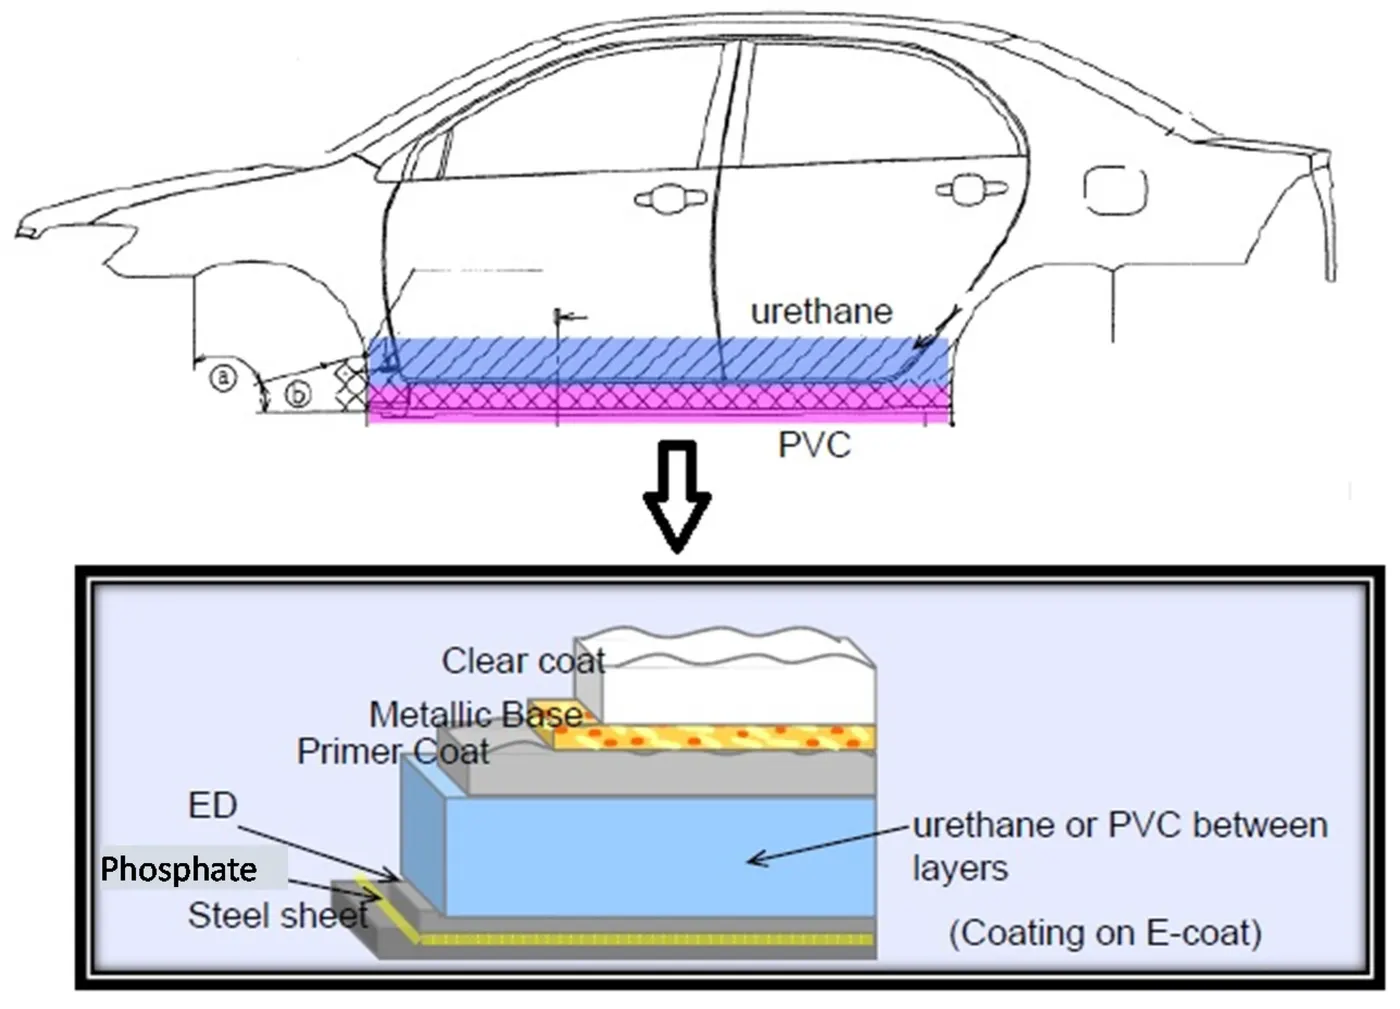
Figure 5. The anti-chipping material coating on lower doors and rocker panels.
During this third step, it is also typical to apply a soft tip primer coat that improves the chipping resistance (resistance against chipping by flying stones or debris). This layer is applied to the front edge of the hood, which is an area prone to chipping shock, using a high elastic resin that resides between the ED and primer coats. Also, during the third step, the radiator supports, wheel housing, and under rear areas of the body are coated with a relatively dull black pigment called a blackout coating.
-- PRIMER -
The fourth coating step is the application of a primer surfacer or simply primer. It can be water-borne, solvent-borne, or a powder. The main reason for primer application until 1990 was to improve weather resistance, appearance, and chipping resistance. Since 1990, primers have been developed in solvent-borne and water-borne materials, and powders (explicitly for reducing the amount of volatile organic compounds (VOC) discharged into the atmosphere or pollutant capture equipment). Today’s primers have to improve adhesion between the E-coat and topcoat, provide chipping protection, enhance paint appearance and, also, be environmentally compatible with emission regulations.
The primer fills and smooths minor imperfections and scratches that may be created during prior steps and by the intermediate sanding or grinding used to remove small imperfections. Additionally, most automobile bodies have surface imperfections that arise from the pressing, stamping, and welding operations, and these defects are typically accentuated during the ED step. Hence, although the main purpose of the primer has been to act as a leveler that produces a smoother finished surface, it also provides additional protection against corrosion and maximizes adhesion between it and the E-coat and basecoat; thereby, the primer increases paint durability. However, as pressing and stamping operations become more sophisticated and create fewer imperfections, the smoothing characteristics of primers become less important.
The primer layer is important for stone chip resistance. When chipping exposes the bare metal, the perforation will inevitably lead to corrosion. At the same time, good adhesion of the top coat to the primer surfacer is required to ensure minimal detraction from the visual appearance if chipping has occurred. Hence, it is common to incorporate suitable colors in primers that are compatible with the topcoat, masking damage to the topcoat caused by stone chipping.
-- TOPCOAT -
The final step in the body coating process is to apply the topcoat, which consists of two layers—the basecoat and clearcoat. The basecoat contains the primary coloring pigment, and the clearcoat provides a protective coating against environmental effects, corrosion, and UV light degradation, promotes unmatched color retention, and provides a smooth, unblemished, and even finish. The body is first coated with either a water-borne or solvent-borne basecoat. If the manufacturer is using a wet-on-wet process, then the clearcoat is applied onto the basecoat after a short flash-off, before curing in an oven. In the absence of a wet-on-wet process, the basecoat is cured before the clearcoat is applied. Independent of which process is employed, typical thermal cure times and temperatures are 30 to 40 min at 125 °C, respectively.
TYPES OF UNDERCOATING
Having undercoating professionally applied to your vehicle can be expensive, but fortunately, if your budget is tight, you can do it yourself for a fraction of the price. Here are some of the various types of undercoating available
Rubberized Undercoating -
Rubberized vehicle undercoating is easy to apply and offers sound-cushioning as well as protection from dust, moisture, and dings or dents.
In addition to your undercarriage, rubberized undercoating is also safe to use on wheel wells and quarter panels, and dries to a soft rubbery finish that prevents further rust, damage, or moisture seeps. The coating can be painted over and, if necessary for bodywork, can be easily removed with an undercoating removal spray.
Overall, rubberized coating is generally the best option for protecting your vehicle's undercarriage, as it provides the simplest and best protective measures against rust and moisture.
Polyurethane Undercoating -
The other option for undercoating your vehicle is to use a polyurethane-based sealant. This type of vehicle undercoating is a little bit quicker and easier to apply.
Oftentimes, polyurethane undercoating will come in canisters ready to preload into an application gun. This type of sealant works by seeping into all cracks and seams, displacing salt and moisture and oozing around rusty areas to bond with and protect unoxidized metal. It also sands quickly in case you'll need to perform bodywork and can be painted over.
On the flipside, this type of car undercoating generally requires a little bit more surface prep work before applying -- sanding and applying an etching primer to bare metals before using are generally recommended.
Wax or Paraffin-Based Undercoatings -
A paraffin-based undercoating will be the cheapest and quickest option available with which to protect the undercarriage of your vehicle. However, keep in mind that it will wear off quicker than other types of undercoating and will need to be stripped and reapplied at least once every year.
Wax-based undercoatings never truly harden. During application, they drip or flow into seams and cracks to provide protective
properties. They are usually available in a spray gun canister or in an aerosol can and offer at least a base protection in moderately humid climates.
Asphalt-Based Undercoating -
For standard vehicles, any of the aforementioned types of undercoating will provide sufficient protection. For large trucks and heavy machinery, asphalt-based undercoating provides a bit of extra durability against rocks, chips, and moisture.
Asphalt-based undercoating generally contains a little bit of rubberized material that sets up firmly and also helps soften noise. Generally sold in five gallon containers, this type of undercoating also needs more cure time than the other three, and is NOT paintable, making it best to use only for undercarriages.
-- ADVANTAGES OF UNDERCOATING -
1) Undercoating gives an extra layer of protection against rust and corrosion, protecting your car.
2) Undercoating will eventually wear out, but you can get years of protection from it. Even vehicles in warmer climates gain protection as debris is repelled and kept away from eating at the vehicle.
3) It can be self-applied.
4) It minimizes the sound from underneath the car.
5) It insulates the interior of the car from the extreme temperature from beneath the vehicle.
6) The coating does not chip away when hit by stones.
-- DISADVANTAGES OF UNDERCOATING -
1) Undercoating will not help you if corrosion already exists and the corrosion needs to be removed first before it can be applied, which can be expensive for you.
2) It must be reapplied every 3 to 5 years for the best results.
3) It adds weight to the vehicle.