Project 2 - Measuring the distance of an object using ultrasonic sensor and also smoothen the sensor data using moving average filter
Overview of the Project:
Our PING)))™ ultrasonic sensor provides an easy method of distance measurement. This sensor is perfect for any number of applications that require you to perform measurements between moving or stationary objects.
Interfacing to a microcontroller is a snap. A single I/O pin is used to trigger an ultrasonic burst (well above human hearing) and then “listen” for the echo return pulse. The sensor measures the time required for the echo return, and returns this value to the microcontroller as a variable-width pulse via the same I/O pin.
The PING))) Ultrasonic Distance Sensor is compatible with all Parallax educational robots. It is also supported by many bonus projects for BASIC Stamp, Arduino, Propeller, and micro:bit on our Learn site.
In this project the implementation of code for “Measuring distance of an object using ultrasonic distance sensor (28015 Ping) and also smoothen the sensor data using moving average filter”.
Goals:
- Measuring the distance in terms of inches of an object using Ultrasonic Distance Sensor (28015 Ping).
- The sensor data is smoothened by using Moving average filter technique to eliminate the high frequency variations from the sensor data.
Key Highlights of the Project:
- Measuring the distance travelled by the wave to the object and gets bounced back from the object to sensor.
- Smoothening the sensor data by moving average filter technique, the filter has a window of certain size. That window determines that how many data the filter can take.
Deliverables of this project:
- The distance travelled by a wave to the object for which we want to measure the distance using Ultrasonic Distance Sensor (28015 Ping).
- Eliminate the high frequency jitters from the sensor data by Moving Average filter to smoothen the sensor data. Key Features:
- Provides precise, non-contact distance measurements within a 3 cm to 3 m range
- Ultrasonic measurements work in any lighting condition, making this a good choice to supplement infrared object detectors
- Simple pulse in/pulse out communication requires just one I/O pin
- Burst indicator LED shows measurement in progress
- 3-pin header makes it easy to connect to a development board, directly or with an extension cable, no soldering required
- Security systems
- Interactive animated exhibits
- Parking assistant systems
- Robotic navigation
- ddp
- Narrow acceptance angle
- Narrow acceptance angle
- Range: approximately 1 inch to 10 feet (3 cm to 3 m)
- 3-pin male header with 0.1″ spacing
- Power requirements: +5 VDC; 35 mA active
- Communication: positive TTL pulse
- Dimensions: 0.81 x 1.8 x 0.6 in (22 x 46 x 16 mm)
- Operating temperature range: +32 to +158 °F (0 to +70 °C)
Materials:-
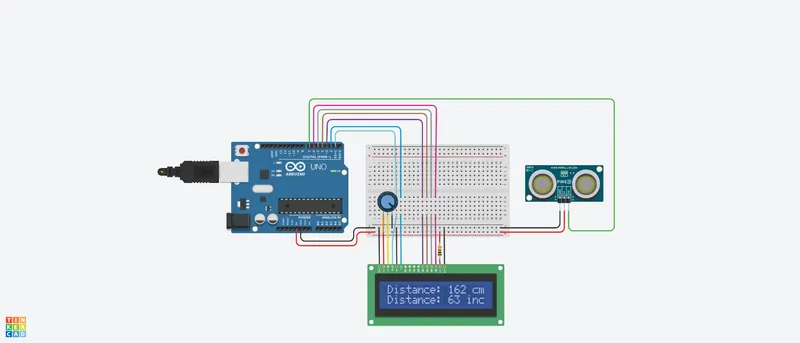
~ Arduino Uno R3
~ Ultrasonic sensor (PING)
~ LCD display (16x2)
~ 10k potentiometer
~ Jumper wire
Connections:-
Vss = Arduino GND
VDD = Arduino 5V
V0 = Potentiometer center pin
RS = Digital pin 1
RW = Arduino GND
E = Digital pin 2
D4 = Arduino digital pin 3
D5 = Arduino digital pin 4
D6 = Arduino digital pin 5
D7 = Arduino digital pin 6
A = Arduino 5V
K = Arduino GND
Ultrasonic GND = Arduino GND
Ultrasonic 5V = Arduino 5V
Ultrasonic Sig = Arduino digital pin 7
Potentiometer left pin = Arduino 5V
Potentiometer right pin = Arduino GND
Code :-
#include <LiquidCrystal.h> // includes the LiquidCrystal Library
LiquidCrystal lcd(1, 2, 3, 4, 5, 6); //// Creates an LCD object. Parameters: (rs, enable, d4, d5, d6, d7)
const int pingPin = 7;
long duration;
int distanceCm, distanceInch;
void setup() {
// initialize serial communication:
lcd.begin(16,2);
pinMode(pingPin, OUTPUT);
pinMode(pingPin, INPUT);
lcd.setCursor(4,0);
lcd.print("Ultrasonic");
lcd.setCursor(6,1);
lcd.print("Sensor");
delay(1000);
lcd.clear();
}
void loop() {
pinMode(pingPin, OUTPUT);
digitalWrite(pingPin, LOW);
delayMicroseconds(2);
digitalWrite(pingPin, HIGH);
delayMicroseconds(5);
digitalWrite(pingPin, LOW);
pinMode(pingPin, INPUT);
duration = pulseIn(pingPin, HIGH);
// convert the time into a distance
distanceCm= duration*0.034/2;
distanceInch = duration * 0.01330 / 2;
lcd.setCursor(0,0); // Sets the location at which subsequent text written to the LCD will be displayed
lcd.print("Distance: "); // Prints string "Distance" on the LCD
lcd.print(distanceCm); // Prints the distance value from the sensor
lcd.print(" cm");
delay(10);
lcd.setCursor(0,1);
lcd.print("Distance: ");
lcd.print(distanceInch);
lcd.print(" inch");
delay(10);
}
Diagram :-