Project 2
Medical Device Design: The Essential, Step-by-Step Guide
Shrinidh Joshi, medical device expert on Kolabtree, provides a comprehensive guide to medical device design, design controls, validation & verification, regulatory requirements and risk management.
In the previous article, we took a look at the overview of the medical device development process from the ideation to the discovery phase. In this article, we will focus more on medical device design, design controls, and compliance.
Medical Device Design: IEC & ISO regulations and compliance
By now you know that for market entry your medical device needs to qualify certain regulatory requirements and standards. Medical device standards such as the International Electrotechnical Commission (IEC) or the International Organization for Standardization (ISO) allow medical device manufacturers, designers, laboratories and all other medical device development service providers such as CDMO to inspect, assess and maintain their devices and equipment to certain quality and usability standards.
The (IEC published the first of its kind medical devices standard in 1970, IEC 60601-1. IEC 60601-1, Medical electrical equipment – Part 1: This is the internationally recognized standard that addresses general requirements for medical electrical equipment and devices covering standards for basic safety and essential performance [4].
The IEC 60601-1 document has been revised periodically to stay in alignment with the latest medical development and technological breakthroughs in the medical device field. Most recent change came into fruition in 2012 (Amendment 1 to IEC 60601-1). This revised standards contains the requirements for human factor consideration, essential performance evaluation of medical devices, usability and commands. It also includes software as a medical device and specifies its adoption of a formal development life cycle. Also included in the scope of revised IEC 60601-1 are newer and revised technical specifications for hazards (both electrical and mechanical), medical device labeling requirements (including new labeling standards) and documentation.
Medical Device Design: ISO Standards
The International Organization for Standardization also has specifications for medical device standards. ISO 13485 and ISO 14971 are widely used standards across the world for medical device quality management. Other than these international standards, certain standards are region-specific and all of them are adopted from international standards with little modification and limitation.
If a medical device company is manufacturing or selling medical devices in the US, the medical device will be regulated by the FDA. American National Standards Institute (ANSI) is the representative of ISO standards in the US.
There are two more similar organizations: the Association for the Advancement of Medical Instrumentation (AAMI) and the American Society for Quality (ASQ) that defines standards for the US.
If a medical device company had designed a device considering ISO standards, there is also a possibility that the FDA may not approve the device. As FDA has its own set of procedures for risk management derived from both international and regional standards, which includes:
- ISO 14971:2007, Medical devices – Application of risk management to medical devices
(international standard.)
- ANSI/AAMI/ISO 14971:2007 (R2010), Medical devices – Application of risk management to medical devices (A regional standard with additions and modifications from the referred international standard.) [5].
In the case of quality management standard, it does not follow the international or regional version of the ISO 13485 standard. This is because the FDA has different guidelines for quality management in medical devices for the US market.
Whereas, if the medical device company is considering the European Union, the European Committee for Standardization (CEN) is the standardization adopted from ISO and the European Committee for Electrotechnical Standardization (CENELEC) is the regional standard inspired by IEC.
CEN is a bit modified as per requirement from ISO and written with an “EN” prefix. E.g.:
- EN ISO 13485:2012, Medical devices — Quality management systems — Requirements for regulatory purposes.
- EN ISO 14971:2012, Medical devices — Application of risk management to medical devices
National members adopt these standards from the EU while adding their prefix. For Switzerland, Swiss Standards publishes standard with “SN” as a prefix such as SN EN ISO 13485:2012 and SN EN ISO 14971:2012.
In the case of Canada, the Canadian Standards Authority (CSA) is the representative organization for ISO.
Medical Device Regulations and Design Control
Medical device manufacturers need to follow Design Control guidelines since the regulatory bodies like FDA, European Commission, Health Canada, and others want to ensure that the medical devices are safe for potential users before manufacturers start to market the devices. As I have mentioned in the above section, the FDA doesn’t follow ISO 13485 as it has different requirements for quality management. Design controls are defined under FDA 21 CFR 820.30 which has a similar intent to section 7.3 Design and Development described under the guidelines for ISO 13485. Additionally, FDA incorporates Current Good Manufacturing Practice (cGMP) requirements into the quality system regulation to follow good quality practices for medical device designs [6].
The regulation provides a framework to implement the design control to a wide variety of devices. The framework delivers flexibility for both regulatory compliances as well as the internal design and development process.
To successfully implement design control of medical devices, professionals with both technical and non-technical backgrounds, such as business administration, life science, engineering, computer science, and the arts are required.
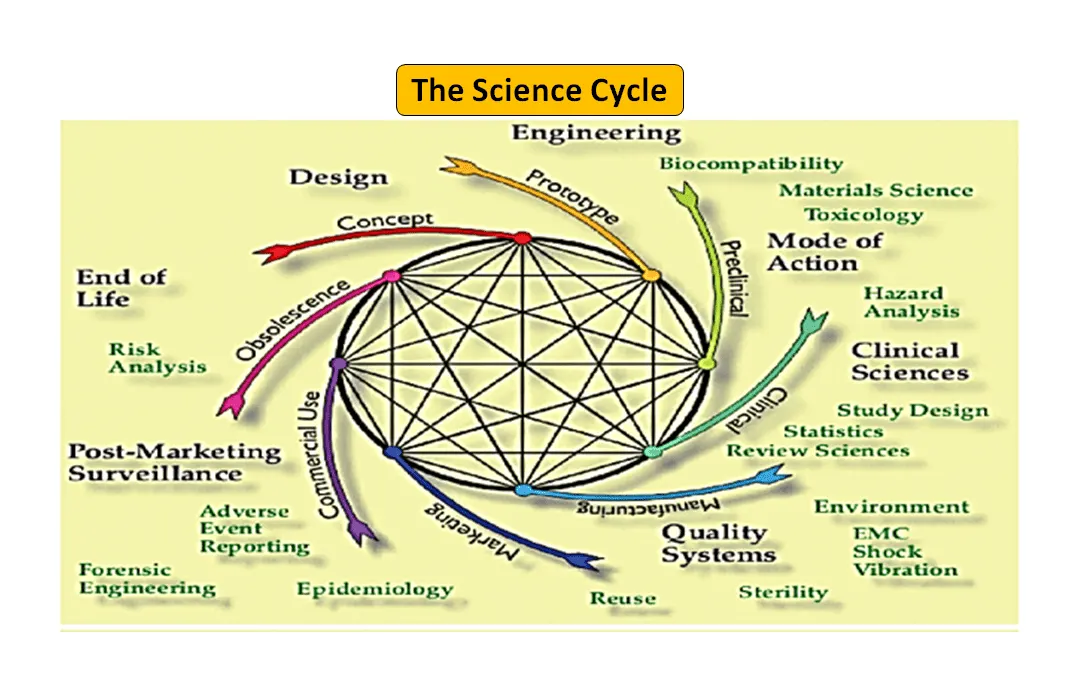
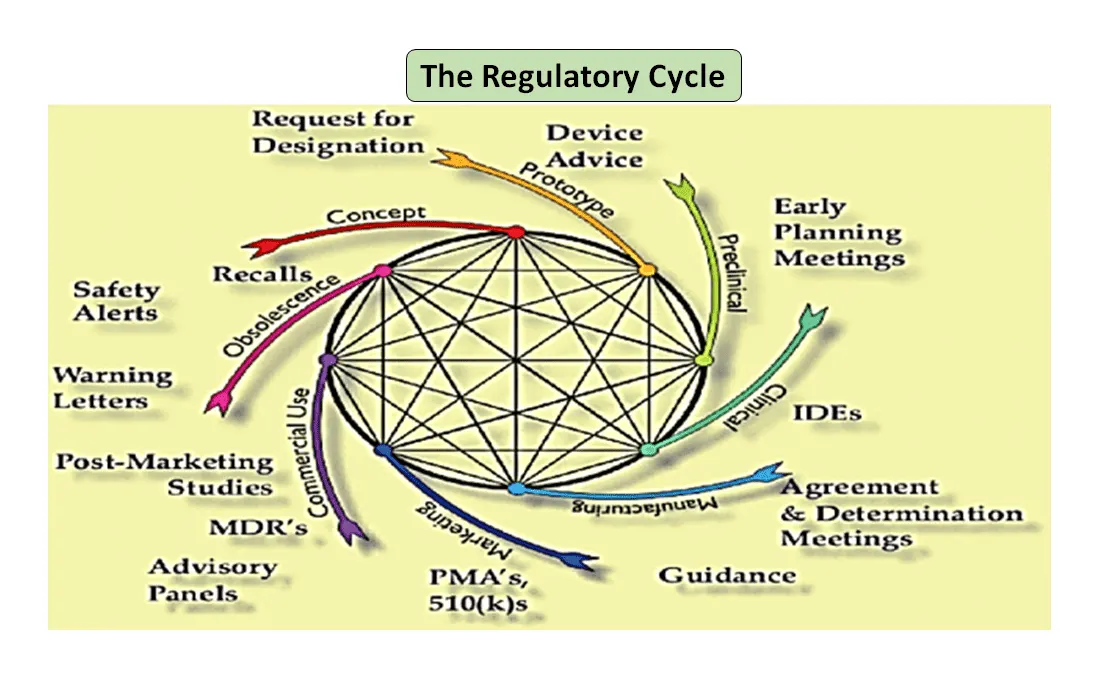
Figure 1: Total product life cycle. The science cycle and the regulatory cycle (Adapted from [7]).
It is noteworthy that the medical device life-cycle starting from innovation to regulatory approval and commercialization is a series of interconnected steps which drives the device development (see Figure 1: Total product cycle). In the beginning, prototypes designed by your engineers are bench tested to optimize the design, tested for biocompatibility, extractables, leachables, flexibility or overall strength of your device. Role of your company’s regulatory advisor is to browse through the regulatory database to suggest to you a guidance document that can help you determine if your product will be regulated as a medical device or not. Intended use of your medical device and its mode of operation or action will guide you in the device design and will also decide your regulatory pathway whether 510(k), PMA, De Novo, Pre-sub, IDE, HDE, master files etc.
As illustrated in Figure 1, both the scientific and regulatory processes are intertwined throughout the product life cycle. Just as different parts of the science life cycle are interconnected, the science and the regulatory requirements are intertwined, each informing and determining the other. There is an opportunity to build connections, both at the FDA and in manufacturers, so parts of the life cycle do not risk only being considered in isolation. For example, it is not uncommon for a premarket application to be reviewed without considering the postmarket experience of similar products.
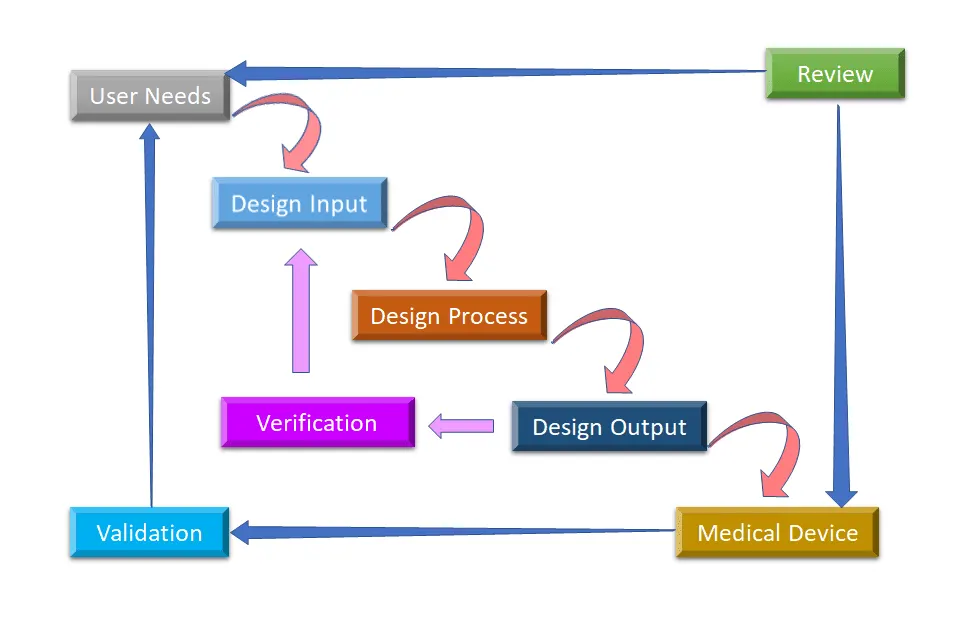
Figure 2: Waterflow design process for medical device design control (Adapted from [8]).
The initial phase from which Design Control starts is Design Input development and approval, which consists of device design and manufacturing processes to be carried out in the production phase. Design control is a holistic approach and doesn’t end with transferring the design to the production phase, once the design is finalized. It also impacts manufacturing processes according to the changes in the design phase or even post-production feedback. It is an ongoing process to develop a product that is usable for a user and thus for the enhanced product, it considers revolutionary changes from usage patterns as well as analyzing failed products. You can see in Figure 2, how Design Control can be performed in the waterfall design process.
- User Needs:- Requirements are defined considering the market need and the device is designed to address that need. After a series of evolution, the medical device design is finalized and transferred to production for manufacturing. There is a need for feedback during every step of this process.
- Design Input: This is an iterative process. When an organization decides to address the particular need, they review and test the acceptability of design input derived from the need. At that point, the iterative process of converting requirements into device design starts.
- Design Process: These design inputs are converted into design output by converting those requirements into high-level specifications (which are Design Output).
- Design Output: The verification process confirms whether the specifications are satisfying requirements or not. And the output becomes the input to revise the requirements and this process goes on until Design Output is aligned with the Design Input.
- Medical Device: Once the final design is ready, it is transmitted to the production facility for mass manufacturing. Design control regulation mandates Design History File (DHF), which illustrates the linkages and relationships between all the Design Controls and help to trace all changes throughout the entire product development process.
Medical device companies can take a paper-based or a software-based approach, especially developed for Design Control; design history files must be traceable as well as accessible to all the team members.
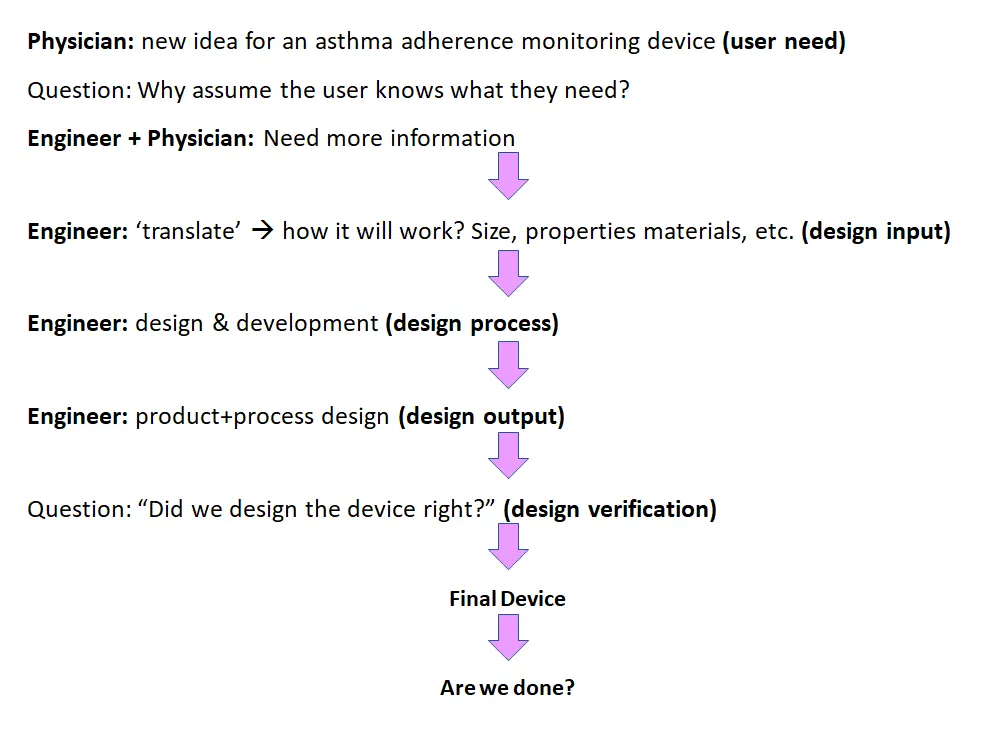
The flow chart below shows a case study for medical device design control.
Medical Device Design: Why Traceability is Important
Currently in the realm of the medical devices industry, it is an ideal practice to develop a traceability matrix that can illustrate the links and relations between user needs, design inputs and outputs, design verification and validation. When you are in the early phase for your device development you can maintain the device traceability using a spreadsheet or document version but as you move forward, its good idea to use cloud-based project management and document sharing platforms such as Microsoft Teams, Asana, Trello or whichever platform is suitable for your organization. The goal is as your project progresses you need to find an option which can save time because the old-school method of maintaining a traceability matrix might consume a lot of your time which you should rather be focusing on design verification and validation.
A Design Control traceability matrix is vital to product development teams, and especially for project managers, because traceability shows the relationship and linkages between all of the Design Controls. How do User Needs relate to Design Inputs? How do Design Outputs relate to Design Inputs? How do Design Verifications link to Design Inputs and Design Outputs? How do Design Validations relate to User Needs? A traceability matrix is an invaluable tool to show a high-level view and the flow of medical device product development from beginning to end.
Best practice product developers have relied on Design Controls traceability for many, many years. And now ISO 13485:2016 also makes traceability a requirement. As cited in ISO 13485:2016, 7.1 Planning of Product Realization, 1. c) required verification, validation, monitoring, measurement, inspection and test, handling, storage, distribution and traceability activities specific to the product together with the criteria for product acceptance; And 7.3.2 Design and Development Planning, 1. e) the methods to ensure traceability of design and development outputs to design and development inputs [9].
Medical Device Design: Verification and Validation
Every medical device must meet the functionality, usability, and reliability objectives to get a successful share in the market.
In addition, your stakeholders (patients, prescribers, regulators or end-users) will also pay attention to the safety and effectiveness of your device. It is very likely that your device is designed to address an unmet need which can be critical to life for example a ventilator or a diagnostic device which can detect heart disease. Therefore, iterative testing of your device with verification and validation is crucial. These two steps in the design process are aimed to confirm that your medical device is in alignment with the requirements of users and it is performing as per its intended use. In simple terms, design verification and validation can ensure that your device is actually doing what it is supposed to be doing. Design verification and validation are also to ensure regulatory requirements, standards, product quality, and manufacturing process of your medical device. Design verification can evaluate if your design output is in compliance with the specified requirements, specifications or regulatory requirements that are specified in the design input. On the other hand, design validation is meant to evaluate whether your medical device is delivering benefits based on the need of the end-users.
Design verification asks: “Did we design the device right?”
Design validation asks: “Did we design the right device?”
Medical devices may consist of different technology shapes, sizes, and different levels of complexity. Verification and validation (V&V) activity is driven by the regulatory environment and must follow international standards. Standardized V&V activities can streamline the manufacturing process as well as enhance the approval process. Additionally, automated testing, diagnostic techniques, and data collection tools can enhance the V&V process [10].
- Product validation vs. Process validation
- Medical device design/product validation:- Conforming to the user and patient needs, i.e. Does the device work right?
- Process validation:- Manufacturing process meets predetermined specifications.
Noteworthy to remember is Design/Product validation ≠ process validation. Regulatory agencies require both design/product validation and process validation individually, so both of them need to be equally taken into account during regulatory submission.
How early in the development process should we think about validation? A medical device company should understand that it is never too early to start validation work, a company should start validating sooner than later to figure out that it is going on the right path and solving the right problem.
Validation (also V&V) being an iterative process consumes a good investment, when planned poorly. A strongly-defined test strategy can help you optimize cost as well as the test period to make the product market-ready on time.
The complexity of any testing strategy depends on technologies to be used and geographical target markets. The test strategy should cover at least six parameters mentioned below:
- Targeted geographies and associated standards;
- Time to market;
- A standard to be followed with a version;
- Testing Labs – internal or independent labs;
- Defining the sequence of tests;
- Presenting the test result
Accordingly, tests used for the verification and validation process also need to be validated. This is to ensure that you measure what you need to measure because a wrong test will deliver wrong outputs of usability and functionality. Medical device companies need an effective and well documented V&V, which complies with associated regulations.
Medical Device Design: Risk Management
Risk migration strategy vs. Risk management plan
Risk management procedures for medical devices are enforced under internationally accepted compliance standard ISO 14971:2007 Medical Devices – “Application of Risk Management to Medical Devices”. Apart from this, risk management policies need to be incorporated across all the stages of medical device design and development and should be also associated with design control aspects as well [10].
Risk management never ends (at least in theory!). The philosophy of risk management is that it should not be about a hard and fast set of rules. Risk management and risk migration strategy are about understanding the intent of risk management and approaching the process logically and systematically. In other words, don’t just follow the rules…think!
Considering the complexity of medical device design, focused risk management practices help ensure usability, safety, and regulatory compliance. It is a process of identifying, controlling, and preventing the failure that may cause hazards to users. It also mandates identifying associated risks.
Figure 3 shows all the steps involved in the risk management process. The process starts with the identification of hazards and then associated risk is measured based on the consequences of hazards and their possibility of risk.
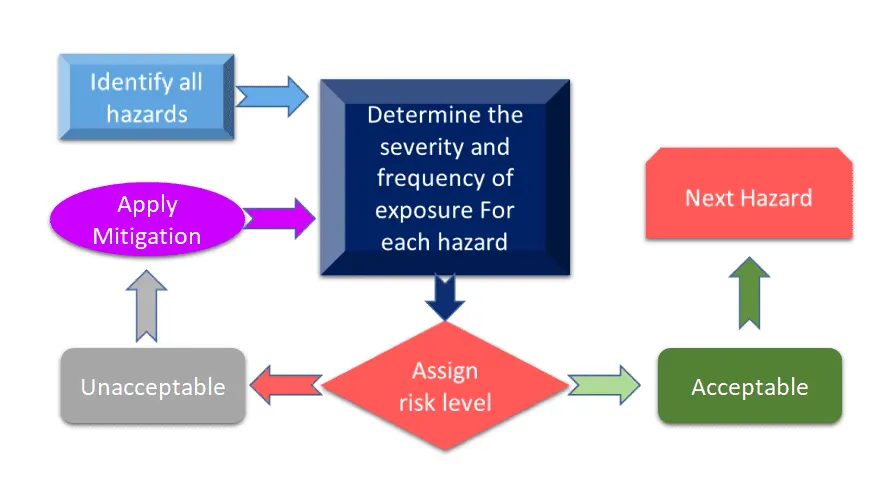
Figure 3: Risk management process for Medical Device (Adapted from [11]).
In case if the risk identified during the risk management process for medical devices is above the defined criteria, then you will require to have a risk mitigation. The level of risk is dependent on several parameters including but not limited to your device, technologies, and in some cases to the way your company is handling the risk mitigation process. It is always advisable to conduct hazard analysis for your device to see what standards can be applied to your device. In the recent revision of ISO 14971: International Standard for Risk Management of Medical Devices, risk analysis and Preliminary Hazard Analysis (PHA) are identified as prime requirements for your medical device [12]. In a simplified manner PHA is meant to provide the initial framework for risk assessments and management and PHA covers both risk analysis and risk evaluation. As per definition, PHA comprises a list of hazards, harms, any hazardous situations, formulated from your devices’ materials of construction (MoC), components or raw material used in your devie, and human-device or manual interfaces, use environment, operating principle, and other relevant factors [13].
Conclusion
In the end, for every medical device startup or a well-established organization, it is important to remember that reading the regulations gains you nothing but understanding the philosophy buys you a lot!
Bottom line: when comes to risk analysis and planning:
- Should be utilized early and throughout the design and development process,
- Often generated new information to feedback into the design and development process (à current/future devices),
- No amount of planning can eliminate all hazards and risks…but you can mitigate many of them! (Following the design control philosophies described here automatically mitigates risk!)
Every medical device’s route to market is complex due to the various factors to be taken into consideration such as usage patterns, material, user experience, regulations, and more.
Need help with medical device design? Browse experienced medtech industry experts on Kolabtree or post your project for free to get proposals.
REFERENCES AND RESOURCES
- https://www.welldoc.com/health-plans/
- https://ec.europa.eu/docsroom/documents/10337/attachments/1/translations
- FDA, 2005, Total Product Lifecycle, FDA-CDRH Presentation by CDRH Director Dr. David Feigal, http://www.fda.gov/cdrh/strategic/presentations/ tplc.html
- Pietzsch, Jan & Shluzas, Lauren & Paté-Cornell, Marie-Elisabeth & Yock, Paul & Linehan, John. (2009). Stage-Gate Process for the Development of Medical Devices. Journal of Medical Devices. 3(2).
- Regulatory Strategies for the Third Edition of IEC 60601-1 Retrieved 9 September 2020.
- https://www.meddeviceonline.com/doc/an-introduction-to-international-medical-device-standards-0001
- https://www.fda.gov/files/drugs/published/Design-Controls—Devices.pdf
- Feigal DW. Appendix D. Impact of the Regulatory Framework on Medical Device Development and Innovation. Institute of Medicine (US) Committee on the Public Health Effectiveness of the FDA 510(k) Clearance Process; Wizemann T, editor. Public Health Effectiveness of the FDA 510(k) Clearance Process: Balancing Patient Safety and Innovation: Workshop Report. Washington (DC): National Academies Press (US); 2010. Appendix D, Impact of the Regulatory Framework on Medical Device Development and Innovation. Available from: https://www.ncbi.nlm.nih.gov/books/NBK209794/.
- 1997, FDA CDRH 1997, Design Control Guidance for Medical Device Manufacturers
- https://starfishmedical.com/blog/iso-134852016-section-7/?doing_wp_cron=1599995964.4528369903564453125000
- Teixeira, M. B., and Bradley, R., 2003, Design Controls for the Medical Device Industry, Marcel Dekker, New York.
- ISO 14971:2019 – Medical devices – Application of risk management to medical devices
- ISO/TR 24971:2020 – Medical devices – Guidance on the application of ISO 14971
Medical Device Design and Development:
A Guide for Medtech Professionals
An effective medical device design addresses healthcare regulatory compliances, solution specifications, and deliver functionalities that satisfy end users’ needs. This blog provides a comprehensive guide for Medtech professionals to design and develop effective medical devices.
A medical device design that adds value to end user and simultaneously captures profitable market share is really a tough job.
Is it because healthcare is a life-critical segment? Or is it because it involves complex procedures?
Apparently, both. In addition, it needs to be aligned with healthcare regulatory requirements, solution specifications, and should deliver functionalities to satisfy end user needs.
Hence, it seeks a holistic approach to design a medical device rather than being an isolated part of the complete process. It requires precision in every stage — right from product ideation to compliance, designing, testing and marketing of the product.
Why is Medical Device Design Important?
Design and development of a medical device is the most crucial phase for its success. A loosely-defined and designed medical device cannot comply with the regulatory needs and make it to market.
Or just in case, even if it passes the compliance, it will fail to deliver the defined functionality and benefits, according to the market needs and suffer from lesser market adoption compared to well-designed products.
Spending hours with medical device developers and studying multiple Medtech projects, including allergic drug vending machine, software controlled insulin pump, endoscopy device miniaturization and much more at eInfochips, now I understand that medical device design and development is more than just conceptualizing a solution, developing a prototype and mass manufacturing to sell.
How to Design and Develop a Medical Device?
It takes a significant amount of effort to deliver the right healthcare solution that meets customer demands. A right healthcare solution demands everybody staying on the same page, with strong scope definition from end user’s need, collaborative efforts across the team, adherence to specification and requirements extracted from product definition, simultaneously mitigating risks and sticking to the best possible quality. Considering these, here’s a comprehensive guide to designing and developing an effective medical device for Medtech professionals.
I am putting everything inside out in this definitive medical device design guide to successfully design and develop Medtech solutions and medical devices that address the needs of customers as well as serve the compliance needs.
Here is the index for the same:
- Product Ideation and Conceptualization
- Addressing Regulation and Compliance need
- Design control regulations
- Testing – Verification and Validation
- Risk management procedures
Let’s get going.
Product Ideation and Conceptualization
Like other industries, Medtech innovation starts with analyzing and identifying the market, the need of which is untapped or unmet or there is a more efficient way to address those particular needs. These needs could be anything that delivers a solution such as a new or better way of monitoring health, enhanced care delivery solutions, devices or technologies to deliver better administration or anything that supports health and a human life.
These needs either could be “Vitamins” or “Pain Killers”.
Let us understand what are Vitamins and Pain Killers in terms of product development:
It’s not obvious that a device must address a particular problem, a device might also be a solution that aids convenience on a routine lifestyle or situation.
For an example: A device like health tracker tracks steps taken, calories burned or even monitors one’s sleeping habit. In this case, it doesn’t deliver a solution but gives you a fair idea about your daily routine, which helps you to improve health or lifestyle. This kind of solution is termed as Vitamins while a device that addresses a problem such an Insulin Pump is a Pain Killer.
Ideally, product ideation and conceptualization start with the following steps:
Step 1: Identification of Need
Identifying the need for demand is a primary step for creating a medical device offering, apart from being compliance-ready.
The success of this depends very much on two things:
- The gap between the need of target market and what Medtech developer perceives as the need; the lesser the gap, the better inputs for product definition
- A strong product definition extracted by analyzing the market needs
(Hint: Medical device product definition is about defining design and desired performance with a specific need.)
Step 2: Device Classification
Once you are done with the product definition and idea, you need to consider procedures like FDA defined classification and intellectual property rights.
Medical device classification is based on the risk associated with the use and enforced by law. Also, you need to look for any pre-existing Intellectual Property on the proposed idea or similar; it might actually disallow you to use the mechanism or technology.
To carry out complete discovery phase, a strong development team is crucial. This may be a pitfall if the team is not well experienced. In any case, you can decide to go with an in-house team, a consultant or a company to get help with medical device engineering.
Whatever option you choose, the team needs to be experts in the following areas:
- Engineering and design
- Human factors and usability engineering
- Clinical and scientific knowledge of medical industry
- Regulatory affairs and quality assurance
- Intellectual property law
Step 3: Transition to Discovery Phase
The next step is to transmit the idea into the discovery phase. This phase consists of initial designing, prototyping, PoCs, and iteration driven redesign.
Once you successfully complete the product conceptualization and discovery phase, you may proceed further for FDA approval and commercialization.
What are some Biggest Challenges in Medical Device Design?
What was science fiction 15 years ago is in FDA trial today. Mechanical engineers are dealing with new materials, electrical engineers are moving to new low-power chips, and software designers are migrating to new mobile operating platforms.
With these facts in mind, we surveyed 35 medical device designers and curated a whitepaper about what they think as medical device design challenges in future.
Addressing Regulation and Compliance Need
In order to get into the market, the medical device needs to pass through certain regulatory compliances, subject to both regional and international standards. Medical device standards are helpful and enforced by law in specifying and evaluating the requirement for design and performance parameters for a biomedical materials, tools, and equipment.
These medical device standards allow institutions in the medical device field such as product manufacturers, laboratories, and others to inspect and assess such equipment and devices to ensure standard quality and usability.
International Electrotechnical Commission (IEC)
The International Electrotechnical Commission (IEC) published first of its kind medical devices standard in 1970, IEC 60601-1. IEC 60601-1, Medical electrical equipment – Part 1: Is the internationally recognized standard which addresses general requirements for medical electrical equipment and devices covering standards for basic safety and essential performance.
The IEC 60601-1 has undergone many revisions time to time over the years in order to remain adaptive and up-to-date with newer medical technologies. The latest set of changes was introduced with the 2012 publication of Amendment 1 to IEC 60601-1. This standard includes the requirements for essential performance, commands usability engineering evaluations and human factor consideration, and mandates the adoption of a formal development life cycle process for software.
It also specifies new as well as revised technical specifications for electrical and mechanical hazards, also new product labeling and documentation requirements.
International Organization for Standardization
The International Organization for Standardization also have specifications for medical device standards. ISO 13485 and ISO 14971 are widely used standards across the world for medical device quality management.
Other than these international standards, there are certain standards which are region specific and all of them are adopted from international standards with little modification and limitation.
- If you are manufacturing or selling medical devices in the US, the medical device will be regulated by the Food and Drug Administration (FDA).
American National Standards Institute (ANSI) is the representative of ISO standards in the US. There are two more similar organizations: Association for the Advancement of Medical Instrumentation (AAMI) and the American Society for Quality (ASQ) that defines standards for the US.
If you have designed a device considering ISO standards, there is a possibility that the FDA may not approve the device. As FDA has its own set of procedures for risk management derived from both international and regional standards, which includes:
- ISO 14971:2007, Medical devices – Application of risk management to medical devices (international standard.)
- ANSI/AAMI/ISO 14971:2007 (R2010), Medical devices – Application of risk management to medical devices (A regional standard with additions and modifications from the referred international standard.)
In case of quality management standard, it does not follow the international or regional version of ISO 13485 standard. This is because FDA has different guidelines for quality management in medical devices for the US market.
- For the European Union, the European Committee for Standardization (CEN) is the standardization adopted from ISO and the European Committee for Electrotechnical Standardization (CENELEC) is the regional standard inspired by IEC.
CEN is a bit modified as per requirement from ISO and written with “EN” prefix. For e.g.:
- EN ISO 13485:2012, Medical devices — Quality management systems — Requirements for regulatory purposes
- EN ISO 14971:2012, Medical devices — Application of risk management to medical devices
National members adopt these standards from EU while adding their own prefix. For Switzerland, Swiss Standards publishes standard with “SN” as prefix such as SN EN ISO 13485:2012 and SN EN ISO 14971:2012.
- For Canada, Canadian Standards Authority (CSA) is the representative organization for ISO.
Looking for Regulatory Compliance Services?
At eInfochips, our experts provide HIPAA compliant engineering solutions, and have the required process expertise in IEC 60601-1/2/6, IEC 62304, 510K and ISO 13485.
Design Control Regulations
Medical device manufacturers need to follow Design Control guidelines since the regulatory bodies like FDA, European Commission, Health Canada, and others want to ensure that the medical devices are safe for potential users before manufacturers start to market the devices.
Like I said earlier, the FDA doesn’t follow ISO 13485 as it has different requirements for quality management. Design controls are defined under FDA 21 CFR 820.30 which has a similar intent to section 7.3 Design and Development described under the guidelines for ISO 13485.
Additionally, FDA incorporates Current Good Manufacturing Practice (CGMP) requirements into the quality system regulation with an aim to follow good quality practices for medical devices design. The regulation provides a framework to implement the design control to a wide variety of devices. The framework delivers flexibility for both regulatory compliances as well as internal design and development process.
To successfully implement design control of medical devices, professionals with both technical and non-technical background, such as business administration, life science, engineering, computer science, and the arts are required.
Design controls guideline is a quality system approach that covers the entire life of medical device starting from design, production, distribution, use, maintenance, and obsolescence.
Here is the index for Design Control clause of the FDA.
- SECTION A. GENERAL
- SECTION B. DESIGN AND DEVELOPMENT PLANNING
- SECTION C. DESIGN INPUT
- SECTION D. DESIGN OUTPUT
- SECTION E. DESIGN REVIEW
- SECTION F. DESIGN VERIFICATION
- SECTION G. DESIGN VALIDATION
- SECTION H. DESIGN TRANSFER
- SECTION I. DESIGN CHANGES
- SECTION J. DESIGN HISTORY FILE (DHF)
Medical Device Design Control Process
Initial phase from which Design Control starts is Design Input development and approval, which consists of device design and manufacturing processes to be carried out in the production phase.
Design control is a holistic approach and doesn’t end with transferring the design to the production phase, once the design is finalized. It also impacts manufacturing processes according to the changes in the design phase or even post-production feedback. It is an ongoing process to develop a product that is usable for a user and thus for the enhanced product, it considers revolutionary changes from usage pattern as well as analyzing failed products.
The image below depicts how Design Control can be performed in the waterfall design process.
Step 1 (User Needs)
Requirements are defined considering the market need and the device is designed to address that need. After series of evolution, the medical device design is finalized and transferred to production for manufacturing. There is a need of feedback during each and every step of this process.
Step 2 (Design Input)
This is an iterative process. When an organization decides to address the particular need, they review and test the acceptability of design input derived from the need. At that point, the iterative process of converting requirements into device design starts.
Step 3 (Design Process)
These design inputs are converted into design output by converting those requirements into high-level specifications (which are Design Output).
Step 4 (Design Output)
Verification process confirms whether the specifications are satisfying requirements or not. And the output becomes the input to revise the requirements and this process goes on until Design Output is aligned with the Design Input.
Step 5 (Medical Device)
Once the final design is ready, it is transmitted to the production facility for mass manufacturing.
Design control regulation mandates Design History File (DHF), which illustrates the linkages and relationships between all the Design Controls and help to trace all changes throughout the entire product development process.
You can take a paper-based approach or a software-based approach, especially developed for Design Control; your design history file must be traceable as well as accessible to all the team members.
Testing – Verification and Validation
Every medical device must meet the functionality, usability and reliability objectives to get a successful share in the market. Apart from these, end users also look for effectiveness and safety of devices that they use to address a particular problem or condition, which are sometimes critical to life. This is why iterative testing with verification and validation of these medical devices becomes imperative.
Verification and validation of medical devices in the design process aim to ensure that the device is aligned with the need of targeted users and it delivers the intended solution. It also helps ensure whether all the requirements are being satisfied or not. It helps to comply with regulation as well as designing the highest quality product and manufacturing processes.
Verification is internal to internal process, which evaluates whether a design output meets the specified requirements, specification or regulation defined in the design input. Whereas validation is internal to an external process, which evaluates if your product delivers benefits, according to the need of targeted users or not.
Medical devices may consist of different technology shapes, sizes, and different level of complexity. Verification and validation (V&V) activity is driven by regulatory environment and must follow international standards.
Standardized V&V activities can streamline the manufacturing process as well as enhance approval process. Additionally, automated testing, diagnostic techniques, and data collection tools can enhance the V&V process.
V&V being an iterative process consumes a lot of money, when planned poorly. A strongly-defined test strategy can help you optimize cost as well as the test period to make the product market ready on time.
The complexity of any testing strategy depends on technologies to be used and geographical target markets. The test strategy should cover at least six parameters mentioned below:
- Targeted geographies and associated standards
- Time to market
- A standard to be followed with version
- Testing Labs – internal or independent labs
- Defining the sequence of tests
- Presenting the test result
Accordingly, tests used for verification and validation process also needs to be validated. This is to ensure that you measure what you need to measure because a wrong test will deliver wrong outputs of usability and functionality. Medtech companies need an effective and well documented V&V, which complies with associated regulations.
HANDPICKED RELATED CONTENT
Implementing Medical Device Testing Strategies: A High-Level Overview
Risk Management Procedures
Risk management procedures for medical devices are enforced under internationally accepted compliance standard ISO 149711:2007 Medical Devices – “Application of Risk Management to Medical Devices”. Apart from this, risk management policies need to be incorporated across all the stages of medical device design and development and should be also associated with design control aspects as well.
Why is risk management procedure important?
Considering the complexity of medical device design, focused risk management practices help ensure usability, safety, and regulatory compliance. It is a process of identifying, controlling and preventing the failure that may cause hazards to users. It also mandates identifying associated risks. Upon reaching an unacceptable level of risk, it notifies developers to decrease at least up to an acceptable level.
How is Risk Management Procedure Followed?
The above image shows all the steps involved in the risk management process. The process starts with the identification of hazards and then associated risk is measured based on the consequences of hazards and their possibility of risk.
If the identified risk level is above the defined criteria, then it needs to be mitigated. The risk level depends on many parameters such as the device, technologies or even company’s risk acceptability policy.
Before finalizing a design, it is good practice to conduct a hazard analysis to get an idea about the standard hazards associated with the device. Primary hazard analysis can be done easily by considering major components and operational requirements such as raw materials and wastes, hardware, monitoring and control systems, human-device interfaces and services; and then identifying potential hazards associated.
There are certain hazards that must be evaluated:
- Raw materials and wastes: toxicity, flammability, and reactivity of material
- Environmental factors: sensitivity to temperature and humidity and more
- Mechanical or electronic hazards
- User device interface: hazards associated with human factors like ineffective delivery, drug administration, incorrect or incomplete information, control of life-sustaining operations
When multiple hazards are identified, they can be prioritized according to severity associated with them. Often, there is a scenario where you have insufficient information to identify hazards. In such cases, you may consider similar devices and their history for identification purpose.
During the prototype development phase, there is a need for detailed hazard and risk analysis. There are two approaches for hazard analysis: Top-down and Bottom-up approaches.
- A hazard and operability (HAZOP) and Failure Mode Effects Analysis (FMEA) are analysis techniques with a bottom-up approach. HAZOP is ideal for complex design, which involves multiple step processes. While FMEA is ideal for devices having multiple mechanical components, it is time-consuming.
- Fault tree analysis is a top-bottom approach to identifying top-level undesired output by analyzing combination and a series of lower level events.
A Medical Device Quality Management System (QMS) is a set of policies, processes, and procedures that a manufacturer of medical devices has in place to ensure that their products are safe and effective for their intended use.
The QMS includes all aspects of design and development, manufacturing, supplier management, risk management, complaint handling, clinical data, storage, distribution, product labeling, and other areas.
Medical devices have different classes based on their risk to the end user. Specific regulatory requirements are applicable depending on the device classification to ensure safe and reliable products.
A medical device QMS needs to reflect the applicable requirements of a company’s processes to help ensure regulatory compliance.
This article will discuss a medical device quality management system, its purpose, some of the main regulatory requirements, and the role of an eQMS in helping streamline processes and maintain a compliant medical device quality system.
SimplerQMS provides medical device QMS software. Our solution includes all QMS modules into one system to streamline processes, including document control, change control, employee training, audits, nonconformance, CAPA management, and much more.
If you are interested in discovering how your company can benefit from SimplerQMS, book a personalized demo and talk with our software experts.
In this article, we will be looking at the following:
- What Is a Medical Device Quality Management System (QMS)?
- Purpose of Medical Device Quality Management System
- International Standards and Regulations Governing Medical Device QMS
- Major Medical Device QMS Processes
- Role of Medical Device Quality Management Software
- Frequently Asked Questions (FAQs) About Medical Device QMS
What Is a Medical Device Quality Management System (QMS)?
A Medical Device Quality Management System (QMS) is a structured system that documents the procedures and processes implemented throughout the lifecycle of a medical device.
A medical device QMS is essential to ensure quality in developing, manufacturing, and distributing processes.
As a manufacturer of medical devices planning to sell your products in the international market, you are required to implement and maintain a quality management system compliant with applicable international and national standards, guidelines, and regulations.
This requires establishing quality processes and assigning responsibilities, resources, and timeframes for each process.
Some of the main QMS processes for medical device manufacturers include document control, change control, employee training, audit management, CAPA, supplier management, risk management, and complaint handling.
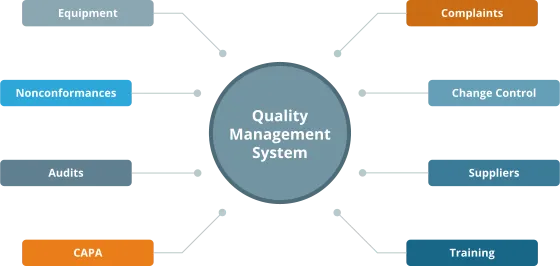
Quality Management System (QMS) can be implemented using paper documents or eQMS software.
Medical device manufacturers can manually manage their QMS if they have the resources to handle manual paperwork.
But with the increasing number and complexity of regulatory requirements, managing all quality processes relying on manual paperwork can become challenging.
Many companies are migrating to eQMS and taking advantage of the benefits, including improved workflows, reduced time and costs, and cloud-based document storage.
SimplerQMS offers an eQMS solution designed for the medical device industry to help companies streamline their quality processes and achieve compliance. We provide interconnected QMS modules for more streamlined control and management of documents, changes, employee training, nonconformances, CAPAs, suppliers, and many other processes.
Purpose of Medical Device Quality Management System
The purpose of a medical device quality management system is to ensure that products are safe and effective for their intended use.
A QMS provides a framework for consistent and documented processes throughout the product lifecycle, from design and development to post-market surveillance.
Implementing and maintaining a QMS for medical devices is critical for manufacturers seeking approval from regulatory authorities in their intended market.
In Europe, having a QMS is required to obtain the CE marking and be able to sell your device across the European Economic Area. It is necessary to achieve compliance with the applicable EU regulations, such as the Medical Device Regulation (MDR) or In Vitro Diagnostic Regulation (IVDR).
You can learn more about how to obtain CE marking for medical devices in our step-by-step guide.
The Food and Drug Administration (FDA) has set forth current good manufacturing practice (cGMP) requirements for medical device quality management systems in the United States.
These requirements are outlined in the 21 CFR Part 820, also known as Quality System Regulation (QSR). They must be implemented throughout the product lifecycle.
International Standards and Regulations Governing Medical Device QMS
There are numerous international standards and regulations governing medical device quality management systems.
This article will focus on two major international markets, Europe and the United States.
Medical device manufacturers marketing and selling in the EU will most likely comply with ISO 13485:2016 standard, MDR, and IVDR for requirements for quality management systems.
On the other hand, manufacturers selling in the US will comply with the FDA’s regulation 21 CFR Part 820, also known as Quality System Regulations (QSR).
Let’s take a brief look at the major standards and regulations that you must be aware of:
- ISO 13485:2016 Standard
- Medical Device Regulation (MDR)
- In Vitro Diagnostic Regulation (IVDR)
- FDA 21 CFR Part 820 Regulation
ISO 13485:2016 Standard
The International Organization for Standardization (ISO) is responsible for the international regulatory standard ISO 13485:2016. It specifies the requirements for a QMS that can be used by organizations involved in the life cycle of a medical device.
Manufacturers that comply with this standard demonstrate their ability to provide medical devices and related services that constantly meet customer and applicable regulatory requirements.
You can read our article to learn more about an ISO 13485:2016 compliant QMS. It discusses the purpose of the ISO 13485:2016 standard, the main QMS requirements, and the role of eQMS in supporting compliance.
And if you want to know specifically about audits, check out our ISO 13485:2016 audits article for an overview of different types of audits and the execution process.
Medical Device Regulation (MDR)
The Medical Devices Regulation (MDR), or EU 2017/745, specifies the requirements for designing, manufacturing and distributing medical devices and accessories for human use in the EU.
The MDR requires medical device manufacturers to establish and maintain a comprehensive QMS to ensure compliance.
Although not mandatory in the MDR, manufacturers often use compliance with the ISO 13485:2016 standard since it presumes compliance with QMS requirements presented in the regulation. Which can help speed up the MDR certification process.
You can learn more about this regulation by reading our article on EU MDR Quality Management System.
In Vitro Medical Device Regulation (IVDR)
The In Vitro Diagnostic Medical Devices Regulation (IVDR) is the most common way to refer to Regulation (EU) 2017/746.
The IVDR has more stringent requirements for manufacturers of in vitro diagnostic devices, including a focus on risk-based classification, performance evaluation, and post-market surveillance.
It also requires manufacturers of in vitro diagnostic devices to implement a QMS that ensures compliance with the essential principles of safety and performance.
Like the MDR, the IVDR also recognizes compliance with ISO 13485:2016 for QMS requirements.
Feel free to read our article to learn more about EU IVDR in a detailed introduction.
FDA 21 CFR Part 820 Regulation
The 21 CFR Part 820 is a regulation of the US Food and Drug Administration (FDA) that outlines the Quality System Regulation (QSR) requirements for medical device manufacturers.
This regulation specifies the minimum requirements for a medical device QMS to ensure that devices are safe and effective for their intended use.
Compliance with 21 CFR Part 820 is mandatory for all medical device manufacturers who wish to sell their products in the US market.
Our article on the FDA 21 CFR Part 820 Quality System Regulation – provides more information regarding this regulation and the role of eQMS in supporting compliance.
Additionally, other requirements must be considered when implementing a quality management system using a computer system, such as QMS software or an eQMS.
This includes ensuring the software is validated and all necessary security measures are in place to prevent unauthorized access and data tampering, among other things.
The software should also be periodically reviewed and updated to ensure it remains compliant with regulatory requirements.
Relevant requirements concerning a QMS system validation are the following:
- FDA 21 CFR Part 11
- EU GMP Annex 11
- ISPE GAMP5
- ISO 13485:2016 Clause 4.1.6
- FDA 21 CFR Part 820.70(i)
FDA 21 CFR Part 11
The 21 CFR Part 11 regulates how electronic records are created, modified, maintained, and stored.
It specifies the requirements to ensure the accuracy and security of electronic records, including the validation of open and closed systems.
This regulation also sets the guidelines for electronic signatures, which are legally binding and serve as an equivalent to traditional handwritten signatures.
You can read our article on the 21 CFR Part 11 requirements to learn more about this regulation.
EU GMP Annex 11
The EU GMP Annex 11 provides Good Manufacturing Practices (GMP) guidelines for computerized systems.
It specifies the requirements to ensure computer systems do not cause a reduction in product quality, process control, or quality assurance, nor increase the overall risk of the process.
The validation documentation must contain change control records and reports on any deviations detected during the validation process.
Having an updated inventory of all relevant systems and their GMP functionality is also important.
ISPE GAMP5
The Good Automated Manufacturing Practice 5 (GAMP5) is a guideline developed by the International Society for Pharmaceutical Engineering (ISPE) for computerized systems.
It provides a risk-based approach to the validation and maintenance of computerized systems to ensure their accuracy, reliability, and consistency.
SimplerQMS software is fully validated according to ISPE GAMP5. It is re-validated upon creating a new version or applying standard updates. This helps you to save time to focus on more value-added activities.
Our solution also complies with FDA 21 CFR Part 11 and EU GMP Annex 11 for electronic records, electronic signatures, and computerized system manufacturing guidelines.
ISO 13485:2016 Clause 4.1.6
Clause 4.1.6 in the ISO 13485:2016 establishes that the medical device manufacturer must document procedures for validating computer software used in the QMS before initial use and after any changes to the software.
The specific approach and activities for software validation and revalidation should correspond to the risk associated with its use.
FDA 21 CFR Part 820.70(i)
The 21 CFR Part 820 section 70(i) also specifies that manufacturers must validate computer software for its intended use according to an established protocol.
All software changes must be validated before approval and issuance, documenting all validation activities and results.
Major Medical Device QMS Processes
We will focus only on some of the major medical device QMS processes in accordance with international standards and regulations – the ISO 13485:2016 standard and the FDA 21 CFR Part 820 regulation.
Among several QMS processes, some of them are mentioned in both ISO 13485:2016 and FDA 21 CFR Part 820. This section will briefly discuss only some of these quality processes and their requirements.
NOTE
Please note that many more standards, guidelines, and regulations may apply to your business. Always refer to the applicable requirements for official information.
According to these, the major medical device quality management requirements can be summarized as given in the following subsections:
- Document Control
- Training Management
- Audit Management
- CAPA Management
Document Control
Your medical device quality management system should include processes and procedures for managing the many different documents that move within your company, amongst sponsors, investors, and regulatory agencies throughout the lifecycle of your product.
This entire process is referred to as document control.
Over the past decade, many manufacturers have migrated from traditional paper-based QMS to automated medical device quality management software with robust document control capabilities.
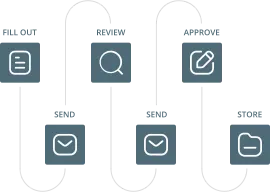
Such software automatically collects data, routes documents for review and approval processes of various documents, and stores them in a single storage location.
QMS software, such as SimplerQMS, provides automatic version control, which ensures that only the latest version of the documents is in circulation.
SimplerQMS offers pre-configured workflows to simplify document control. You can easily create documents using forms or document templates and route them for review as often as needed. After the final version of a document is approved and released, employees are automatically notified.
Moreover, if you want to know more about document control, read our articles on Quality Management System Documentation and Medical Device Document Control.
Training Management
International regulations and standards such as the FDA 21 CFR 820 and ISO 13485:2016 require medical device manufacturers to have specifically trained and competent employees doing their job.
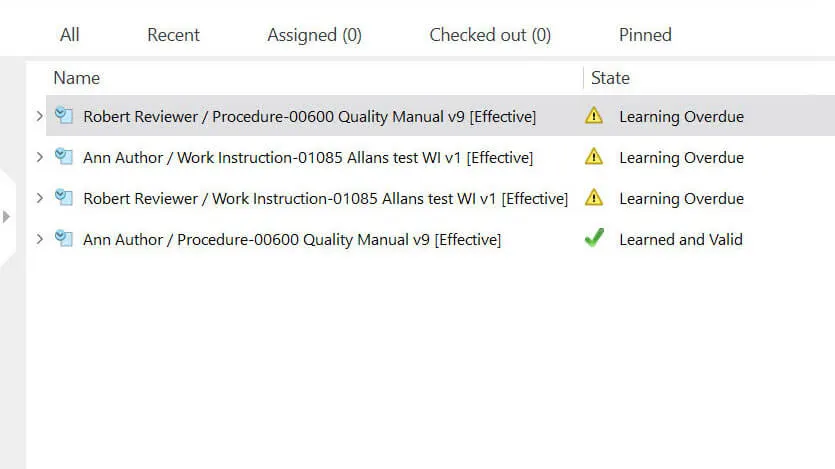
This means that all training procedures must be constantly evaluated, and all employee training records must be appropriately maintained.
For instance, changes to the manufacturing process of medical devices must be learned by all personnel involved. This means companies must provide training and assess the training effectiveness to ensure employees have the skill to perform their duties.
SimplerQMS provides training management software to help streamline the entire training process. From assigning training tasks to specific employees, distributing training material, and tracking all training activities, to providing quizzes to measure training effectiveness.
Audit Management
The FDA 21 CFR 820 and ISO 13485:2016 require medical device manufacturers to establish a proper audit process and conduct regular quality audits.
This is to ensure that the medical device quality management system as a whole is compliant.
Companies need to properly audit all the applicable requirements for a medical device to ensure compliance regarding product safety and efficacy.
The audit management module by SimplerQMS facilitates the entire audit process. You can schedule activities, set due dates, send automatic notifications to the right personnel, and track employee performance related to their assignments.
Whenever an audit finding occurs, you will be able to easily link it to a nonconformance case, supplier corrective action request (SCAR), or escalate to corrective action and preventive action (CAPA).
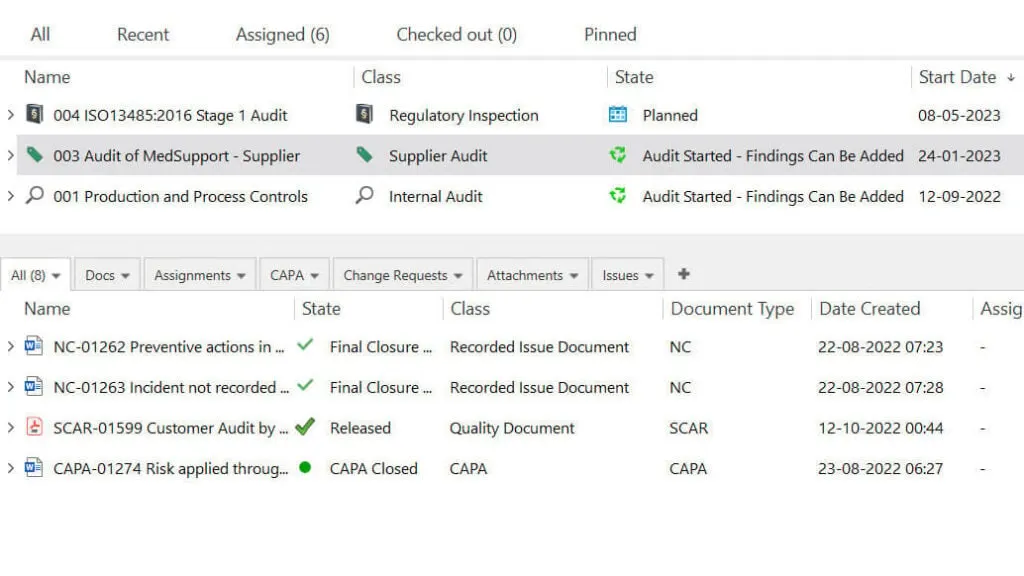
You can read our article on medical device audits to learn more about the different audits in the medical device industry.
CAPA Management
As per the FDA 21 CFR 820 and the ISO 13485:2016 requirements, all manufacturers of medical devices must implement the process of managing corrective actions and preventive actions (CAPA).
The CAPA process is essential to resolve and prevent issues that are likely to impact the quality of the product, such as nonconformances, audit findings, complaints, etc. Additionally, all actions must be documented adequately and resolved in a timely manner.
Key CAPA process steps are illustrated below.
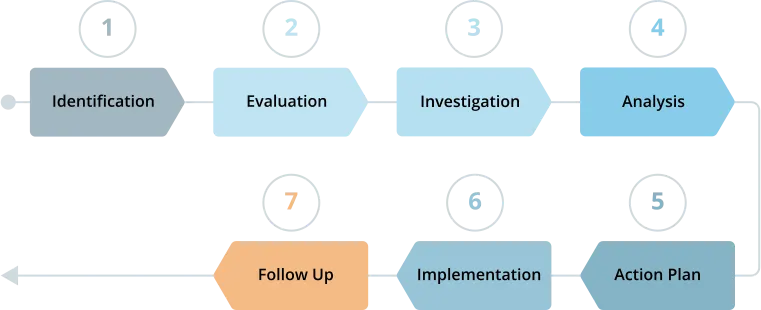
With the SimplerQMS CAPA management software, you can streamline the entire CAPA process by automating data collection, routing, follow-ups, notifications, approvals, and escalation of overdue activities.
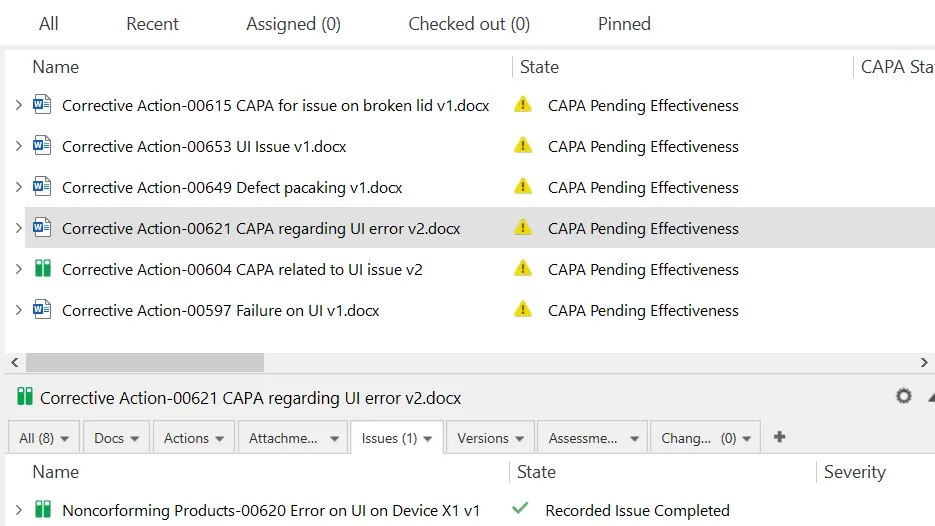
You can quickly initiate CAPA forms directly from issues, such as nonconformances or deviations, audit findings, and customer complaints.
The system automatically enters data from the metadata in the CAPA form to reduce human error. It also enables you to relate documents in scope and eliminates the need to circulate documents or chase signatures manually.
Check out our article to better understand what CAPA is in the medical device industry.
In addition to the quality processes mentioned in this section, several other processes are required as per standards and regulations, such as ISO 13485:2016 and FDA 21 CFR Part 820.
Some of these include:
- Change management
- Complaint management
- Nonconformance management
- Equipment management
- Supplier management
This article does not cover all sections above. Companies should always verify which processes are relevant to them and comply with the specific requirements that apply to their business.
Role of Medical Device Quality Management Software
A medical device quality management system is essential for ensuring products are safe and effective for their intended use.
It is a requirement of many standards and regulations that medical device companies have a compliant QMS.
Companies can have a paper-based or hybrid QMS by implementing a manual system. The latter approach may be adequate for small companies with adequate resources, but it can be time-consuming, prone to errors, and challenging to maintain compliance with regulatory requirements.
Electronic QMS provides an alternative solution that offers greater efficiency and accuracy, making it a robust option for numerous companies.
Medical device manufacturers can use such software to manage quality processes throughout the product lifecycle, from design and development to manufacturing, labeling, distribution, and corrective and preventive actions.
The benefits of medical device quality system software include the following:
- Ensure compliance with regulatory requirements using pre-configured workflows
- Improve customer satisfaction by addressing issues in a timely manner
- Save time with automated documentation processes
- Ensure traceability with automated data collection and flexible linking capabilities
- Improve communication and collaboration across departments
- Reduce the risk of inaccuracies by mitigating human errors associated with manual data entry
SimplerQMS provides an eQMS designed for the medical device industry. Our software streamlines quality processes and helps companies in achieving compliance with regulatory requirements.
We offer robust document management capabilities that simplify document creation, versioning, review, approval, and search within one secure location.
Our QMS modules are interconnected and allow for easy linking of complaints, CAPAs, training, and other quality management processes.
The SimplerQMS system is fully validated in compliance with ISPE GAMP5 and undergoes revalidation for each new version or standard update.
It also complies with FDA 21 CFR Part 11, which sets the guidelines for electronic signatures and electronic records, and EU GMP Annex 11, which provides good manufacturing guidelines for computerized systems.
Now that you are aware of the benefits of an eQMS in terms of compliance and streamlined workflows, it is important to consider the associated time and cost savings.
Understanding these factors will help you make an informed decision about whether to allocate a budget for an eQMS and move forward with implementation.
We recommend downloading our eQMS Business Case template. This tool will help you provide decision-makers with concrete evidence of the benefits of implementing an eQMS and make a compelling case for the investment.
Frequently Asked Questions (FAQs) About Medical Device QMS
What Are the Two Main Quality Systems Adopted by Medical Device Manufacturers?
The two main quality systems medical device manufacturers adopt are the FDA 21 CFR 820 and the ISO 13485:2016.
The FDA 21 CFR 820 sets the requirements for quality management systems in the US, while ISO 13485:2016 is an international regulatory standard that outlines the requirements for QMS for medical devices in the EU and other countries.
What is the Best Quality Management Software for Medical Devices?
The best medical device QMS software for your company will depend on various factors, such as the size and complexity of your company, applicable specific requirements, available time, and budget.
QMS software solutions are available for Life Science companies in the medical device, pharmaceutical, biotechnological, and other industries. Each solution has unique features and qualities, so it is essential to consider your company’s specific needs and regulatory requirements.
The chosen software should be easy to use and provide good customer support to help with any doubts or problems that may arise. For a more straightforward evaluation, there is a compiled list of the 6 best QMS software solutions for Life Sciences options available.
Additionally, our QMS software comparison template can be used to compare shortlisted options and select the best one for your company or as a reference to develop a list of requirements for quality management software.
What Is the ISO 13485:2016 Quality Management System?
The ISO 13485:2016 QMS standard specifies requirements for a quality management system where an organization needs to demonstrate its ability to provide medical devices and related services that constantly meet customer and applicable regulatory requirements.
You can learn more about this international regulatory standard in our article on ISO 13485:2016 Compliant QMS.
When Is a Quality Management System (QMS) Required for Medical Devices?
Medical device companies require a Quality Management System (QMS) when registering devices for marketing and selling.
Compliance with FDA 21 CFR Part 820 is required for operating in the US market, and medium to high-risk devices must go through the 510(K) process.
In Europe, obtaining the CE marking is required for marketing and selling devices, and certification to ISO 13485:2016 can be used to comply with the QMS requirements of the MDR or IVDR.
When Should I Start Building a Medical Device QMS?
Timing is crucial when building a QMS.
Starting the QMS during the early prototype phase or idea testing can put unnecessary constraints on development. Sufficient research and knowledge should be obtained before building the QMS.
However, it is also not advisable to wait too long to build the QMS, as it takes time to develop a suitable system.
The ideal time to start building a medical device QMS is when enough information and knowledge have been gathered to ensure an efficient QMS development process. This can be around the Design and Development phase.
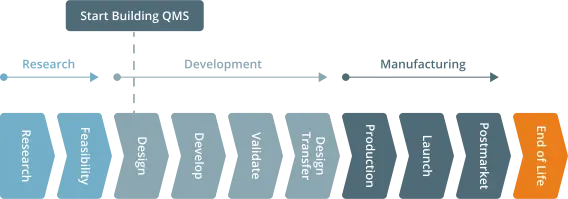
How Long Does It Take to Fully Implement Medical Device QMS?
It typically takes 3 to 9 months to fully establish a medical device QMS. Still, medical device consultants suggest starting preparations at least 18-24 months before commercialization.
Using a document template for processes and protocols is advantageous and can help speed up the implementation.
SimplerQMS offers a customizable document template package based on Life Science requirements, such as ISO 13485:2016, to simplify the creation of documents and streamline your quality documentation processes by managing forms and templates effectively.
Final Thoughts
The medical device quality management system is a regulatory requirement for manufacturers of medical devices. The quality management system covers all aspects of the medical device’s lifecycle.
It is a regulated framework comprising strategies and procedures for the design, clinical data, manufacturing, storage and distribution, supplier management, complaints, labeling, and other aspects of your medical devices.
SimplerQMS medical device QMS software streamlines your quality management processes by managing routine documentation tasks, enabling you to achieve greater efficiency while making compliance easier.
If you are looking for a comprehensive QMS software solution to manage quality processes more effectively, schedule a demo presentation to see SimplerQMS in action and talk to our experts.
Product development process: The 6 stages (with examples)
Summary
The product development process is a six-stage plan that involves taking a product from initial concept to final market launch. This process helps break down tasks and organize cross-departmental collaboration. Find out how to implement a process of your own.
Product development is both an exciting and difficult endeavor. From initial ideation to research and prototyping, no two product launches are the same. However, there’s a general process that can help you get started with the product development process.
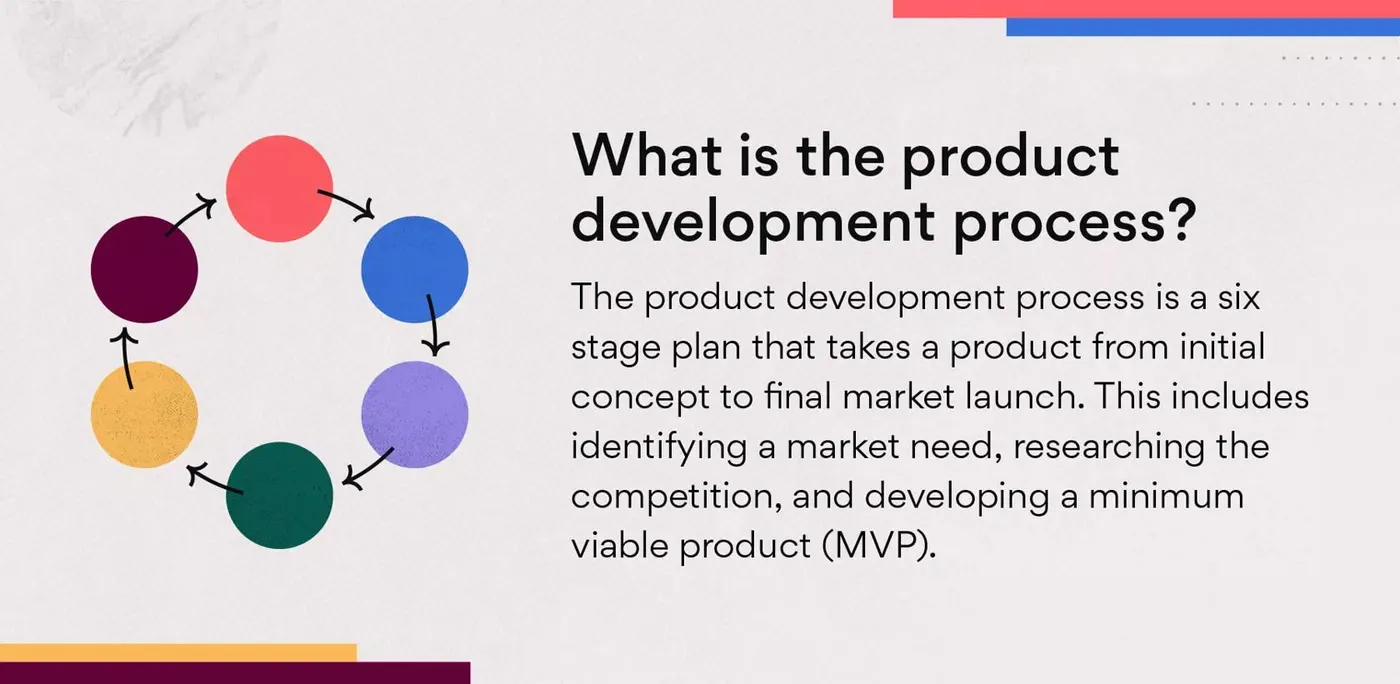
The product development process describes the six steps needed to take a product from initial concept to final market launch. This includes identifying a market need, researching the competition, ideating a solution, developing a product roadmap, and building a minimum viable product (MVP).
The product development process has evolved in recent years and is now commonly used by dividing each step into six separate phases. This helps better organize the process and break individual deliverables into smaller tasks.
What is product development?
Product development is the process of building a new product, from ideation all the way through launch. Product development begins with those initial brainstorming sessions, when you’re just discussing a budding idea. From there, the process is creative but strategic, and you may have seen it done in a million different ways. But without clear organization, it can be hard to mesh creativity and strategy effectively. Which is where the product development process comes in—a six step framework to help you standardize and define your work.
Create a product development templateIs product development the same as product management?
Though they sound almost identical, there's an important difference between product development and product management. Product development describes the process of building a product, where product management is the overseeing of that work. It's a slight difference, but an important distinction. A product manager, who often oversees a team that is in the product development process, will lead product management.
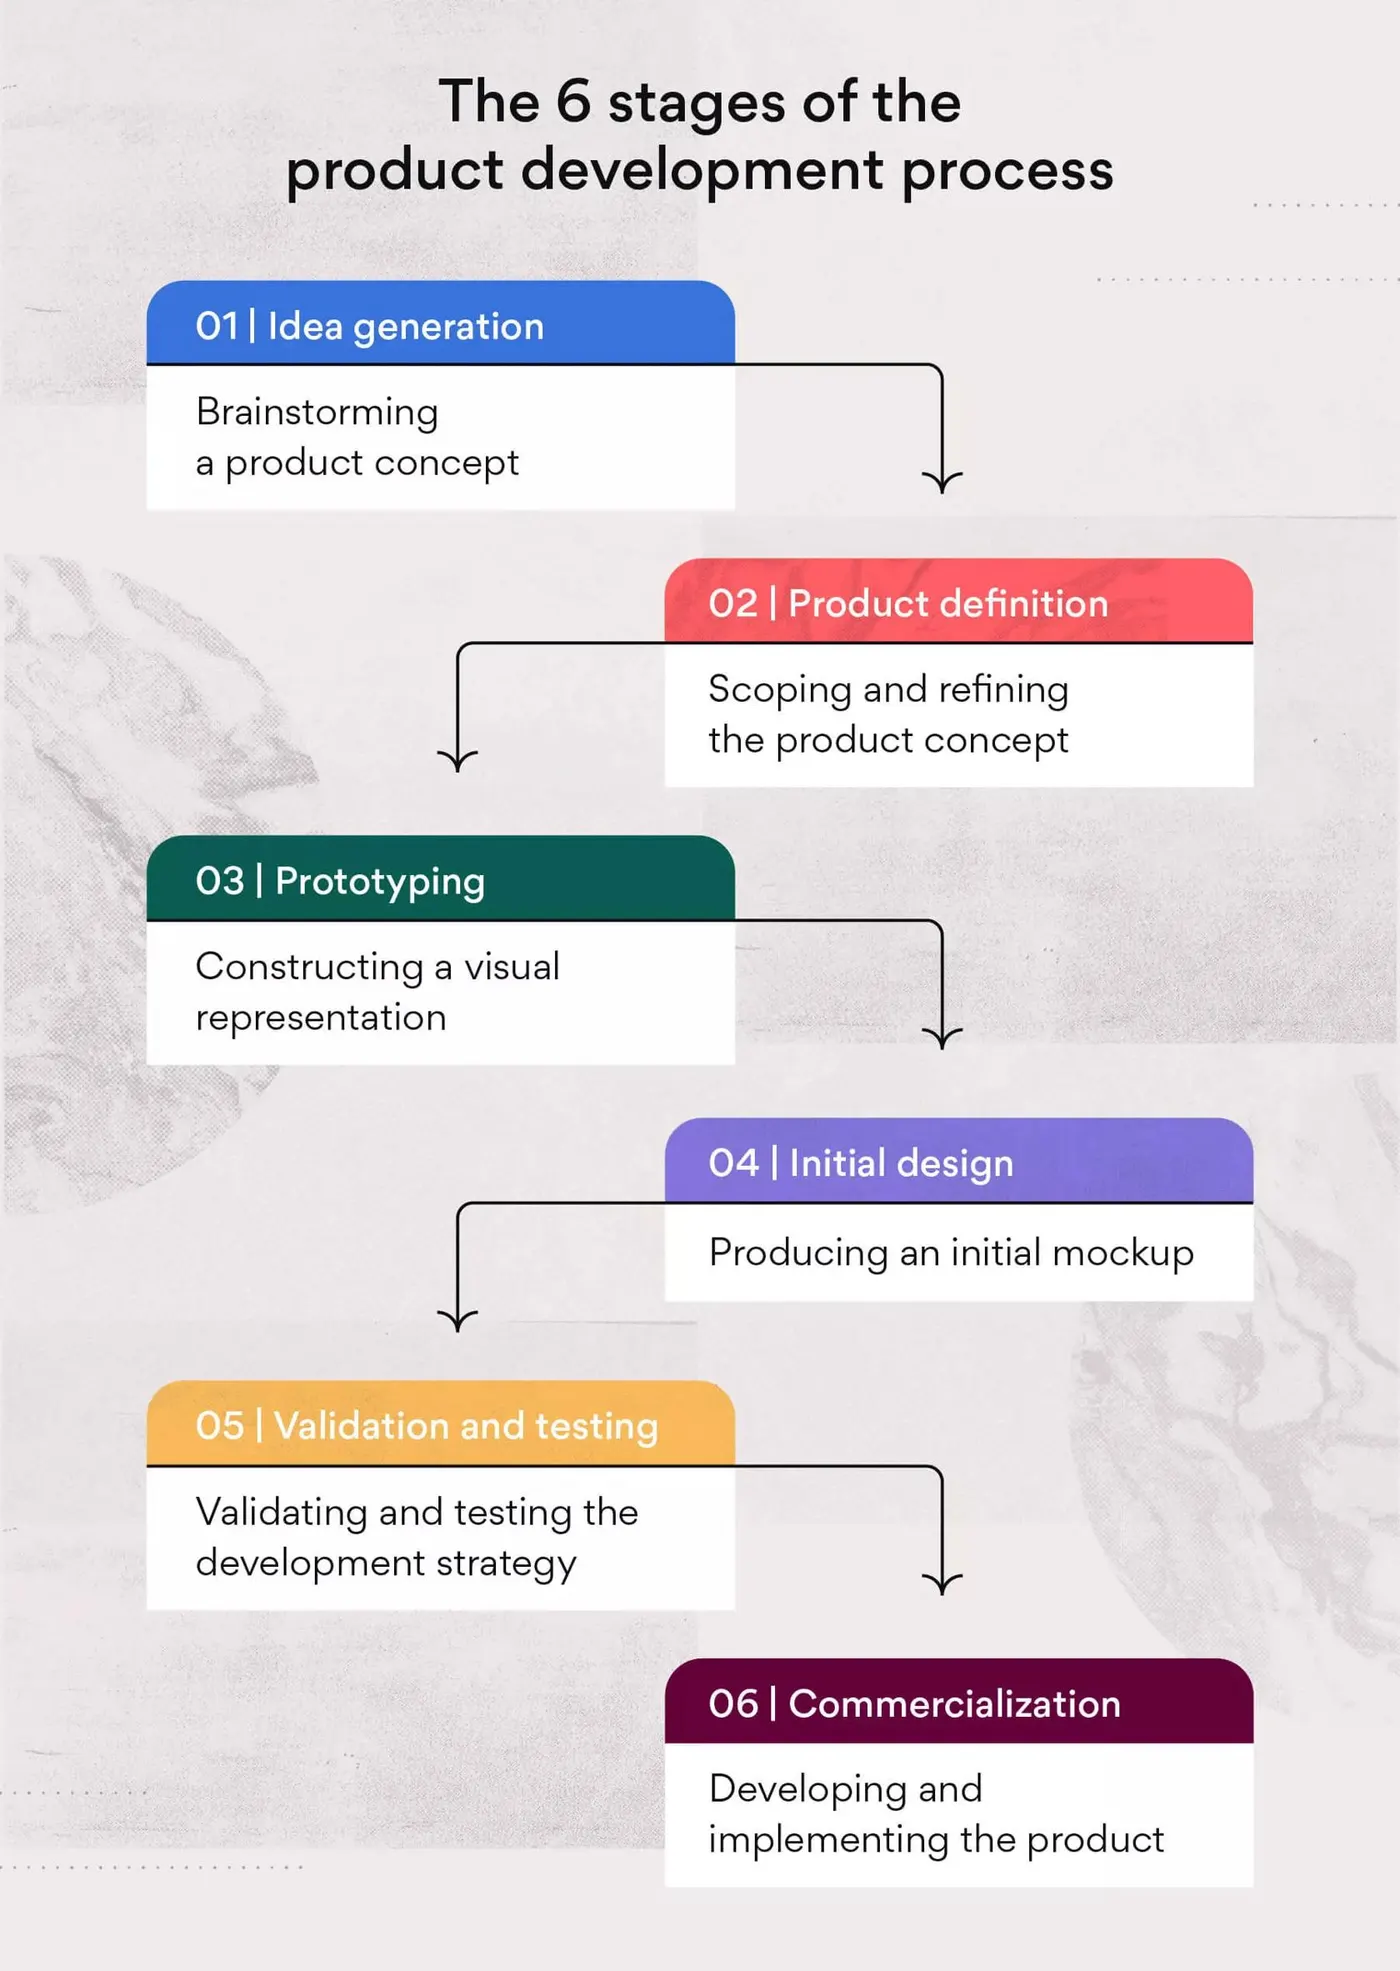
The 6 stages of product development
Not only does the product development process help simplify a launch, but it also encourages cross-team collaboration with teamwork and communication at the forefront of the process.
Let’s dive into the product life cycle and define the six product phases. All of which can help you successfully launch your next product.
1. Idea generation (Ideation)
The initial stage of the product development process begins by generating new product ideas. This is the product innovation stage, where you brainstorm product concepts based on customer needs, concept testing, and market research.
It’s a good idea to consider the following factors when initiating a new product concept:
-
Target market: Your target market is the consumer profile you’re building your product for. These are your potential customers. This is important to identify in the beginning so you can build your product concept around your target market from the start.
-
Existing products: When you have a new product concept, it’s a good idea to evaluate your existing product portfolio. Are there existing products that solve a similar problem? Or does a competitor offer a product that doesn’t allow for market share? And if yes, is your new concept different enough to be viable? Answering these questions can ensure the success of your new concept.
-
Functionality: While you don’t need a detailed report of the product functionality just yet, you should have a general idea of what functions it will serve. Consider the look and feel of your product and why someone would be interested in purchasing it.
-
SWOT analysis: Analyzing your product strengths, weaknesses, opportunities, and threats early in the process can help you build the best version of your new concept. This will ensure your product is different from competitors and solves a market gap.
-
SCAMPER method: To refine your idea, use brainstorming methods like SCAMPER, which involves substituting, combining, adapting, modifying, putting to another use, eliminating, or rearranging your product concept.
To validate a product concept, consider documenting ideas in the form of a business case. This will allow all team members to have a clear understanding of the initial product features and the objectives of the new product launch.
2. Product definition
Once you’ve completed the business case and discussed your target market and product functionality, it’s time to define the product. This is also referred to as scoping or concept development, and focuses on refining the product strategy.
During this stage, it’s important to define specifics including:
-
Business analysis: A business analysis consists of mapping out distribution strategy, ecommerce strategy, and a more in-depth competitor analysis. The purpose of this step is to begin building a clearly defined product roadmap.
-
Value proposition: The value proposition is what problem the product is solving. Consider how it differs from other products in the market. This value can be useful for market research and for developing your marketing strategy.
-
Success metrics: It’s essential to clarify success metrics early so you can evaluate and measure success once the product is launched. Are there key metrics you want to look out for? These could be basic KPIs like average order value, or something more specific like custom set goals relevant to your organization.
-
Marketing strategy: Once you’ve identified your value proposition and success metrics, begin brainstorming a marketing strategy that fits your needs. Consider which channels you want to promote your product on—such as social media or a blog post. While this strategy may need to be revised depending on the finished product, it’s a good idea to think about this when defining your product to begin planning ahead of time.
Once these ideas have been defined, it’s time to begin building your minimum viable product (MVP) with initial prototyping.
3. Prototyping
During the prototyping stage, your team will intensively research and document the product by creating a more detailed business plan and constructing the product.
These early-stage prototypes might be as simple as a drawing or a more complex computer render of the initial design. These prototypes help you identify areas of risk before you create the product.
During the prototyping phase, you will work on specifics like:
-
Feasibility analysis: The next step in the process is to evaluate your product strategy based on feasibility. Determine if the workload and estimated timeline are possible to achieve. If not, adjust your dates accordingly and request help from additional stakeholders.
-
Market risk research: It’s important to analyze any potential risks associated with the production of your product before it’s physically created. This will prevent the product launch from being derailed later on. It will also ensure you communicate risks to the team by documenting them in a risk register.
-
Development strategy: Next, you can begin working through your development plan. In other words, know how you’ll be assigning tasks and the timeline of these tasks. One way you can plan tasks and estimate timeline is by using the critical path method.
-
MVP: The final outcome of the prototyping stage is a minimum viable product. Think of your MVP as a product that has the features necessary to go to launch with and nothing above what’s necessary for it to function. For example, an MVP bike would include a frame, wheels, and a seat, but wouldn’t contain a basket or bell. Creating an MVP can help your team execute the product launch quicker than building all the desired features, which can drag launch timelines out. Desired features can be added down the road when bandwidth is available.
Now it’s time to begin designing the product for market launch.
Read: Stage Gate process: How to prevent project riskCreate a product development template4. Initial design
During the initial design phase, project stakeholders work together to produce a mockup of the product based on the MVP prototype. The design should be created with the target audience in mind and complement the key functions of your product.
A successful product design may take several iterations to get just right, and may involve communicating with distributors in order to source necessary materials.
To produce the initial design, you will:
-
Source materials: Sourcing materials plays an important role in designing the initial mockup. This may entail working with various vendors and ordering materials or creating your own. Since materials can come from various places, you should document material use in a shared space to reference later if needed.
-
Connect with stakeholders: It’s important to keep tight communication during the design phase to verify your initial design is on the right track. Share weekly or daily progress reports to share updates and get approvals as needed.
-
Receive initial feedback: When the design is complete, ask senior management and project stakeholders for initial feedback. You can then revise the product design as needed until the final design is ready to be developed and implemented.
Once the design is approved and ready to be handed off, move onto the validation phase for final testing before launching the product.
5. Validation and testing
To go live with a new product, you first need to validate and test it. This ensures that every part of the product—from development to marketing—is working effectively before it’s released to the public.
To ensure the quality of your product, complete the following:
-
Concept development and testing: You may have successfully designed your prototype, but you’ll still need to work through any issues that arise while developing the concept. This could involve software development or the physical production of the initial prototype. Test functionality by enlisting the help of team members and beta testers to quality assure the development.
-
Front-end testing: During this stage, test the front-end functionality for risks with development code or consumer-facing errors. This includes checking the ecommerce functionality and ensuring it’s stable for launch.
-
Test marketing: Before you begin producing your final product, test your marketing plan for functionality and errors. This is also a time to ensure that all campaigns are set up correctly and ready to launch.
Once your initial testing is complete, you’re ready to begin producing the final product concept and launch it to your customer base.
6. Commercialization
Now it’s time to commercialize your concept, which involves launching your product and implementing it on your website.
By now, you’ve finalized the design and quality tested your development and marketing strategy. You should feel confident in your final iteration and be ready to produce your final product.
In this stage you should be working on:
-
Product development: This is the physical creation of your product that will be released to your customers. This may require production or additional development for software concepts. Give your team the final prototype and MVP iterations to produce the product to the correct specifications.
-
Ecommerce implementation: Once the product has been developed and you’re ready to launch, your development team will transition your ecommerce materials to a live state. This may require additional testing to ensure your live product is functioning as it was intended during the previous front-end testing phase.
Your final product is now launched. All that’s left is to measure success with the initial success metrics you landed on.
Product development process examples
Now that you understand the six stages of the product life cycle, let’s look at real world examples of some of the most successful product development strategies of iconic startups to inspire your own.
Example 1: How Figma expanded their product features
-
Originally started in 2012, Figma was the first professional-grade UI design tool built entirely in the browser. Today, Figma has grown into the leading competitor for design web applications.
Their mission is to make design accessible to more people and help them bring their creativity to life. They’ve shown this by continuously adding new product features—like multiple flow capabilities, a brainstorming timer, and an interactive whiteboard—coordinating successful software releases, and building trust through transparency.
Read our case study to learn how Figma uses Asana to manage development backlogs.
Example 2: How Uber solved a market gap
-
While today we think of Uber as the biggest ride-sharing service, that wasn’t always the case. They too started with a compelling product strategy that made them into the innovative company they are today.
Uber’s strategy began by solving a gap in the existing taxi industry: creating an easier ride-hailing process with simplified payment processing. But they didn’t stop there: they continued to innovate their product portfolio by developing ride tiers ranging from luxury to budget-friendly.
While each situation varies slightly, with the right product strategy, you too can create an innovative portfolio.
Who is part of the product development team?
There are many stakeholders and various teams that assist with the product development process. The main leader is the product manager, who oversees all product tasks related to ideation, research, development, and product launch.
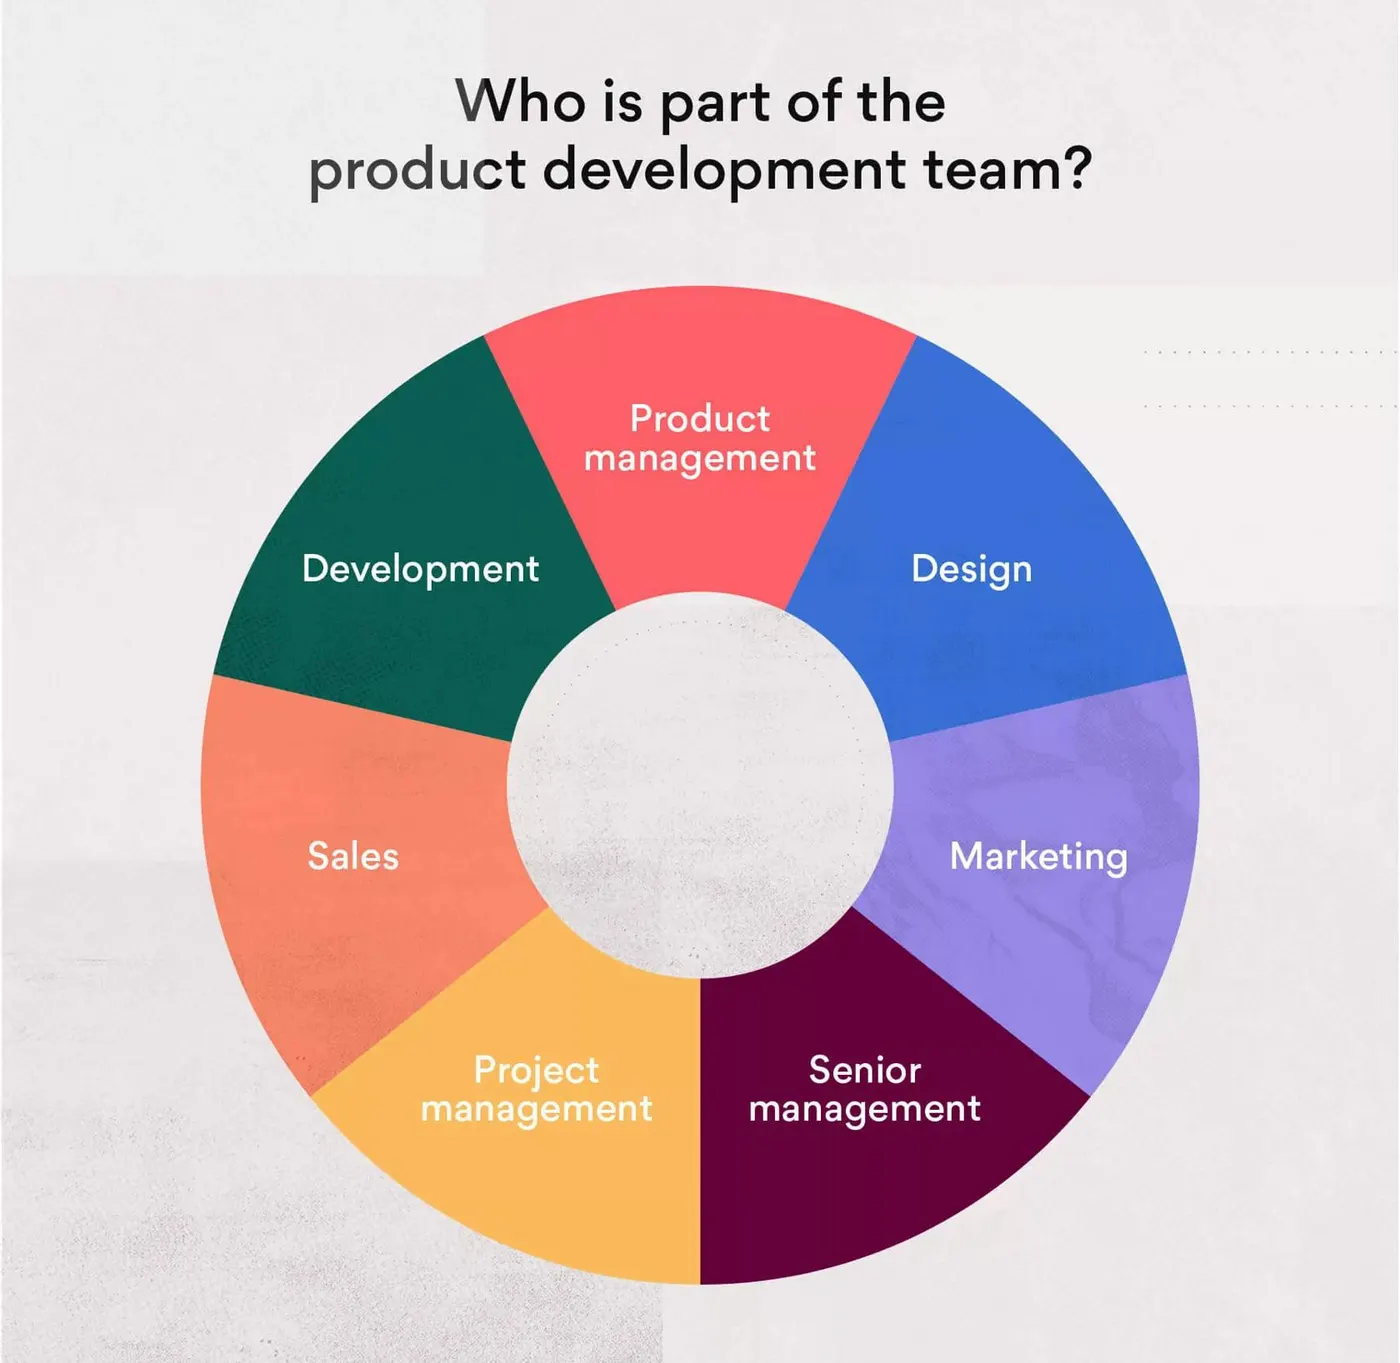
Additional important stakeholders include:
-
Product management: A product manager oversees all areas of the product life cycle and works to bridge communication gaps between various internal and external teams. The product manager works to initiate new product launches and initiates product ideation and market research.
-
Project management: A project manager may be involved in the product development process to assist with cross-departmental communication. They might also assist with task delegation and goal tracking.
-
Design: The design team helps during the prototyping and designing phase to support the visual product concept. It’s important to connect product designs with brand guidelines and UX best practices.
-
Development: The development team helps with the implementation of the product on your website. Most commonly, a team of developers will work together to build the new product offering depending on the complexity of the concept.
-
Marketing: The marketing team will assist with developing the marketing strategy and testing it before the product goes live. They will also measure the success of the marketing initiatives.
-
Sales: The product manager works with the sales team to come up with an effective strategy and report on success metrics after the product has been implemented.
-
Senior management: Senior stakeholders may need to give final approval before the product can go to launch.
In addition to these important roles, other teams that may be involved are finance, engineering, and any other related stakeholders. All of which can play a role in the process depending on the complexity of the concept.
Read: Product manager vs. project manager: What’s the difference?The process that simplifies product development
The right product development process can help you streamline each step with organized tasks and team collaboration. The six stages outlined above will get your team through all steps of the process, from initial idea screening to the development phase.
But you might need help along the way. Coordinate tasks and organize your product development process with Asana for product management. Asana can help get your products to market faster by tracking workload and simplifying planning.
Raw Materials: Definition, Accounting, and Direct vs. Indirect
What Are Raw Materials?
Raw materials are materials or substances used in the primary production or manufacturing of goods. Raw materials are commodities that are bought and sold on commodities exchanges worldwide. Businesses buy and sell raw materials in the factor market because raw materials are factors of production.
KEY TAKEAWAYS
- Raw materials are the input goods or inventory that a company needs to manufacture its products.
- Examples of raw materials include steel, oil, corn, grain, gasoline, lumber, forest resources, plastic, natural gas, coal, and minerals.
- Raw materials can be direct raw materials, which are directly used in the manufacturing process, such as wood for a chair.
- Indirect raw materials are not part of the final product but are instead used comprehensively in the production process.
- The value of direct raw materials inventory appears as a current asset on the balance sheet.
Raw Materials
Understanding Raw Materials
Raw materials are used in a multitude of products and can take many different forms. Raw materials are the input goods or inventory that a company needs to manufacture its products. For example, the steel used to manufacture vehicles would be a raw material for an automobile manufacturer. For manufacturing companies, raw materials inventory requires detailed budgeting and a special framework for accounting on the balance sheet and income statement.
Raw materials are often related to natural resources. For this reason, manufacturing companies may be at the disposal of mother nature regarding the availability to secure raw materials. In the same light, manufacturing companies may not want to directly invest in extracting the raw materials. For example, consider how a company that relies on oil or plastics often does not own the drilling rig that extracts the raw materials from the group.
Examples of raw materials include steel, oil, corn, grain, gasoline, lumber, forest resources, plastic, natural gas, coal, and minerals.
Accounting for Raw Materials
Manufacturing companies take special steps to account for raw materials inventory. This includes three distinct inventory classifications on their balance sheet compared to just one for non-manufacturers. The current assets portion of the balance sheet represents the assets that are likely to be used up in less than one year and include:
- Raw materials inventory
- Work-in-process
- Finished goods
All inventory, including raw materials inventory, should be valued at its comprehensive cost. This means its value includes shipping, storage, and preparation. The typical journal entries in an accrual accounting system for the initial purchases of raw materials inventory include a credit to cash and a debit to inventory. Debiting inventory increases current assets, and crediting cash will reduce cash assets by the inventory amount.
When a company uses raw materials inventory in production, it transfers them from the raw materials inventory to the work-in-process inventory. When a company completes its work-in-process items, it adds the finished items to the finished goods inventory, making them ready for sale.
Direct vs. Indirect Raw Materials
In some cases, raw materials may be divided into two categories: direct and indirect. Whether a raw material is direct or indirect will influence where it is reported on the balance sheet and how it is expensed on the income statement.
Direct Raw Materials
Direct raw materials are materials that companies directly use in the manufacturing of a finished product, such as wood for a chair. Direct raw materials are placed in current assets and are expensed on the income statement within cost of goods sold.
Manufacturing companies must also take added steps over non-manufacturing companies to create more detailed expense reporting on costs of goods sold. Direct raw materials are typically considered variable costs since the amount used depends on the quantities being produced.
Direct Raw Materials Budget
A manufacturer calculates the amount of direct raw materials it needs for specific periods to ensure there are no shortages. By closely tracking the amount of direct raw materials bought and used, an entity can reduce unnecessary inventory stock, potentially lower ordering costs, and reduce the risk of material obsolescence.
Raw materials may degrade in storage or become unusable in a product for various reasons. In this case, the company declares them obsolete. If this occurs, the company expenses the inventory as a debit to write-offs and credits the obsolete inventory to decrease assets.
Indirect Raw Materials
Indirect raw materials are not part of the final product but are instead used comprehensively in the production process. Indirect raw materials will be recorded as long-term assets. They can fall under several categories within long-term assets, including selling, general, and administrative (SG&A) or property, plant, and equipment (PP&E).
Long-term assets usually follow a depreciation schedule that allows them to be expensed over time and matched with revenue they help produce. For indirect raw materials, depreciation timing will usually be shorter than other long-term assets like a building expensed over several years.
Companies may make an entirely independent budget specific for raw materials when preparing its annual manufacturing or production budget.
Types of Raw Materials
Raw materials can be classified in several ways, but one common classification is the nature of how the good is extracted. These types include:
- Mined raw materials extracted from the earth, such as ores, stones, metals, minerals, lime, sand, soil, oil, and coal.
- Plant-based raw materials come from trees or plants, including fruits, nuts, flowers, vegetables, resins, wood, cotton, and latex.
- Animal-based raw materials are extracted from animals such as milk, meat, furs, leather, and wool.
Raw materials are often segregated into these three categories as each type often entails very different investments to procure the raw materials. For example, the operations of a farm are substantially different from an oil drilling rig; companies that require both raw materials must be mindful of how to most efficiently source the materials.
Example of Raw Materials
Consider a company manufactures tables and chairs. Below are the materials used in production:
- Direct raw materials: timber, wood, cushions, padding for the chairs, cloth fabric to cover the chairs
- Indirect raw materials: fittings, nails, wood glue, equipment for workers
Since the wood, padding, and fabric can be directly tied to the production of the tables and chairs, they are considered direct raw materials. When calculating the cost on a per-unit basis, the direct raw materials could be traced to each unit.
The glue, nails, and worker equipment would likely be considered indirect materials since the quantities used would not be significant, nor would they be directly tied to each unit produced. These types of costs would likely be allocated to a product via manufacturing overhead.
What Are Raw Materials in Food?
Raw materials in food can be standalone items like meats, milk, fruits, and vegetables. They can also refer to the ingredients that go into a food item or recipe. For instance, milk is a raw material used in the production of cheese and yogurt.
Is Water a Raw Material?
Yes, water can be thought of as a raw material that is used in a wide range of products and production processes, from beverages to agriculture to industrial uses.
What Is the Difference Between Inventory and Raw Materials?
In many cases, raw materials are a type of inventory. It represents goods on a balance sheet that have not yet been converted to work-in-progress or a finished product. Companies often buy, acquire, or extract raw materials for use, then report raw materials as an asset. Then, as the company uses raw materials in the production of finished goods, it converts the raw materials into products it can sell to consumers.
How Do Companies Get Raw Materials?
Companies are often very strategic in how they obtain raw materials. For many, it makes most financial sense to work closely with a reliable third-party that collects and distributes the raw materials. In other cases, it may be more efficient for companies to establish production facilities that directly collect the raw materials. The former path incurs ongoing operating expenses, while the latter path results in arguably less operating costs but greater upfront capital investment.
The Bottom Line
Raw materials are the inputs used in the production process to create finished products that are ready to sell to consumers. This makes raw materials a vital piece of the global economy and international trade. Having natural resources that can serve as raw materials can boost exports and help a country grow its GDP. Businesses and investors can engage in raw trading markets through commodities markets.
What Is Manufacturing?
The term manufacturing refers to the processing of raw materials or parts into finished goods through the use of tools, human labor, machinery, and chemical processing.
Manufacturing allows businesses to sell finished products at a higher cost than the value of the raw materials used. Large-scale manufacturing allows for goods to be mass-produced using assembly line processes and advanced technologies as core assets. Efficient manufacturing techniques enable manufacturers to take advantage of economies of scale, producing more units at a lower cost.
KEY TAKEAWAYS
- Manufacturing is the process of turning raw materials or parts into finished goods through the use of tools, human labor, machinery, and chemical processing.
- Most products were handmade using human labor and basic tools before the Industrial Revolution.
- The Industrial Revolution led to mass production, assembly line manufacturing, and the use of mechanization to manufacture larger quantities of goods at a lower cost.
- Financial analysts study the ISM Manufacturing Report each month as a potential early indicator of the economy's health and where the stock market might be headed.
- Manufacturing can be defined and classified under different types, processes, or techniques.
Understanding Manufacturing
Manufacturing is an integral and huge part of the economy. It involves the processing and refinement of raw materials, such as ore, wood, and foodstuffs, into finished products, such as metal goods, furniture, and processed foods.
Converting these raw materials into something more useful adds value. This added value increases the price of finished products, making manufacturing a very profitable part of the business chain. Some people specialize in the skills required to manufacture goods, while others provide the funds that businesses need to purchase the tools and materials.
As noted above, efficiency in manufacturing can lead to higher productivity and cost savings. Manufacturers are able to accomplish this if they are able to:
- Reduce redundancies
- Improve the quality of work
- Update equipment and procedures
- Set realistic goals
- Streamline intake, supply chain, and distribution channels1
Manufacturing is often reported on by the conference board and is well examined by economists.
Types of Manufacturing
How products are manufactured has changed over time. People have historically manufactured goods using raw materials. And in certain cases, they still do. Hand manufacturing involves the use of basic tools through more traditional processes. This form of manufacturing is often associated with decorative art, textile production, leatherwork, carpentry, and some metalwork.
Handmade goods are labor-intensive and require a lot of time. In some cases, they can command a high price, depending on the supplier and the type of goods. For instance, one-of-a-kind handmade fashion items can be sold at a higher price compared to something mass-produced. There are cases, though, where people who make goods using these techniques can be exploited, especially where labor laws are lax and demand for jobs is high.
Larger businesses use mechanization to mass-produce items on a much grander scale. This process involves the use of machines, which means that the manual manipulation of materials isn't necessarily required. Very little human capital is needed in the production process, although highly skilled individuals may be required to operate and ensure that machinery is running properly.
Additive Manufacturing
This type of manufacturing is commonly referred to as 3D printing. It involves the use of layers that are built up upon each other to create shapes and patterns in a three-dimensional process using a special piece of equipment, such as a 3D printer.2
Advanced Manufacturing
This method involves new forms of technology to improve the production process. Companies can add even more value to the raw materials they use to better serve their target markets. Newer technologies also help bring new products to market faster while increasing output.3
Contract Manufacturing
This is common in the manufacturing industry. Companies will enter into partnerships and business relationships with other firms to outsource certain manufacturing processes. For example, an automotive company may hire a third party to make parts that it will use in its assembly lines to make cars.4
3D printing has been around since the 1980s.5
Types of Manufacturing Techniques
Make to Stock (MTS)
The traditional production technique is make-to-stock, the manufacturing of a standard product based on forecast demand. A company estimates how many units will be sold over a given period of time, then plan in advance to manufacture that many goods. Goods are often held as inventory leading up to the release and broad distribution of the goods.
A company must have sufficient information in advance of a product release to understand how many goods it will need to manufacture. This includes using historical data from similar goods, understanding macroeconomic conditions, and considering customer expectations for specific product features.
The advantage of MTS is companies can often capitalize on scales of economy. Because a company sets a target level of manufacturing, it can plan in advance how much raw materials, labor, or equipment it will need and can often build the most robust manufacturing plans. On the downside, not meeting expectation leaves a company with unusable product, surplus inventory, and committed yet underutilized fixed costs.
Make to Order (MTO)
Opposite of MTS, make-to-order manufacturing entails working directly with a customer to understand their need and desired product specifications. Manufacturing typically only starts after a signed contract or letter of intent. In addition, manufacturers may generate light prototypes but will often hold off on starting manufacturing until full product specifications have been delivered.
MTO is most common in industries where specialized products are being made for a very specific purpose. Aerospace, construction, or technology (to a lesser degree) are examples of industries where manufacturers will often not manufacture a good until a government entity has agreed to purchase the aircraft or a tenant has signed a long-term lease agreement.
On one hand, MTO manufacturers can often charge a premium for their products as the good may not be easily acquired in a marketplace. This is especially true for highly-specified goods. In addition, MTO manufacturers often only make a good if a sale is lined up; therefore, it often never carries inventory. As a downside, MTO manufacturing often comes with uneven product demand that may result in slower periods of business.
Make to Assemble (MTA)
The third type of manufacturing technique is a make-to-assemble process. Companies try to get a head start by starting production on component parts. Then, as customers begin to place orders, companies assemble previously-manufactured components.
Because the company had partially completed the manufacturing process, the good can often be delivered faster to customers than under MTO processes. However, the company still runs the risk of being stuck with an inventory of forecast demand that does not materialize. In addition, the company risks losing the benefits of MTO and MTS by trying to balance each type of process.
Types of Manufacturing Processes
Finally, manufacturing can be divided into different production methods. Each method results in a uniquely different end product.
Discrete Manufacturing
Discrete manufacturing is aptly named because each product manufactured can be specifically identified. The manufacturing process leverages a bill of materials to track what raw materials or components go into each specific unit. In discrete manufacturing processes, units are often made on a production line where assembly line workers follow a production schedule and record material usage.
Process Manufacturing
There are two main types of process manufacturing. First, batch process manufacturing entails manufacturing a product based on a specific standard that uses a recipe or formula. Batch process manufacturing is often used in the food and beverage industry to make easily replicable goods of a specific quantity (i.e. a specific vessel of teriyaki sauce).
Alternatively, continuous process manufacturing entails consistent, ongoing operations that often manufacture a good around the click for a long period. Then, manufacturing is halted for a period of time before being resumed. Continuous process manufacturing is heavily used in the oil and gas industry when drilling for natural resources.
Mixed Mode Manufacturing
Some goods may entail a combination of both discrete and manufacturing processes. This is often the case for goods manufactured using batch process before these standardized goods are converted to more specific individual package. The initial stage to generate a product uses process manufacturing, while the unique specifics of the delivery method (including any customer customizations) are added in the second half.
Job Shop Manufacturing
An even more specific type of manufacturing process, goods can be manufactured using job shop manufacturing. This process is most often used when there is a batch to process yet the batch is different than a company's normal product. For this specialized, customized good, a company must often perform unique set-up and process steps including converting existing equipment to a more usable structure.
Repetitive Manufacturing
A potential subset of other manufacturing processes, repetitive manufacturing often breaks long manufacturing processes into smaller parts. Each part, often called a dedicated assembly line or manufacturing cell, is intended to manufacture only their specific part of the unit. Then, units are continuously transferred to the next subsequent dedicated assembly line. Any work in material resides within the manufacturing line as temporary storage areas are often not used.
In 2021, an estimated 12.1 million Americans work in the manufacturing sector.6
History of Modern Manufacturing
Handmade products dominated the market before the Industrial Revolution. This period ushered in the industrial process, where raw materials were made into finished products in high volumes. The development of steam engines and newer technologies allowed companies to use machines in the manufacturing process. This reduced the need for human capital while increasing the sheer volume of goods that could be produced.
Mass production and assembly line manufacturing allowed companies to create parts that could be used interchangeably and allowed finished products to be easily made by reducing the need for part customization.7 Ford popularized mass-production techniques in the early 20th century.8
Computers and precision electronic equipment have since allowed companies to pioneer high-tech manufacturing methods. Companies that use these methods typically carry a higher price but also require more specialized labor and higher capital investment.
The skills required to operate machines and develop manufacturing processes have drastically changed over time. Many low-skill manufacturing jobs have shifted from developed to developing countries because labor in developing countries tends to be less expensive. As such, high-end products that require precision and skilled manufacturing are typically produced in developed economies.
Measuring Manufacturing in the Economy
Economists and government statisticians use various ratios when evaluating the role manufacturing plays in the economy. For example, manufacturing value added (MVA) is an indicator that compares an economy's manufacturing output to its overall size. This metric is expressed as a percentage of gross domestic product (GDP).
The Institute for Supply Management (ISM) surveys manufacturing firms to estimate employment, inventories, and new orders. The ISM publishes the ISM Manufacturing Report each month to summarize its findings.9 Financial analysts and researchers eagerly await this report as they see it as a potential early indicator of the economy's health as well as a sign of where the stock market may be going.
$2.2 Trillion
Manufacturing has always been a key contributor to the United States economy. It's estimated that 10.8% of the U.S. GDP in 2020 was contributed to manufacturing. This was equal to a little over $2.2 trillion.10
Steps of Manufacturing
These seven steps, following in sequential order, encompass not only the physical manufacturing of a good but the stages before and after a tangible good is made.
Step 1: Develop the Idea
Before any tangible good is made, manufacturing begins with concept development and the growth of the product vision. This product vision defines what the product is, who the target audience is, what the need for the good is, and what competitors exist. Many of these types of questions may define the good and help refine what characteristics will go into the actual product.
Step 2: Perform Market Research
Though many believe manufacturing only entails the physical aspect of making a good, the manufacturing process still incorporates researching the potential product to explore ways to make it better. This includes understanding what raw materials can be used, what equipment is needed, what conditions the good must be made under, and how the good will differentiate from competing goods.
Step 3: Design the Product
With research considerations in-hand, it's time to design the product. This should always be done in consideration of what the customer will need and use. This also should incorporate any manufacturing limitations discovered during the research stage. This also includes understanding the costs that will go into this product design so you can forecast what your product profitability will be. It is during this stage that the manufacturing process is most deeply rooted in research and development.
Step 4: Finalize and Prototype
With the design stage now complete, it's time to make final decisions on what the product will be. This includes making choices of what raw materials to use or how to define the manufacturing process. These decisions are implemented by creating an initial prototype. This means drafting a smaller-scale test product that mirrors what the true manufacturing product will be.
Step 5: Prototype Testing
Once the prototype is complete, it's time to test it. This includes analyzing actual resources that went into the good to better understand how much the actual product will cost and what its profit margin will be. This also includes finding weaknesses or inefficiencies in the manufacturing process. This is often the final stage before mass production begins; though changes can be made in the future, this is the time for big changes to be made without major implications on the product or manufacturing process.
Step 6: Manufacture the Good
Enough time, testing, and research has been done; it's now time to make the good. The company acquires the machinery and equipment necessary to make full-scale processes to manufacture the good. The company also invests in the full amount of labor, storage, insurance, and other costs related to a full manufacturing line.
Companies may choose to continually improve their processes; instead of returning back to prototype stages, they often review and implement smaller changes during the actual manufacturing step.
Step 7: Monitor the Process
In order to continually improve, the company must continually evaluate how the process is going and whether expectations are being met. The company must analyze how much the good costs to make and compare this against sale prices. The company must also evaluate product demand and scale up (or scale down) based on consumer preference.
Manufacturing vs. Production
Though sometimes referred to as the same thing, there are subtle differences between the manufacturing process and the production process. In manufacturing, a company must often solicit raw materials from third-party or external vendors to be processed into finished goods. For production, the company often has ownership of those raw materials.
The definition of each encompasses different processes. Production is broader and encompasses manufacturing, as production is simply taking input and yielding an output. Manufacturing, a more specific type of production, is the act of taking a raw material and transforming it into a tangible finished good.
The manufacturing process ends with a tangible good. Alternatively, production can end with a tangible or intangible good. Consider the theatrical example that is aptly named. A show or theater production literally ends with public entertainment to be consumed by the general public.
Because the manufacturing process is heavily reliant on raw materials, the manufacturing process often relies on heavy machinery or equipment. It also relies on set-up time and labor to establish the process. During production, machinery may not be required depending on the output.
-
Often requires procurement of a raw material
-
Output is physical, tangible goods
-
Machinery and labor are essential to the process
-
Is a more specific type of process
-
Often entails previous ownership of the inputs for the process
-
Output may be tangible or intangible good
-
Machinery may or may not be required
-
Is a less specific type of process
Example of Manufacturing
Known for its efficient manufacturing process, Toyota Motor Corporation is a historically well-known and successful manufacturer. The company uses a lean manufacturing system to produce vehicle order by customers in the quickest and most efficient way possible.11 At the end of 2021, Toyota announced it was increasing its long-term forecast of battery electric vehicle sales, planning for 3.5 million units sold in 2030 (up from the previous plan of 2.0 million).12
The company's manufacturing process is based on two core concepts:
- Jidoka: When there is a production issue, the equipment stops immediately to prevent future defective products.
- Just-in-Time: Each process manufactures only what is essential for the current process. This includes sourcing just enough material without carrying excessive amounts of reserves.11
Under jidoka, engineers design and build systems by hand to intricately understand the manufacturing process. Then, they carefully simplify operations and transition to leveraging machines. The goal is for the manufacturing process to leverage repetitive processes that make the manufacturing process more simple and less expensive.
Under just-in-time, Toyota strives to eliminate "waste, inconsistencies, and unreasonable requirements on the production line".11 When an order is received, the production instructions must go to the manufacturing line immediately. The manufacturing line must have the required materials and parts available. Any deficiencies are quickly resolved by swapping similar parts.11
What Is Lean Manufacturing?
Lean manufacturing is a form production that can be used by manufacturers that want to reduce production system time in order to increase their efficiency. Implementing a lean manufacturing approach means that a company wants to boost productivity while eliminating as much waste as possible. This could mean cutting back on operating costs and lead times.
How Do You Calculate Manufacturing Overhead?
Manufacturing overhead is the total indirect cost associated with manufacturing. This includes any expenses like employee wages, asset depreciation, rent, leases, and utilities. Costs like materials are not included.
In order to calculate your manufacturing overhead, take your monthly overhead expenses and divide that total by your monthly sales. You can multiply the result by 100 to get the total percent of monthly overhead.
What Is the Purpose of Manufacturing?
Manufacturing is the process of converting a raw material into a finished, tangible product. Manufacturing entails making a process efficient as it converts specific resources into a different resource, often for the purpose of being sold to a customer.
What Are the Steps of Manufacturing?
The manufacturing process often begins with an information-gathering stage where engineers and management learn about a process. Prototypes are often created and evaluated. Then, specific designs are implemented, and commercial production begins. As goods are made, they are inspected, shipped, and delivered to the next user of the finished good.
Why Is Manufacturing Important?
Manufacturing is critical for most, if not all, of the goods around you. Without a formal process to convert raw materials into more complex goods, we would be without electronics, appliances, transportation, and many facets of life that make our days more efficient, safe, and productive. Manufacturing is the backbone of the items we interact with, rely on, enjoy, and consume.
The Bottom Line
Humans have traditionally turned raw materials into finished goods for as long as we can remember. This process, which converts raw materials into finished goods, is called manufacturing. Businesses can still use human labor to convert these materials by hand. But they now also have the option to purchase machinery to mass-produce goods on a much larger scale. Technology has helped the way we manufacture our goods and continues to evolve. The advent of 3D printing is making it easier for individuals to produce finished goods themselves, without ever leaving their own homes.
What is a Risk Assessment?
A risk assessment is a systematic process performed by a competent person which involves identifying, analyzing, and controlling hazards and risks present in a situation or a place. This decision-making tool aims to determine which measures should be put in place in order to eliminate or control those risks, as well as specify which of them should be prioritized according to the level of likeliness and impact they have on the business.
Risk assessment is one of the major components of a risk analysis. Risk analysis is a process with multiple steps that intends to identify and analyze all of the potential risks and issues that are detrimental to the business. This is an ongoing process that gets updated when necessary. These concepts are interconnected and can be used individually.
Risk communication is the process of exchanging information and opinion on risk with concerned parties. Risk management is the proactive control and evaluation of threats and risks to prevent accidents, uncertainties, and errors. Together with risk assessment, these are all vital elements that help make informed decisions such as mitigating risks.
Why is it Important?
Identifying hazards by using the risk assessment process is a key element when ensuring the health and safety of your employees and customers. OSHA requires businesses to conduct risk assessments. According to regulations set by OSHA, assessing hazards or potential risks will determine the personal protective gears and equipment a worker may need for their job. There are guidelines available for different industries since present types of possible risks may vary, an example of this is agribusinesses. Unique risks for this industry include manure storage, tractor operation, animal handling, behavior, and health.
The Environmental Protection Agency (EPA) of the US specializes in assessing hazards related to humans and its environmental receptors such as animals, chemicals, and other ecological factors. While in the UK, conducting risk assessments are a legal requirement as stated in the Health and Safety at Work Act. The specific regulation under this law can be retrieved from the Management of Health and Safety at Work Regulations Section.
The gravity of hazard identifications is clear with all these organizations and governments requiring risk assessments at work. With this, it is apparent that risk assessment is important in preventing and reducing risks to save lives and ensure that the workplace stays a safe space.
Risk Analysis Framework
When Do You Perform a Risk Assessment?
Beyond complying with legislative requirements, the purpose of risk assessments are to eliminate operational risks and improve the overall safety of the workplace. It is employers responsibility to perform risk assessments when:
- new processes or steps are introduced in the workflow;
- changes are made to the existing processes,
- equipment, and tools; or new hazards arise.
Risk assessments are also performed by auditors when planning an audit procedure for a company.
3 Types
While the exact details of risk assessments may vary greatly across different industries, HSE distinguishes three general risk assessment types:
Large Scale Assessments
This refers to risk assessments performed for large scale complex hazard sites such as the nuclear, and oil and gas industry. This type of assessment requires the use of an advanced risk assessment technique called a Quantitative Risk Assessment (QRA).
Required specific assessments
This refers to assessments that are required under specific legislation or regulations, such as the handling of hazardous substances (according to COSHH regulations, 1998) and manual handling (according to Manual Handling Operations Regulations, 1992).
General assessments
This type of assessment manages general workplace risks and is required under the management of legal health and safety administrations such as OSHA and HSE.
Examples of Risk Assessments
Risk assessments are essential to identify hazards and risks that may potentially cause harm to workers. There are a variety of risk assessments used across different industries tailoring specific needs and control measures. Here are common risk assessment examples:
- Health and Safety Risk Assessment – a type of risk assessment used by safety managers to determine health and safety risks associated with the job, work environment, and current processes. Hazards can be identified as biological, chemical, energy, environmental, and the like.
- Workplace Risk Assessment – performed by office managers and school administrators, this tool helps ensure that a workplace is free from health and safety threats. This assessment also helps boost employee morale and productivity.
- Fall Risk Assessment – performed by the nursing staff of aged care units or centers to evaluate the possibility of falling. This checklist will ensure that the facilities, equipment, and other factors are safe for elderly patients.
- Construction Risk Assessment – a vital assessment used in the construction site to help safety teams implement corrective measures and stakeholders comply with safety regulations.
Here are reports of risk assessment examples performed using pre-existing risk assessment templates:
Risk assessments can be seen as a regulatory paperwork burden, but understanding the reason and purpose of a risk assessment will help your team identify, prioritize and control hazards in your workplace.
Planning
Risk assessments should be carried out by competent persons who are experienced in assessing hazard injury severity, likelihood, and control measures. To start off, good planning will be essential in order to implement a risk assessment effectively. Consider the following 4 elements as stated by the Occupational Safety and Health Administration (OSHA):
- What is your scope?
Determining the scope when planning your risk assessment can help you figure out what resources you would need. Be specific about what you’re assessing. Are you assessing a product? An organizational process? Or a workplace area? - What resources do you need?
Determine the kind of training, tools, and equipment your team needs to effectively carry out the risk assessment. You should also determine the risk analysis measures you are going to use and know why they are the best choice for your purpose. - Who is involved?
Note the personnel involved in your risk assessment planning and implementation. They could be managers, supervisors, workers, or suppliers. This helps you identify additional resources that can help you improve the effectiveness of your risk assessment. - What laws, regulations, and internal policies do you need to comply with?
Non-compliance could lead to hefty fines and other offenses that can spell trouble for your operation. Determine the laws, regulations, codes, standards, and internal policies you need to consider when conducting your risk assessment.
By determining all of these, you can create a solid foundation for an effective risk assessment. Once you’ve planned out your risk assessment, you can proceed with performing the risk assessment. A risk assessment is performed in 5 steps or stages.
5 Steps
Risk assessment is a step-by-step process that allows users to follow an ideal chronology in order to make the most out of the tool and effectively identify risks and their possible controls. Below are the 5 steps on how to efficiently perform risk assessments:
1. Identify hazards
Survey the workplace and look at what could reasonably be expected to cause harm. Identify common workplace hazards. Check the manufacturer’s or suppliers’ instructions or data sheets for any obvious hazards. Review previous accident and near-miss reports. Efficiently identify hazards by using a hazard identification checklist. This ensures everything is discovered during risk assessment and hazard identification which prevents risks from escalating.
Hazards and risks are sometimes used interchangeably; however, they actually refer to two different elements of a potential incident. A hazard is something that has the potential of causing harm to people, property, or the environment, while risk is the likelihood of a hazard to actually cause harm or damage under defined circumstances.
2. Evaluate the risks
To evaluate a hazard’s risk, you have to consider how, where, how much, and how long individuals are typically exposed to a potential hazard. Assign a risk rating to your hazards with the help of a risk matrix. Using a risk matrix can help measure the level of risk per hazard by considering factors such as the likelihood of occurrence, and severity of potential injuries. Meanwhile, performing an environmental analysis lets you gauge potential risks and their impacts on your business environment.
Make sure to also consider using specific tools for different functions, take for example—excavation safety software to reduce the risk of excavation-related accidents, hazard reporting software to quickly communicate any potential hazards found, or an all-encompassing tool that has the general capabilities of these various software.
3. Decide on control measures to implement
After assigning a risk rating to an identified hazard, it’s time to come up with effective controls to protect workers, properties, civilians, and/or the environment. Follow the hierarchy of controls in prioritizing implementation of controls.
4. Document your findings
It is important to keep a formal record of risk assessments. This can help your organization keep track of hazards, risk, and control measures. Documentation may include a detailed description of the process in assessing the risk, an outline of evaluations, and detailed explanations on how conclusions were made.
Use a risk assessment template to document your findings. Get started with SafetyCulture (formerly iAuditor)’s free risk assessment templates that you can use on your mobile device while on-site. Share your report and findings with key parties who can implement changes.
5. Review your assessment and update if necessary
Follow up with your assessments and see if your recommended controls have been put in place. If the conditions in which your risk assessment was based on change significantly, use your best judgment to determine if a new risk assessment is necessary.
Tools and Techniques
There are options on the tools and techniques that can be seamlessly incorporated into a business’ process. The four common risk assessment tools are: risk matrix, decision tree, failure modes and effects analysis (FMEA), and bowtie model. Other risk assessment techniques include what-if analysis, failure tree analysis, and hazard operability analysis.
How to use a Risk Matrix?
| Likelihood | Very Likely | Likely | Unlikely | Highly Unlikely | |
| Consequences | Fatality | High | High | High | Medium |
| Major Injuries | High | High | Medium | Medium | |
| Minor Injuries | High | Medium | Medium | Low | |
| Negligible Injuries | Medium | Medium | Low | Low | |
A risk matrix is often used during a risk assessment to measure the level of risk by considering the consequence/ severity and likelihood of injury to a worker after being exposed to a hazard. The two measures can then help determine the overall risk rating of the hazard. Two key questions to ask when using a risk matrix should be:
- Consequences: How bad would the most severe injury be if exposed to the hazard?
- Likelihood: How likely is the person to be injured if exposed to the hazard?
The most common types are the 3×3 risk matrix, 4×4 risk matrix, and 5×5 risk matrix.
How to Assess Consequences?
In assessing the consequences of a hazard, the first question should be asked “If a worker is exposed to this hazard, how bad would the most probable severe injury be?”. For this consideration we are presuming that a hazard and injury is inevitable and we are only concerned with its severity.
It is common to group the injury severity and consequence into the following four categories:
- Fatality – leads to death
- Major or serious injury – serious damage to health which may be irreversible, requiring medical attention and ongoing treatment
- Minor injury – reversible health damage which may require medical attention but limited ongoing treatment). This is less likely to involve significant time off work.
- Negligible injuries – first aid only with little or no lost time.
To illustrate how this can be used in the workplace we will use the example of a metal shearing task. A hazard involved could include a piece of metal flying out of the equipment while in use. In this example the probable most severe injury would be “Major or Serious Injury” with the possibility of bruising, breakage, finger amputation.
How to Assess Likelihood?
In assessing the likelihood, the question should be asked “If the hazard occurs, how likely is it that the worker will be injured?”. This should not be confused with how likely the hazard is to occur. It is common to group the likelihood of a hazard causing worker injury into the following four categories:
- Very likely – exposed to hazard continuously.
- Likely – exposed to hazard occasionally.
- Unlikely – could happen but only rarely.
- Highly unlikely – could happen, but probably never will.
In our metal shearing example the question should not be “How likely is the machine expected to fail?” but instead “When the machine fails and causes metal to fly out, how likely is the worker expected to be injured?”. If in our example we observe a safe distance between the machine and worker and proper PPE being worn, we could rate it as “Unlikely” given our observations
Risk Assessment Training: Achieving a Culture of Safety
“Safety has to be everyone’s responsibility… everyone needs to know that they are empowered to speak up if there’s an issue.” – Captain Scott Kelly, at the SafetyCulture Virtual Summit.
Thinking about safety shouldn’t stop at the completion of a risk assessment. Embody a safety culture, so workers are empowered take extra care as they do their best work. A hazard identification and risk assessment training can help your organization achieve that.
A good and effective risk assessment training should orient new and existing workers on various hazards and risks that they may encounter. It should also be able to easily walk them through safety protocols. When everyone is on the same page, managing risks becomes easy.
Conducting or delivering effective Training shouldn’t be a pain. With today’s technology, courses are now made more engaging through bite sized lessons. Below are a few courses we picked out that can get your team training started:
How do you Perform a Risk Assessment with SafetyCulture?
Many factors and processes can come into play when conducting a risk assessment. The process usually takes a lot of time as it involves going through multiple hands for review and completion. Which in turn, opens the whole risk assessment procedure to issues like losing track of paperwork and records.
Using a risk assessment software like SafetyCulture makes it easy for you to have everything in one place. Organizations are able to track hazards, risks, control measures, and corrective actions within just a few taps.
See how SafetyCulture can help your risk assessment every step of the way:
- Identify hazards – Using your mobile or tablet device, survey the workplace and list down risks and hazards you’ve identified. Provide a better understanding of the risks and hazards, by attaching or capturing photo evidence within the app during the inspection.
- Evaluate the risks – Risks and hazards identified, can be assigned the appropriate risk rating and control measures then and there. Image references can be included within the risk assessment form for users to base on for a more accurate rating.
- Assign control measures – Be proactive by not only listing down the appropriate control measure for each risk, SafetyCulture enables users to assign corrective actions so action items are immediately resolved instead of piled up.
- Record your risk assessment – Comprehensive reports are automatically generated after the completion of the risk assessment forms. They can be shared in Word, PDF, or by weblink across your team members and others.
- Review and update your risk assessment – Risk assessment documents are instantly and securely saved in your account, ready for you to access and update whenever you need to.
SafetyCulture gives you the flexibility to power any inspection you require – onsite, underground, and across the globe. Inspect construction sites, restaurant inspections for food safety, conduct temperature checks, pre-flight checks, toolbox talks, and more. It is the mobile forms inspection solution for all industries.
What is a risk assessment?
Back to topRisk assessment is a term used to describe the overall process or method where you:
- Identify hazards and risk factors that have the potential to cause harm (hazard identification).
- Analyze and evaluate the risk associated with that hazard (risk analysis, and risk evaluation).
- Determine appropriate ways to eliminate the hazard, or control the risk when the hazard cannot be eliminated (risk control).
A risk assessment is a thorough look at your workplace to identify those things, situations, processes, etc. that may cause harm, particularly to people. After identification is made, you analyze and evaluate how likely and severe the risk is. When this determination is made, you can next, decide what measures should be in place to effectively eliminate or control the harm from happening.
The CSA Standard Z1002 "Occupational health and safety - Hazard identification and elimination and risk assessment and control" uses the following terms:
Risk assessment – the overall process of hazard identification, risk analysis, and risk evaluation.
Hazard identification – the process of finding, listing, and characterizing hazards.
Risk analysis – a process for comprehending the nature of hazards and determining the level of risk.
Notes:
(1) Risk analysis provides a basis for risk evaluation and decisions about risk control.
(2) Information can include current and historical data, theoretical analysis, informed opinions, and the concerns of stakeholders.
(3) Risk analysis includes risk estimation.Risk evaluation – the process of comparing an estimated risk against given risk criteria to determine the significance of the risk.
Risk control – actions implementing risk evaluation decisions.
Note: Risk control can involve monitoring, re-evaluation, and compliance with decisions.
For definitions and more information about what hazards and risks are, please see the OSH Answers document Hazard and Risk.
Why is risk assessment important?
Risk assessments are very important as they form an integral part of an occupational health and safety management plan. They help to:
- Create awareness of hazards and risk.
- Identify who may be at risk (e.g., employees, cleaners, visitors, contractors, the public, etc.).
- Determine whether a control program is required for a particular hazard.
- Determine if existing control measures are adequate or if more should be done.
- Prevent injuries or illnesses, especially when done at the design or planning stage.
- Prioritize hazards and control measures.
- Meet legal requirements where applicable.
What is the goal of risk assessment?
The aim of the risk assessment process is to evaluate hazards, then remove that hazard or minimize the level of its risk by adding control measures, as necessary. By doing so, you have created a safer and healthier workplace.
The goal is to try to answer the following questions:
- What can happen and under what circumstances?
- What are the possible consequences?
- How likely are the possible consequences to occur?
- Is the risk controlled effectively, or is further action required?
When should a risk assessment be done?
There may be many reasons a risk assessment is needed, including:
- Before new processes or activities are introduced.
- Before changes are introduced to existing processes or activities, including when products, machinery, tools, equipment change or new information concerning harm becomes available.
- When hazards are identified.
How do you plan for a risk assessment?
In general, determine:
- What the scope of your risk assessment will be (e.g., be specific about what you are assessing such as the lifetime of the product, the physical area where the work activity takes place, or the types of hazards).
- The resources needed (e.g., train a team of individuals to carry out the assessment, the types of information sources, etc.).
- What type of risk analysis measures will be used (e.g., how exact the scale or parameters need to be in order to provide the most relevant evaluation).
- Who are the stakeholders involved (e.g., manager, supervisors, workers, worker representatives, suppliers, etc.).
- What relevant laws, regulations, codes, or standards may apply in your jurisdiction, as well as organizational policies and procedures.
How is a risk assessment done?
Assessments should be done by a competent person or team of individuals who have a good working knowledge of the situation being studied. Include either on the team or as sources of information, the supervisors and workers who work with the process under review as these individuals are the most familiar with the operation.
In general, to do an assessment, you should:
- Identify hazards.
- Determine the likelihood of harm, such as an injury or illness occurring, and its severity.
- Consider normal operational situations as well as non-standard events such as maintenance, shutdowns, power outages, emergencies, extreme weather, etc.
- Review all available health and safety information about the hazard such as Safety Data Sheet (SDS), manufacturers literature, information from reputable organizations, results of testing, workplace inspection reports, records of workplace incidents (accidents), including information about the type and frequency of the occurrence, illnesses, injuries, near misses, etc.
- Understand the minimum legislated requirements for your jurisdiction.
- Identify actions necessary to eliminate the hazard, or control the risk using the hierarchy of risk control methods.
- Evaluate to confirm if the hazard has been eliminated or if the risk is appropriately controlled.
- Monitor to make sure the control continues to be effective.
- Keep any documents or records that may be necessary. Documentation may include detailing the process used to assess the risk, outlining any evaluations, or detailing how conclusions were made.
When doing an assessment, also take into account:
- The methods and procedures used in the processing, use, handling or storage of the substance, etc.
- The actual and the potential exposure of workers (e.g., how many workers may be exposed, what that exposure is/will be, and how often they will be exposed).
- The measures and procedures necessary to control such exposure by means of engineering controls, work practices, and hygiene practices and facilities.
- The duration and frequency of the task (how long and how often a task is done).
- The location where the task is done.
- The machinery, tools, materials, etc. that are used in the operation and how they are used (e.g., the physical state of a chemical, or lifting heavy loads for a distance).
- Any possible interactions with other activities in the area and if the task could affect others (e.g., cleaners, visitors, etc.).
- The lifecycle of the product, process or service (e.g., design, construction, uses, decommissioning).
- The education and training the workers have received.
- How a person would react in a particular situation (e.g., what would be the most common reaction by a person if the machine failed or malfunctioned).
It is important to remember that the assessment must take into account not only the current state of the workplace but any potential situations as well.
By determining the level of risk associated with the hazard, the employer, and the health and safety committee (where appropriate), can decide whether a control program is required and to what level.
See a sample risk assessment form.
How are the hazards identified?
Overall, the goal is to find and record possible hazards that may be present in your workplace. It may help to work as a team and include both people familiar with the work area, as well as people who are not - this way you have both the experienced and fresh eye to conduct the inspection. In either case, the person or team should be competent to carry out the assessment and have good knowledge about the hazard being assessed, any situations that might likely occur, and protective measures appropriate to that hazard or risk.
To be sure that all hazards are found:
- Look at all aspects of the work.
- Include non-routine activities such as maintenance, repair, or cleaning.
- Look at accident / incident / near-miss records.
- Include people who work off site either at home, on other job sites, drivers, teleworkers, with clients, etc.
- Look at the way the work is organized or done (include experience of people doing the work, systems being used, etc).
- Look at foreseeable unusual conditions (for example: possible impact on hazard control procedures that may be unavailable in an emergency situation, power outage, etc.).
- Determine whether a product, machine or equipment can be intentionally or unintentionally changed (e.g., a safety guard that could be removed).
- Review all of the phases of the lifecycle.
- Examine risks to visitors or the public.
- Consider the groups of people that may have a different level of risk such as young or inexperienced workers, persons with disabilities, or new or expectant mothers.
It may help to create a chart or table such as the following:
| Example of Risk Assessment | ||||
|---|---|---|---|---|
| Task | Hazard | Risk | Priority | Control |
| Delivering product to customers | Drivers work alone | May be unable to call for help if needed | ||
| Drivers have to occasionally work long hours | Fatigue, short rest time between shifts | |||
| Drivers are often in very congested traffic | Increased chance of collision | |||
| Longer working hours | ||||
| Drivers have to lift boxes when delivering product | Injury to back from lifting, reaching, carrying, etc. | |||
How do you know if the hazard will cause harm (poses a risk)?
Each hazard should be studied to determine its' level of risk. To research the hazard, you can look at:
- Product information / manufacturer documentation.
- Past experience (knowledge from workers, etc.).
- Legislated requirements and/or applicable standards.
- Industry codes of practice / best practices.
- Health and safety material about the hazard such as safety data sheets (SDSs), research studies, or other manufacturer information.
- Information from reputable organizations.
- Results of testing (atmospheric or air sampling of workplace, biological swabs, etc.).
- The expertise of an occupational health and safety professional.
- Information about previous injuries, illnesses, near misses, incident reports, etc.
- Observation of the process or task.
Remember to include factors that contribute to the level of risk such as:
- The work environment (layout, condition, etc.).
- The systems of work being used.
- The range of foreseeable conditions.
- The way the source may cause harm (e.g., inhalation, ingestion, etc.).
- How often and how much a person will be exposed.
- The interaction, capability, skill, experience of workers who do the work.
How are risks ranked or prioritized?
Ranking or prioritizing hazards is one way to help determine which risk is the most serious and thus which to control first. Priority is usually established by taking into account the employee exposure and the potential for incident, injury or illness. By assigning a priority to the risks, you are creating a ranking or an action list.
There is no one simple or single way to determine the level of risk. Nor will a single technique apply in all situations. The organization has to determine which technique will work best for each situation. Ranking hazards requires the knowledge of the workplace activities, urgency of situations, and most importantly, objective judgement.
For simple or less complex situations, an assessment can literally be a discussion or brainstorming session based on knowledge and experience. In some cases, checklists or a probability matrix can be helpful. For more complex situations, a team of knowledgeable personnel who are familiar with the work is usually necessary.
As an example, consider this simple risk matrix. Table 1 shows the relationship between probability and severity.
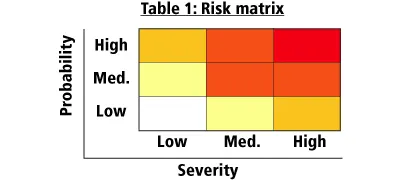
Severity ratings in this example represent:
- High: major fracture, poisoning, significant loss of blood, serious head injury, or fatal disease
- Medium: sprain, strain, localized burn, dermatitis, asthma, injury requiring days off work
- Low: an injury that requires first aid only; short-term pain, irritation, or dizziness
Probability ratings in this example represent:
- High: likely to be experienced once or twice a year by an individual
- Medium: may be experienced once every five years by an individual
- Low: may occur once during a working lifetime
The cells in Table 1 correspond to a risk level, as shown in Table 2.
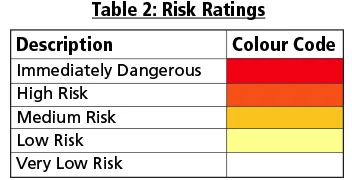
These risk ratings correspond to recommended actions such as:
- Immediately dangerous: stop the process and implement controls
- High risk: investigate the process and implement controls immediately
- Medium risk: keep the process going; however, a control plan must be developed and should be implemented as soon as possible
- Low risk: keep the process going, but monitor regularly. A control plan should also be investigated
- Very low risk: keep monitoring the process
Let's use an example: When painting a room, a step stool must be used to reach higher areas. The individual will not be standing higher than 1 metre (3 feet) at any time. The assessment team reviewed the situation and agrees that working from a step stool at 1 m is likely to:
- Cause a short-term injury such as a strain or sprain if the individual falls. A severe sprain may require days off work. This outcome is similar to a medium severity rating.
- Occur once in a working lifetime as painting is an uncommon activity for this organization. This criterion is similar to a low probability rating.
When compared to the risk matrix chart (Table 1), these values correspond to a low risk.
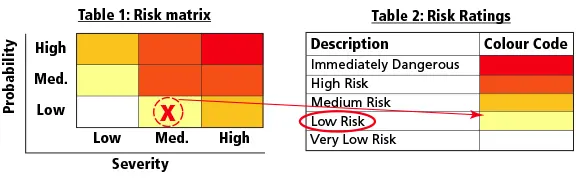
The workplace decides to implement risk control measures, including the use of a stool with a large top that will allow the individual to maintain stability when standing on the stool. They also determined that while the floor surface is flat, they provided training to the individual on the importance of making sure the stool's legs always rest on the flat surface. The training also included steps to avoid excess reaching while painting.
What are methods of hazard control?
Once you have established the priorities, the organization can decide on ways to control each specific hazard. Hazard control methods are often grouped into the following categories:
- Elimination (including substitution).
- Engineering controls.
- Administrative controls.
- Personal protective equipment.
For more details, please see the OSH Answers Hazard Control.
Why is it important to review and monitor the assessments?
It is important to know if your risk assessment was complete and accurate. It is also essential to be sure that any changes in the workplace have not introduced new hazards or changed hazards that were once ranked as lower priority to a higher priority.
It is good practice to review your assessment on a regular basis to make sure your control methods are effective.
What documentation should be done for a risk assessment?
Keeping records of your assessment and any control actions taken is very important. You may be required to store assessments for a specific number of years. Check for local requirements in your jurisdiction.
The level of documentation or record keeping will depend on:
- Level of risk involved.
- Legislated requirements.
- Requirements of any management systems that may be in place.
Your records should show that you:
- Conducted a good hazard review.
- Determined the risks of those hazards.
- Implemented control measures suitable for the risk.
- Reviewed and monitored all hazards in the workplace.