Creation of geometries by Coordinate system methods using AutoCad
Aim : To draw the given geometries using different coordinate methods in Auto Cad
Procedure:
In the given geometries,line command is only used .To activate line :
a. Ribbon -Home >draw >line
b. Toolbar : Draw>Line
c. Menu bar : Draw>Line
d. Tool palettes: Draw >line
e. Command : Line or L
1. P-1
a. Absolute coordinate system - In this system ,distances are measured from orgin. The coordinates with respect to orgin are:
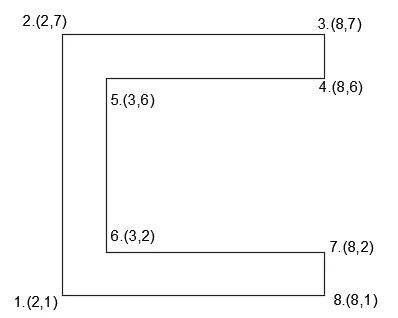
Procedure:
Step 1: Type the command "L"for line and give the coordinates for point 1 #(2,1).
Step 2: Type the next coordinate of point 2 #(2,7) in the command box.
Step 3 : Type next coordinates of point 3. #(8,7) in the command box.
Step 4 : Type next coordinates of point 4. #(8,6) in the command box
Step 5 : Type next coordinates of point 5. #(3,6) in the command box
Step 6 : Type next coordinates of point 6. #(3,2) in the command box
Step 7 : Type next coordinates of point 7. #(8,2) in the command box
Step 8 : Type next coordinates of point 8. #(8,1) in the command box.
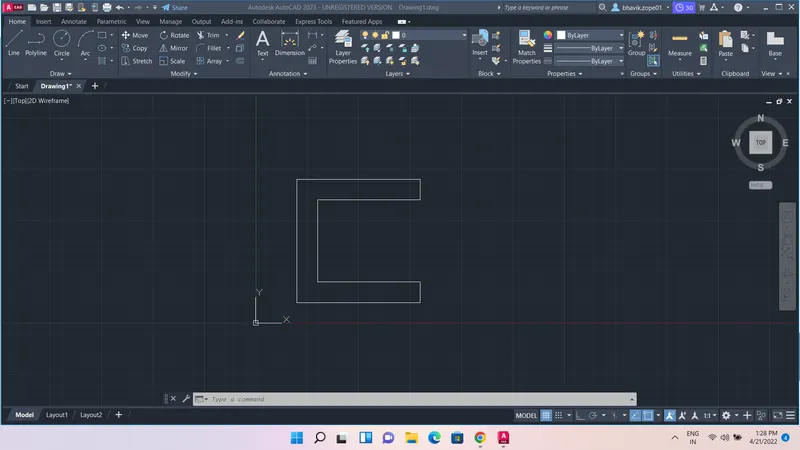
Step 9 : Enter or click on the command "close".
Note: # is for to draw line with respect to origin.
Result:
b. Relative rectangular coordinate system - In this system, the coordinates are measured from the previous point , the coordinates are:
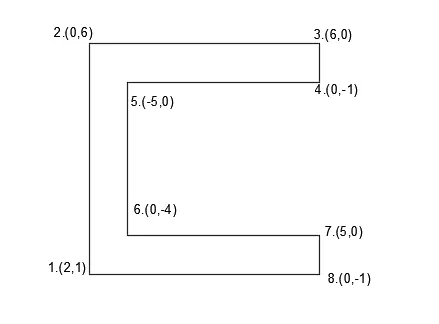
Procedure:
Step 1: Type the command "L"for line and give the coordinates for point 1.(2,1).
Step 2: Type the next coordinate of point 2 .@0,6 in the command box.
Step 3 : Type next coordinates of point 3. @ 6,0 in the command box.
Step 4 : Type next coordinates of point 4. @0,-1 in the command box
Step 5 : Type next coordinates of point 5. @ -5,0 in the command box
Step 6 : Type next coordinates of point 6. @0,-4 in the command box
Step 7 : Type next coordinates of point 7. @5,0 in the command box
Step 8 : Type next coordinates of point 8. @0,-1in the command box.
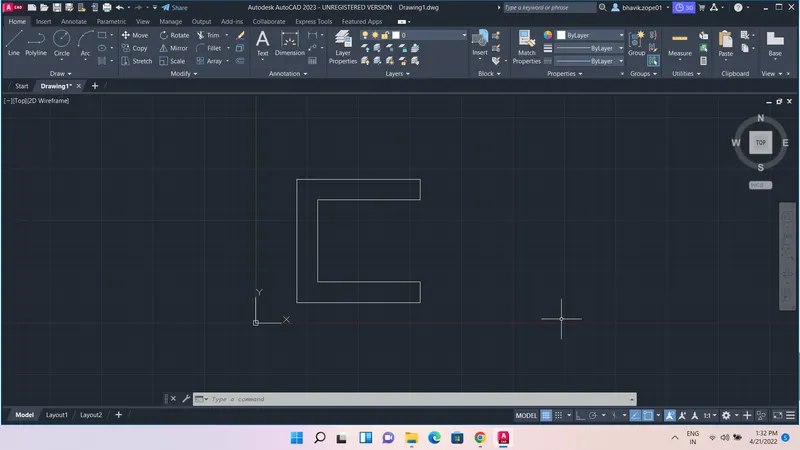
Step 9 : Enter or click on the command "close".
Result:
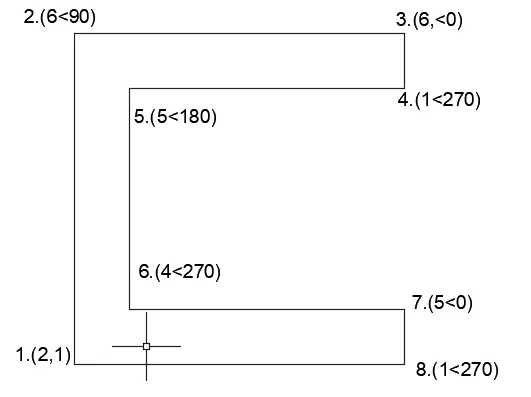
c. Polar coordinate system - In polar coordinate system, the coordinate and the angle with respect to x axis is given.
Procedure:
Step 1: Type the command "L"for line and give the coordinates for point 1.(2,1).
Step 2: Type the next coordinate of point 2 . @6<90 in the command box.
Step 3 : Type next coordinates of point 3. @6<0 in the command box.
Step 4 : Type next coordinates of point 4. @ 1<270 in the command box
Step 5 : Type next coordinates of point 5. @ 5<180 in the command box
Step 6 : Type next coordinates of point 6. @ 4<270 in the command box
Step 7 : Type next coordinates of point 7. @5<0 in the command box
Step 8 : Type next coordinates of point 8. @1<270in the command box.
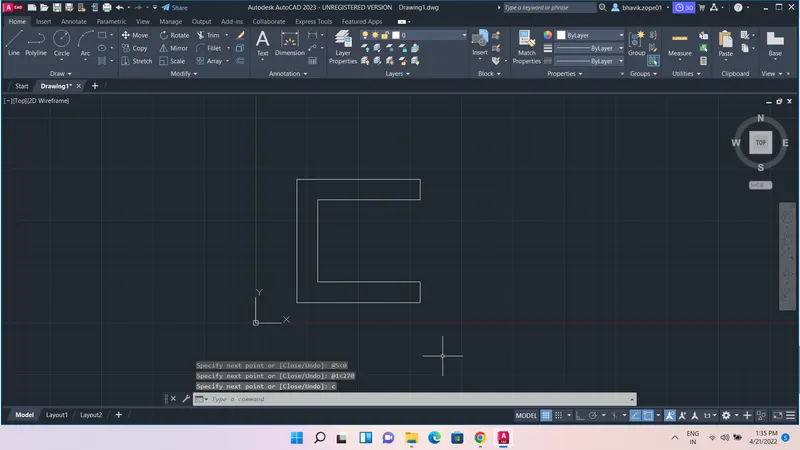
Step 9 : Enter or click on the command "close".
Result:
2. P-2
a. Absolute coordinate system:
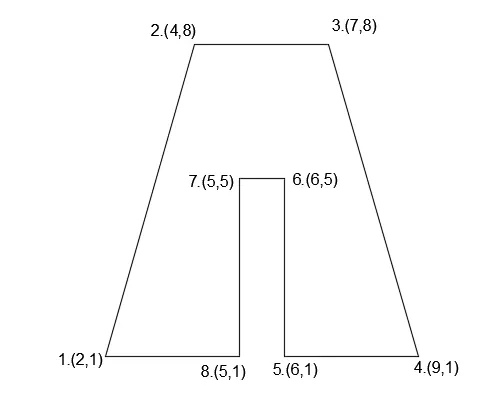
Procedure:
Step 1: Type the command "L"for line and give the coordinates for point 1 #(2,1).
Step 2: Type the next coordinate of point 2 #(4,8) in the command box.
Step 3 : Type next coordinates of point 3. #(7,8) in the command box.
Step 4 : Type next coordinates of point 4. #(9,1) in the command box
Step 5 : Type next coordinates of point 5. #(6,1) in the command box
Step 6 : Type next coordinates of point 6. #(6,5) in the command box
Step 7 : Type next coordinates of point 7. #(5,5) in the command box
Step 8 : Type next coordinates of point 8. #(5,1) in the command box.
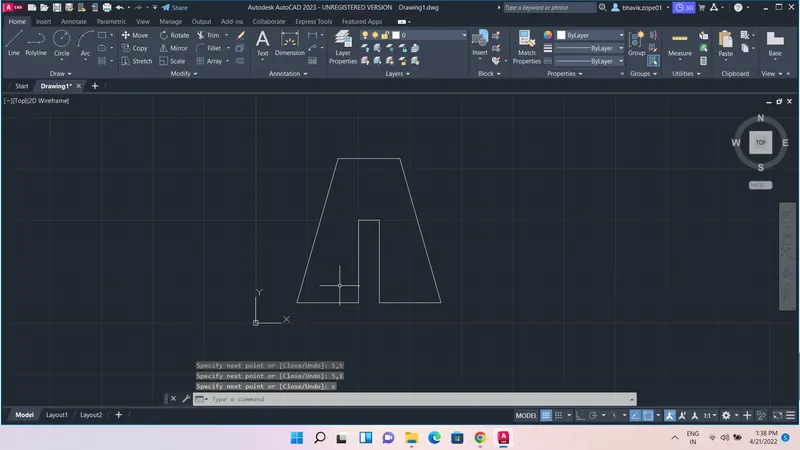
Step 9 : Enter or click on the command "close".
Note: # is for to draw line with respect to origin.
Result:
b. Relative rectangular coordinate system:
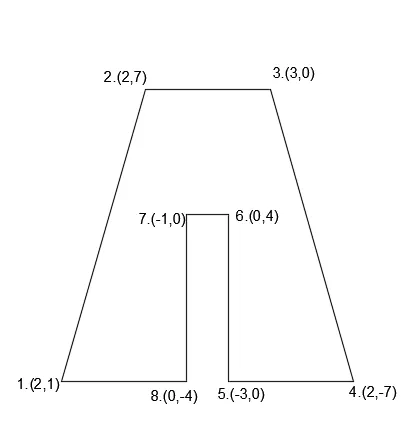
Procedure:
Step 1: Type the command "L"for line and give the coordinates for point 1. (2,1).
Step 2: Type the next coordinate of point 2 .@2,7 in the command box.
Step 3 : Type next coordinates of point 3. @ 3,0 in the command box.
Step 4 : Type next coordinates of point 4. @2,-7 in the command box
Step 5 : Type next coordinates of point 5. @ -3,0 in the command box
Step 6 : Type next coordinates of point 6. @0,4 in the command box
Step 7 : Type next coordinates of point 7. @-1,0 in the command box
Step 8 : Type next coordinates of point 8. @0,-4 in the command box.
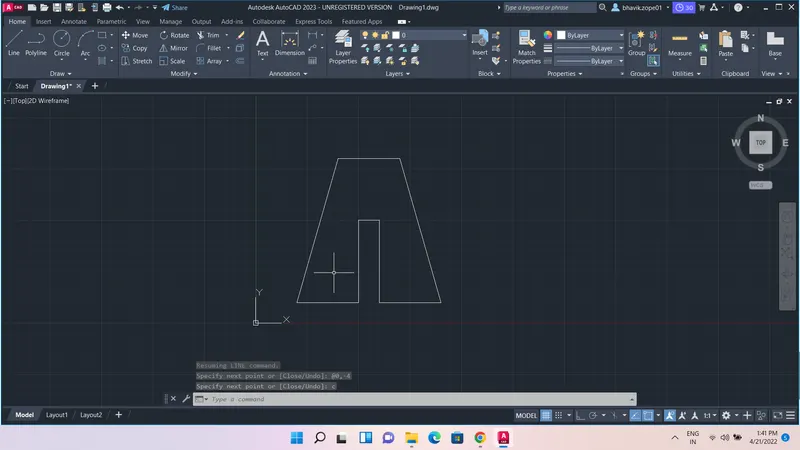
Step 9 : Enter or click on the command "close".
Result:
3. P-4
a. Absolute coordinate system:
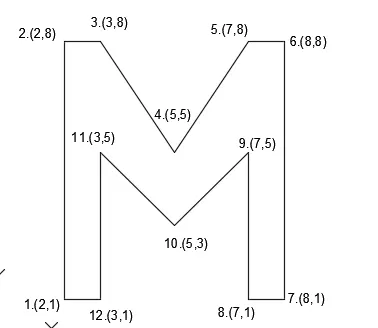
Procedure:
Step 1: Type the command "L"for line and give the coordinates for point 1 #(2,1).
Step 2: Type the next coordinate of point 2 #(2,8) in the command box.
Step 3 : Type next coordinates of point 3. #(3,8) in the command box.
Step 4 : Type next coordinates of point 4. #(5,5) in the command box
Step 5 : Type next coordinates of point 5. #(7,8) in the command box
Step 6 : Type next coordinates of point 6. #(8,8) in the command box
Step 7 : Type next coordinates of point 7. #(8,1) in the command box
Step 8 : Type next coordinates of point 8. #(7,1) in the command box.
Step 9 : Type next coordinates of point 9. #(7,5) in the command box.
Step 10 : Type next coordinates of point 10. #(5,3) in the command box.
Step 11 : Type next coordinates of point 11. #(3,5) in the command box.
Step 12 : Type next coordinates of point 12. #(3,1) in the command box.
Step 13 : Enter or click on the command "close".
Note: # is for to draw line with respect to origin.
Result:
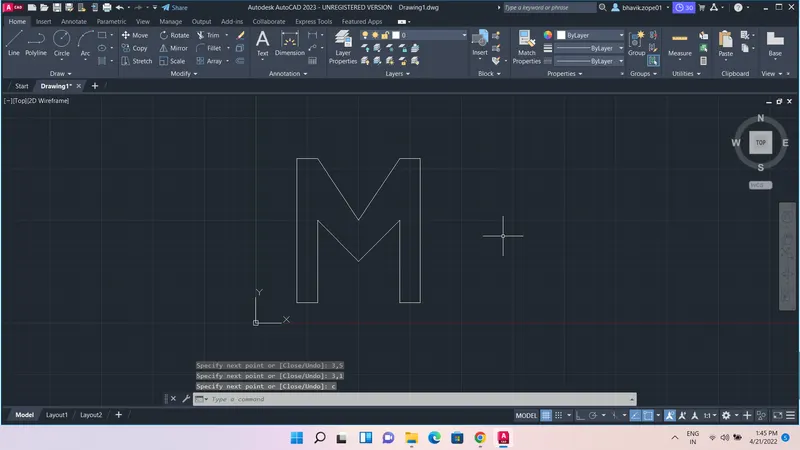
b. Relative rectangular coordinate:
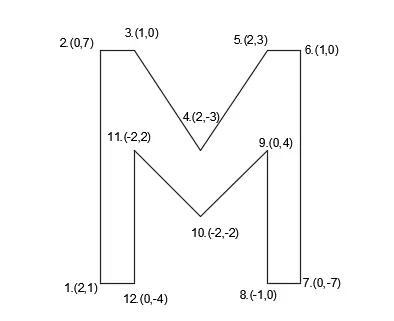
Procedure:
Step 1: Type the command "L"for line and give the coordinates for point 1.(2,1).
Step 2: Type the next coordinate of point 2 .@0,7 in the command box.
Step 3 : Type next coordinates of point 3. @ 1,0 in the command box.
Step 4 : Type next coordinates of point 4. @2,-3 in the command box
Step 5 : Type next coordinates of point 5. @ 2,3 in the command box
Step 6 : Type next coordinates of point 6. @1,0 in the command box
Step 7 : Type next coordinates of point 7. @0,-7 in the command box
Step 8 : Type next coordinates of point 8. @-1,0 in the command box.
Step 9 : Type next coordinates of point 9. @0,4 in the command box.
Step 10 : Type next coordinates of point 10. @-2,-2 in the command box.
Step 11 : Type next coordinates of point 11. @-2,2 in the command box.
Step 12 : Type next coordinates of point 8. @0,-4 in the command box.
Step 13 : Enter or click on the command "close".
Result:
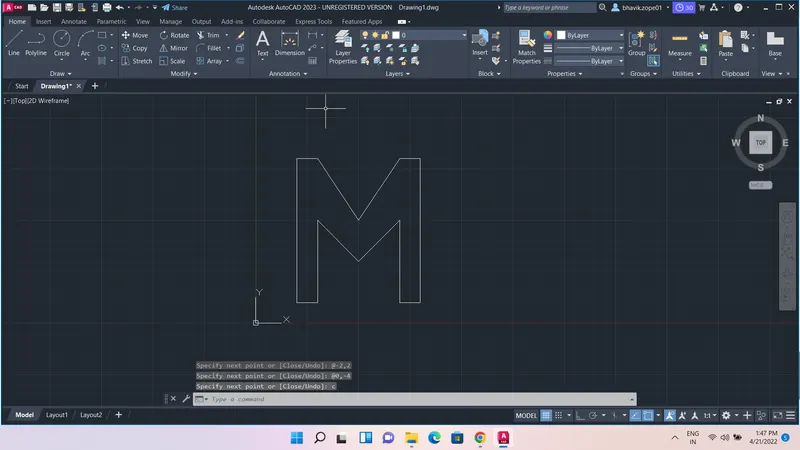
4. P-5
a. Absolute coordinate system:
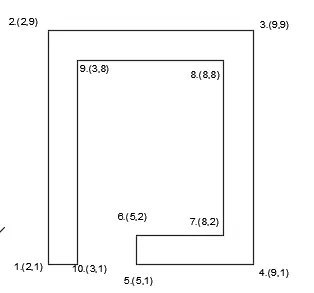
Procedure:
Step 1: Type the command "L"for line and give the coordinates for point 1 #(2,1).
Step 2: Type the next coordinate of point 2 #(2,9) in the command box.
Step 3 : Type next coordinates of point 3. #(9,9) in the command box.
Step 4 : Type next coordinates of point 4. #(9,1) in the command box
Step 5 : Type next coordinates of point 5. #(5,1) in the command box
Step 6 : Type next coordinates of point 6. #(5,2) in the command box
Step 7 : Type next coordinates of point 7. #(8,2) in the command box
Step 8 : Type next coordinates of point 8. #(8,8) in the command box.
Step 9 : Type next coordinates of point 9. #(3,8) in the command box.
Step 10 : Type next coordinates of point 10. #(3,1) in the command box.
Step 11 : Enter or click on the command "close".
Note: # is for to draw line with respect to origin.
Result:
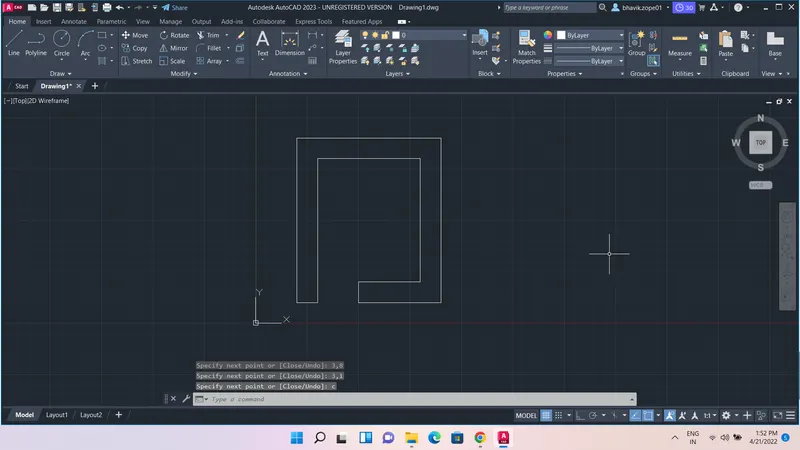
b. Relative rectangular coordinate:
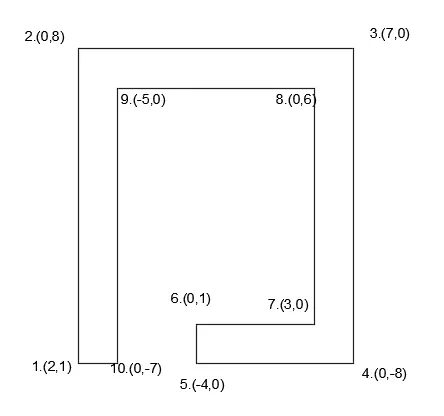
Procedure:
Step 1: Type the command "L"for line and give the coordinates for point 1.(2,1).
Step 2: Type the next coordinate of point 2 .@0,8 in the command box.
Step 3 : Type next coordinates of point 3. @ 7,0 in the command box.
Step 4 : Type next coordinates of point 4. @0,-8 in the command box
Step 5 : Type next coordinates of point 5. @ -4,0 in the command box
Step 6 : Type next coordinates of point 6. @0,1 in the command box
Step 7 : Type next coordinates of point 7. @3,0 in the command box
Step 8 : Type next coordinates of point 8. @0,6 in the command box.
Step 9 : Type next coordinates of point 9. @-5,0 in the command box.
Step 10 : Type next coordinates of point 10. @0,-7 in the command box.
Step 11 : Enter or click on the command "close".
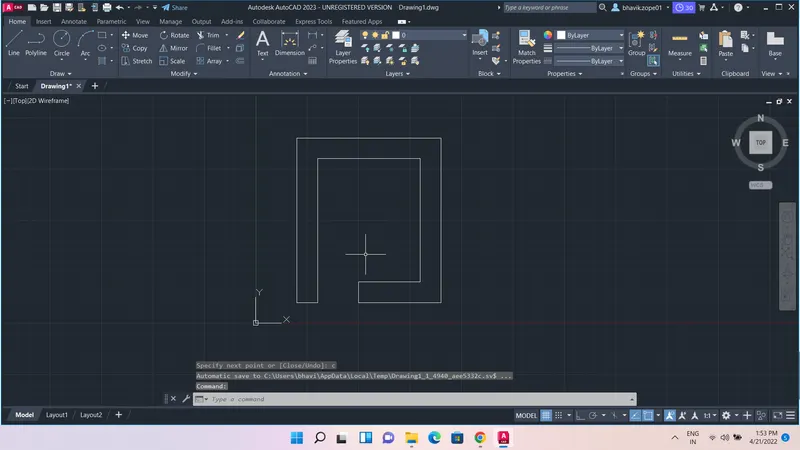
Result:
5. P -7
a. Absolute coordinate system:
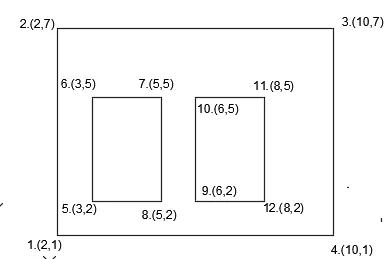
Procedure:
Step 1: Type the command "L"for line and give the coordinates for point 1 #(2,1).
Step 2: Type the next coordinate of point 2 #(2,7) in the command box.
Step 3 : Type next coordinates of point 3. #(10,7) in the command box.
Step 4 : Type next coordinates of point 4. #(10,1) in the command box
Step 5 : Enter or click on the command "close".
Step 6 : Type the command "L"for line and give the coordinates for point 5. #(3,2).
Step 7 : Type next coordinates of point 6. #(3,5) in the command box
Step 8 : Type next coordinates of point 7. #(5,5) in the command box.
Step 9 : Type next coordinates of point 8. #(5,2) in the command box.
Step 10 : Enter or click on the command "close".
Step 11 : Type the command "L"for line and give the coordinates for point 9. #(6,2).
Step 12 : Type next coordinates of point 10. #(6,5) in the command box.
Step 13 : Type next coordinates of point 11. #(8,5) in the command box.
Step 14 : Type next coordinates of point 12. #(8,2) in the command box.
Step 15 : Enter or click on the command "close".
Note: # is for to draw line with respect to origin.
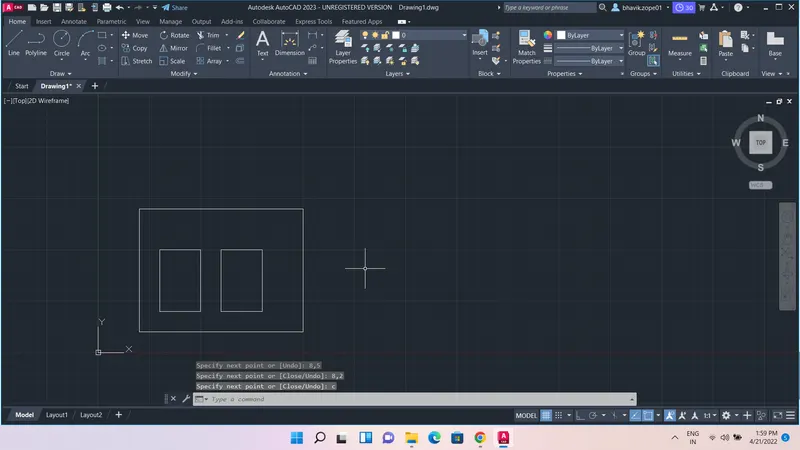
Result:
b. Relative rectangular coordinate system:
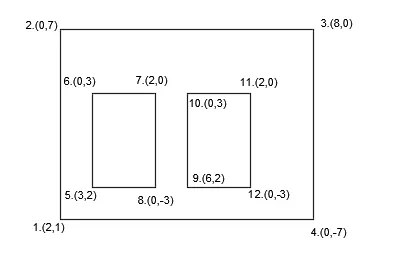
Procedure:
Step 1: Type the command "L"for line and give the coordinates for point 1.(2,1).
Step 2: Type the next coordinate of point 2 .@0,7 in the command box.
Step 3 : Type next coordinates of point 3. @ 8,0 in the command box.
Step 4 : Type next coordinates of point 4. @0,-7 in the command box
Step 5 : Enter or click on the command "close".
Step 6 : Type the command "L"for line and give the coordinates for point 5. (3,2).
Step 7 : Type next coordinates of point 6. @0,3 in the command box
Step 8 : Type next coordinates of point 7. @2,0 in the command box.
Step 9 : Type next coordinates of point 8. @0,-3 in the command box.
Step 10 : Enter or click on the command "close".
Step 11 : Type the command "L"for line and give the coordinates for point 9.(6,2).
Step 12 : Type next coordinates of point 10. @0,3 in the command box.
Step 13 : Type next coordinates of point 10. @2,0 in the command box.
Step 14 : Type next coordinates of point 10. @0,-3 in the command box.
Step 15 : Enter or click on the command "close".
Result:
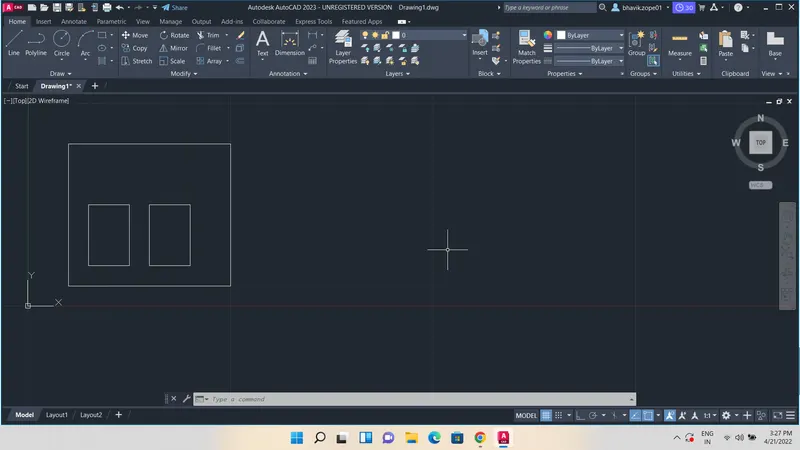
6.P-8
a. Absolute coordinate system:
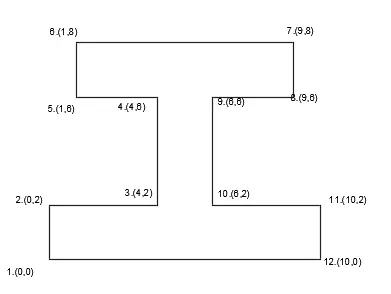
Procedure:
Step 1: Type the command "L"for line and give the coordinates for point 1 #(0,0).
Step 2: Type the next coordinate of point 2 #(0,2) in the command box.
Step 3 : Type next coordinates of point 3. #(4,2) in the command box.
Step 4 : Type next coordinates of point 4. #(4,6) in the command box
Step 5 : Type next coordinates of point 5. #(1,6) in the command box
Step 6 : Type next coordinates of point 6. #(1,8) in the command box
Step 7 : Type next coordinates of point 7. #(9,8) in the command box
Step 8 : Type next coordinates of point 8. #(9,6) in the command box.
Step 9 : Type next coordinates of point 9. #(6,6) in the command box.
Step 10 : Type next coordinates of point 10. #(6,2) in the command box.
Step 11 : Type next coordinates of point 11. #(10,2) in the command box.
Step 12 : Type next coordinates of point 10. #(10,0) in the command box.
Step 13 : Enter or click on the command "close".
Note: # is for to draw line with respect to origin.
Result:
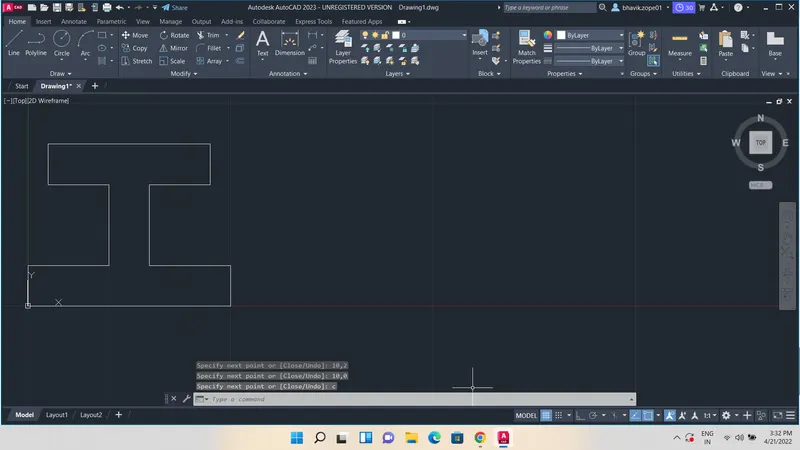
b. Relative rectangular coordinate:
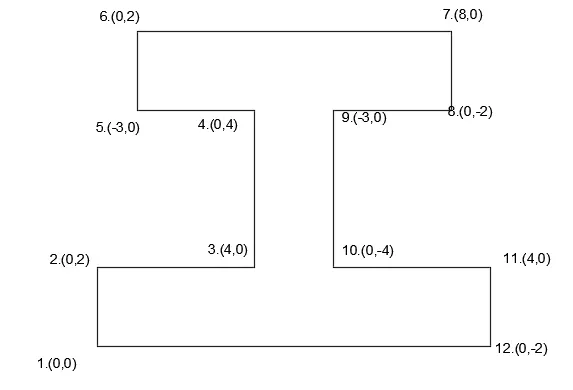
Procedure:
Step 1: Type the command "L"for line and give the coordinates for point 1.(0,0).
Step 2: Type the next coordinate of point 2 .@0,2 in the command box.
Step 3 : Type next coordinates of point 3. @ 4,0 in the command box.
Step 4 : Type next coordinates of point 4. @0,4 in the command box
Step 5 : Type next coordinates of point 5. @ -3,0 in the command box
Step 6 : Type next coordinates of point 6. @0,2 in the command box
Step 7 : Type next coordinates of point 7. @8,0 in the command box
Step 8 : Type next coordinates of point 8. @0,-2 in the command box.
Step 9 : Type next coordinates of point 9. @-3,0 in the command box.
Step 10 : Type next coordinates of point 10. @0,-4 in the command box.
Step 11 : Type next coordinates of point 10. @4,0 in the command box.
Step 12 : Type next coordinates of point 10. @0,-2 in the command box.
Step 13 : Enter or click on the command "close".
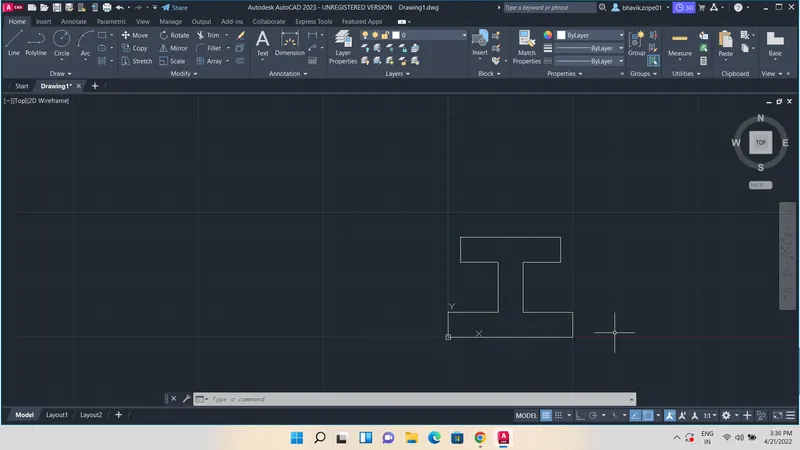
Result:
7. P-9
a. Absolute coordinate system:
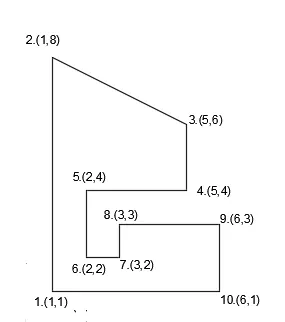
Procedure:
Step 1: Type the command "L"for line and give the coordinates for point 1 #(1,1).
Step 2: Type the next coordinate of point 2 #(1,8) in the command box.
Step 3 : Type next coordinates of point 3. #(5,6) in the command box.
Step 4 : Type next coordinates of point 4. #(5,4) in the command box
Step 5 : Type next coordinates of point 5. #(2,4) in the command box
Step 6 : Type next coordinates of point 6. #(2,2) in the command box
Step 7 : Type next coordinates of point 7. #(3,2) in the command box
Step 8 : Type next coordinates of point 8. #(3,3) in the command box.
Step 9 : Type next coordinates of point 9. #(6,3) in the command box.
Step 10 : Type next coordinates of point 10. #(6,1) in the command box.
Step 11 : Enter or click on the command "close".
Note: # is for to draw line with respect to origin.
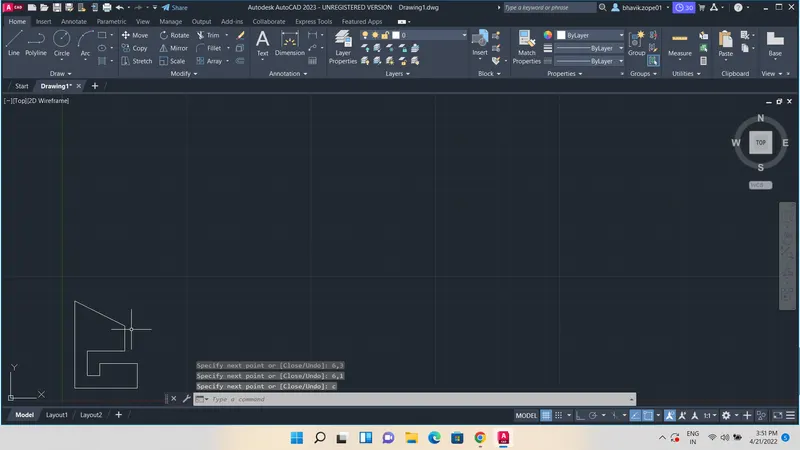
Result:
b. Relative rectangular coordinate:
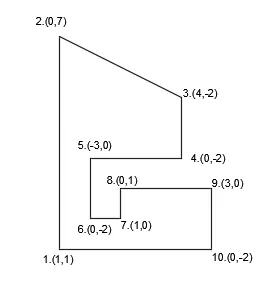
Procedure:
Step 1: Type the command "L"for line and give the coordinates for point 1.(1,1).
Step 2: Type the next coordinate of point 2 .@0,7 in the command box.
Step 3 : Type next coordinates of point 3. @ 4,-2 in the command box.
Step 4 : Type next coordinates of point 4. @0,-2 in the command box
Step 5 : Type next coordinates of point 5. @ -3,0 in the command box
Step 6 : Type next coordinates of point 6. @0,-2 in the command box
Step 7 : Type next coordinates of point 7. @1,0 in the command box
Step 8 : Type next coordinates of point 8. @0,1 in the command box.
Step 9 : Type next coordinates of point 9. @3,0 in the command box.
Step 10 : Type next coordinates of point 10. @0,-2 in the command box.
Step 11 : Enter or click on the command "close".
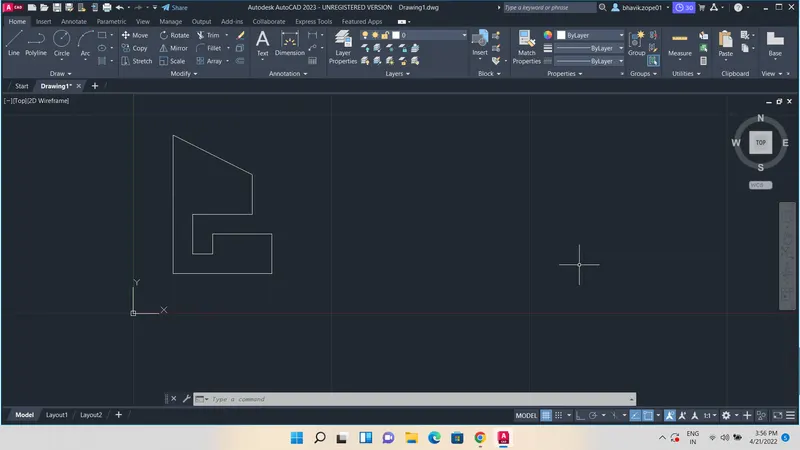
Result:
8. P-10
a. Absolute coordinate system:
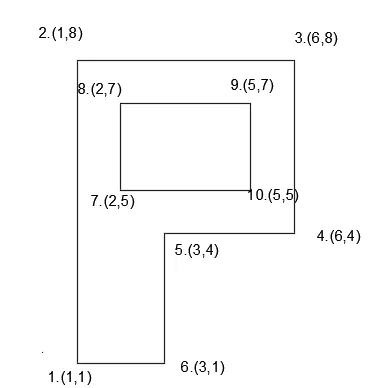
Procedure:
Step 1: Type the command "L"for line and give the coordinates for point 1 #(1,1).
Step 2: Type the next coordinate of point 2 #(1,8) in the command box.
Step 3 : Type next coordinates of point 3. #(6,8) in the command box.
Step 4 : Type next coordinates of point 4. #(6,4) in the command box
Step 5 : Type next coordinates of point 5. #(3,4) in the command box
Step 6 : Type next coordinates of point 6. #(3,1) in the command box
Step 7 : Enter or click on the command "close".
Step 8 : Type the command "L"for line and give the coordinates for point 7. #(2,5).
Step 9 : Type next coordinates of point 8. #(2,7) in the command box.
Step 10 : Type next coordinates of point 9. #(5,7) in the command box.
Step 11 : Type next coordinates of point 10. #(5,5) in the command box.
Step 12 : Enter or click on the command "close".
Note: # is for to draw line with respect to origin.
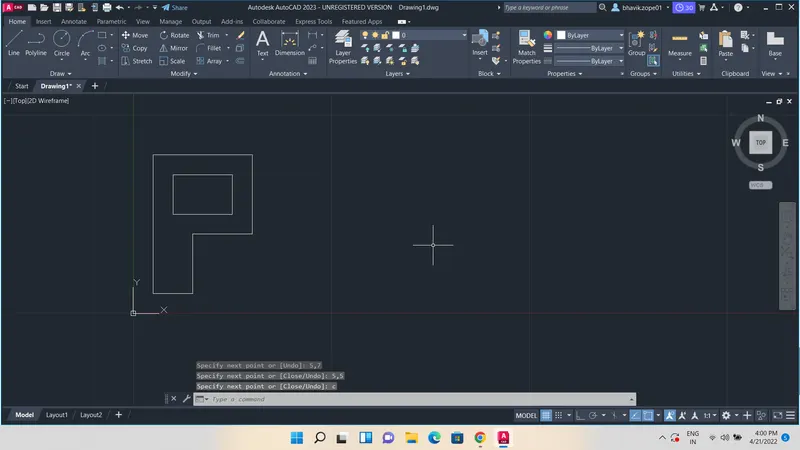
Result:
b. Relative rectangular coordinate:
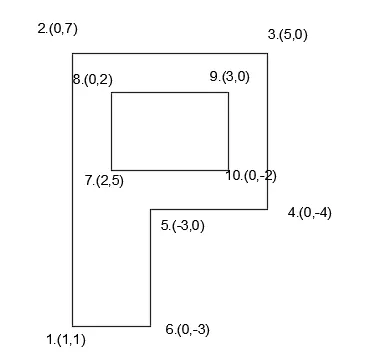
Procedure:
Step 1: Type the command "L"for line and give the coordinates for point 1.(1,1).
Step 2: Type the next coordinate of point 2 .@0,7 in the command box.
Step 3 : Type next coordinates of point 3. @ 5,0 in the command box.
Step 4 : Type next coordinates of point 4. @0,-4 in the command box
Step 5 : Type next coordinates of point 5. @ -3,0 in the command box
Step 6 : Type next coordinates of point 6. @0,-3 in the command box
Step 7 : Enter or click on the command "close".
Step 8 : Type the command "L"for line and give the coordinates for point 7.(2,5).
Step 9 : Type next coordinates of point 8. @0,2 in the command box.
Step 10 : Type next coordinates of point 9. @3,0 in the command box.
Step 11 : Type next coordinates of point 10. @0,-2 in the command box.
Step 12 : Enter or click on the command "close".
Result:
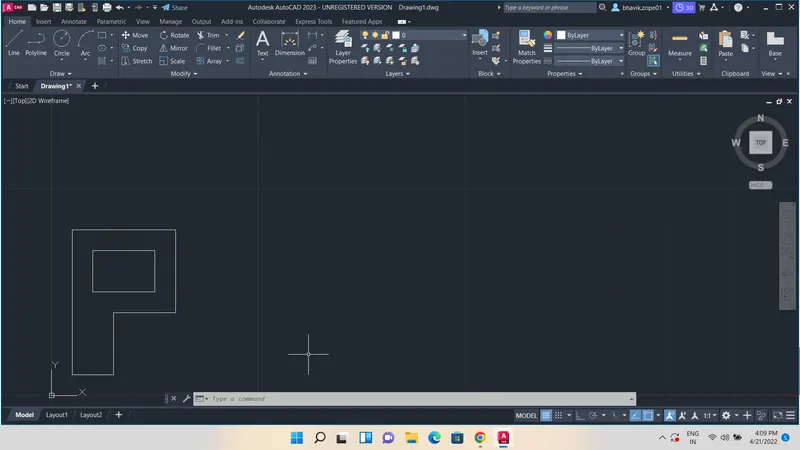
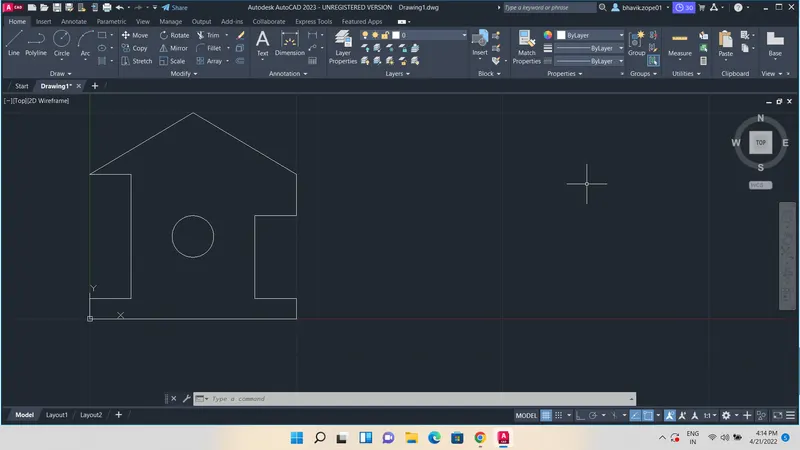
9. Profile- wood
This is done by Relative rectangular coordinate system:
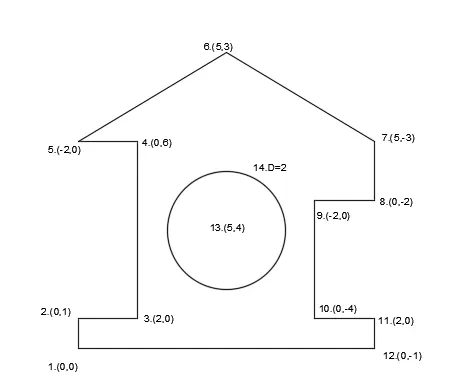
Procedure:
Step 1: Type the command "L"for line and give the coordinates for point 1.(0,0).
Step 2: Type the next coordinate of point 2 .@0,1 in the command box.
Step 3 : Type next coordinates of point 3. @ 2,0 in the command box.
Step 4 : Type next coordinates of point 4. @0,6 in the command box
Step 5 : Type next coordinates of point 5. @ -2,0 in the command box
Step 6 : Type next coordinates of point 6. @5,3 in the command box
Step 7 : Type next coordinates of point 7. @5,-3 in the command box
Step 8 : Type next coordinates of point 8. @0,-2 in the command box
Step 9 : Type next coordinates of point 9. @-2,0 in the command box.
Step 10 : Type next coordinates of point 10. @0,-4 in the command box.
Step 11 : Type next coordinates of point 11. @2,0 in the command box.
Step 12: Type next coordinates of point 12. @0,-1 in the command box.
Step 13: Enter or click on the command "close".
Step 14: Click circle from the draw panel and select centre -radius
Step 15: Enter the coordinates of the centre 5,4 in the command box
Step 16: Then the command box shows " enter the diameter" and enter the value 2 ,which is the diameter of circle.
Result:
10. Queen post truss
Combination of relative rectangular and polar coordinate system is used here
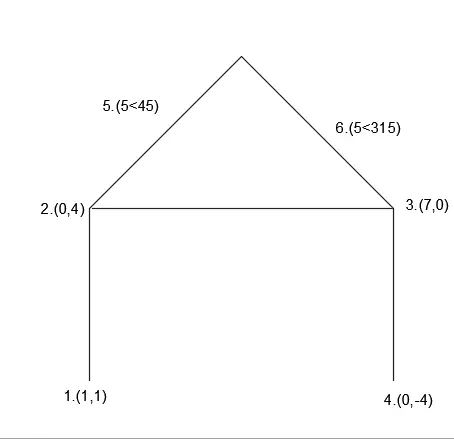
Procedure:
Step 1: Type the command "L"for line and give the coordinates for point 1.(1,1).
Step 2: Type the next coordinate of point 2 .@0,4 in the command box.
Step 3 : Type next coordinates of point 3. @ 7,0 in the command box.
Step 4 : Type next coordinates of point 4. @0,-4 in the command box
Step 5 : Press Esc to cancel the command.
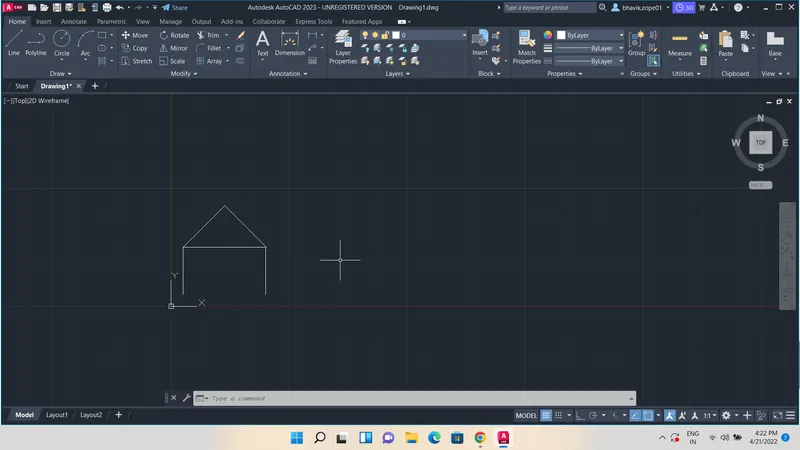
Step 6 : Type the command "L"for line and select the point 2 and then give the coordinates for point 5.@5<45.
Step 7 : Type the coordinates for point 6. @5<315.
Result:
11. Monopitch:
Relative rectangular coordinate is used:
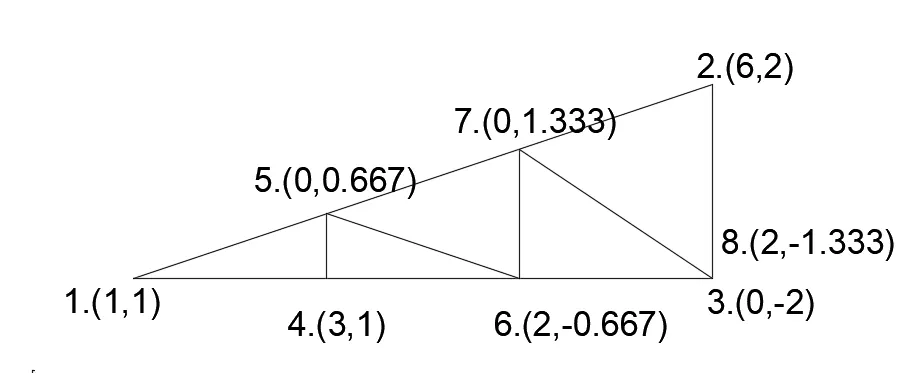
Procedure:
Step 1: Type the command "L"for line and give the coordinates for point 1.(1,1).
Step 2: Type the next coordinate of point 2 .@6,2 in the command box.
Step 3 : Type next coordinates of point 3. @ 0,-2 in the command box.
Step 4 :Enter or click on the command "close".
Step 5 : Type the command "L"for line and give the coordinates for point 4.(3,1).
Step 6 : Type next coordinates of point 5. @0,0.667 in the command box
Step 7 : Type next coordinates of point 6. @2,-0.667 in the command box
Step 8 : Type next coordinates of point 7. @0,1.333 in the command box
Step 9 : Type next coordinates of point 8. @2,-1.333 in the command box.
Result:
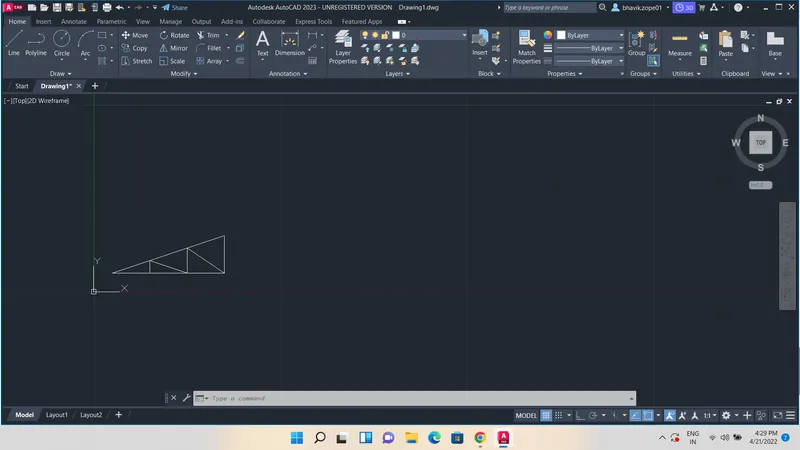
RESULT:
All the geometries are drawn in respective coordinate system and using line tool and each output is shown for each geometries.