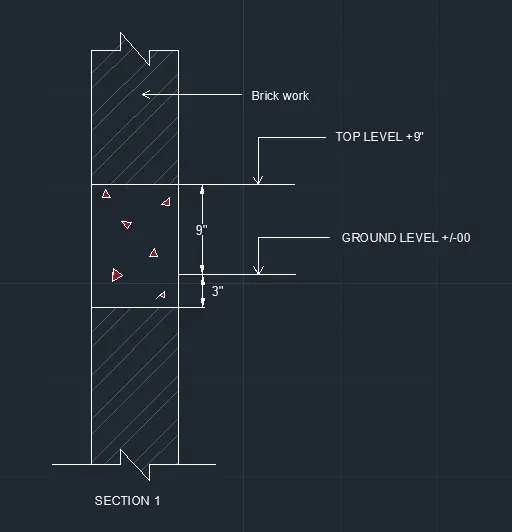
Creation of Column Schedule and Drawing Template using AutoCad
ASSIGNMENT 5
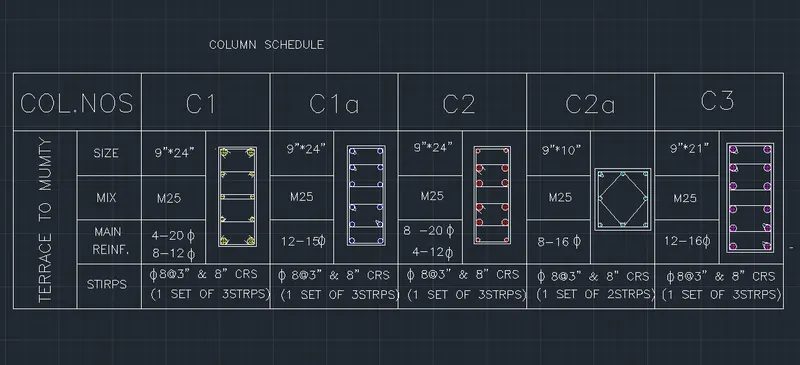
Q1. To create a column schedule as given
in the figure using AutoCAD
ANS -
Procedure :-
- Type "REC' in command box t o create a rectangle and press en ter.
- Click on dimensions in command box and specify the length of rectangle as 60' and width of rectangle as 2·0.
- Type "EX PLODE" in the command box and press enter.
- Select the rectangle and press enter. Press "esc ".
- Type "O" for offset command and press enter.
- Specify the offset distance as 5' and press enter.
- Make the 12 columns inside the rectangle with the offset of 5· to each .
- Type "O" for offset command and press enter.
■ Specify the offset distance as 4’ – 5’ and press enter.
- Select t h e top horizontal line of rectangle and make the offset inside the rectangle.
■ Type "O" for offset command and press enter.
- Specify the offset distance as 3'- 6" and press enter.
■ Select t h e bottom horizontal line of rectangle and make the offset inside the rectangle.
- Type "TR" in t he command box for trim command trim.
■ Now trim the extra and unwanted lines.
Drawing of column section C1
■Type "REC' in command box to create a rectangle and press en ter.
- Click on dimensions in command box and specify the length of rectangle as 9" and w id t h of rectangle as 24".
- Type "EX PLODE" in the command box and press en ter.
- Select t h e rectangle and press en ter. Press "esc ".
- Type "O" for offset command and press en ter.
■ Specify the offset distance as 40mm or O S and press en ter.
- Select rectangle and make the offset inward.
- Type ·c for circle and press enter and select tangent, tangent, radius from com m and box a n d mar k the first and second tangents as top and side line of column and make a circle of radius 10mm or 0.3937",
- Next use mirror command and make the same circle copy to each corners o f rectangle.
- Type T for fillet command and give the radius 0.2". And fillet all vertices of inner rectangle.
■Now take the command "div " and give the segment value 4 and select vertical line.
- Type "L" for line command and press enter.
- Make lines at each segment point parallel to the length of rectangle.
■ Next type "C for circ le in command box a n d make bar of 12mm or 0.4724"dia and place at the upper line drawn.
- use the mirror command and mirror it in all sides as per the question.
- Now type "HATCH" for the hatch command and take the solid hatch and hatch all the reinforcement bars.
- Give hatch colour of choice.
■ To make the hooks, mark the line right and left side of the bar and trim it and then place it at by rota ting at required angle.
Type "ST" for text style and set font style as "roman·
Now type the command DT.
- Take the height of the text as 8 " and angle of the text as ''O".
- Now make the heading as column schedule.
- Now copy the heading by the command "CO".
- Next rotate it by rotate command "RO" at an angle of 90 and edit the heading as "TERRCE TO MUMTY .
- Now to change the text sty le take the command "ST" select the font name as "shx".
- Then copy the text created and edit the schedule table with required text.
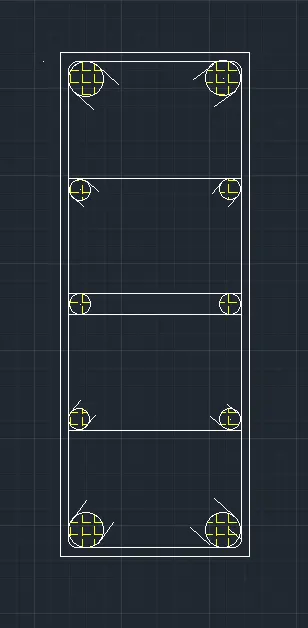
Drawing of column section C1a
- Type "REC ' in command box to create a rectangle and press enter.
- Click on dimensions in command box and specify the length of rectangle as 9" and width of rectangle as 24 ".
- Type "EXPLODE" in the command box and press en ter.
- Select the rectangle and press enter. Press "esc".
- Type "o " for offset command and press enter.
- Specify the offset distance as 40mm or 0.5" and press enter.
- Select rectangle and make the offset inward.
- Type "C" for circle and p,ress enter and select tangent, tang en t, radius from command box and mark the first and second tangents as to p mi d side line of column and make a circle of radius 8mm o r 0.315 ".
- Next use mirror command and make the same circle copy to each corners of rectangle.
- Type F for fillet command and give the radius 0.2". And fillet all ve rtices of inner rectangle.
- Now take the command "d iv" and give the segment value 5 and select vertical line .
- Type T' for line command and press enter.
- Make lines at each segment Point parallel to the, Iength of rec tangle.
- Next type "C" for circle in command box and make bar of 8mm o r 0.315 " dia and place at the upper line drawn.
- Use the mirror command and mirror it in all sides as per the quest ion.
- Now type "HATC H" for the hatch command and take t he solid ha tch and hatch all the reinforcement bars.
- Give hatch colour of choice.
- To make the hooks, mark the line right and left side of the bar and trim it and then place it at by rotating at required angle.
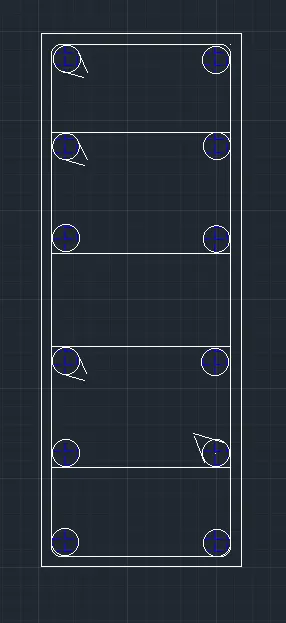
Drawing of column section C2
- Ty pe "REC' in command box t o create a rectangle and press
en,ter.
- Click on dimensions in command box and specify the length of rectangle as 9" and width of rectangle as 24 ".
■ Type "EX PLODE" in the command box and press enter.
".
■ Type o for offset command and press en ter.
■ Specify the offset distance as 40mm or 0.5"
■ Select rectangle and make the offset inward.
- Type · c " for circle and press enter and select tangent, ta ngent, radius from command box and mark the first and second tangents as top and side line of column and make a circle of radius 6mm or 0.2362 ".Type "F" for fillet command and give the radius 0.2". And fillet all vertices of inner rectangle.
- Now take the command "div" and give the segment value 5 and select vertical line.
- Type l for line command, and press enter.
- Make lines at each segment point parallel to the length of
rectangle.
- Next type "C" for circle in command box and make bar of 20mm or 0.787402" dia and place at the upper line drawn.
- Use the mirror command and mirror it in all sides as per the quest ion.
- Now type "HATCH" for t he hatch command and take the so lid hatch and hatch all the reinforcement bars.
- Give hatch colour of choice.
- To make the hooks, mark the line right and left side of the bar and trim it and then place it at by rotating at required angle.
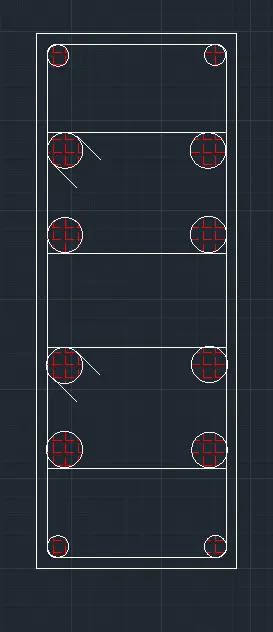
FINAL DRAWING BY ADDING TEXT IN TABLE
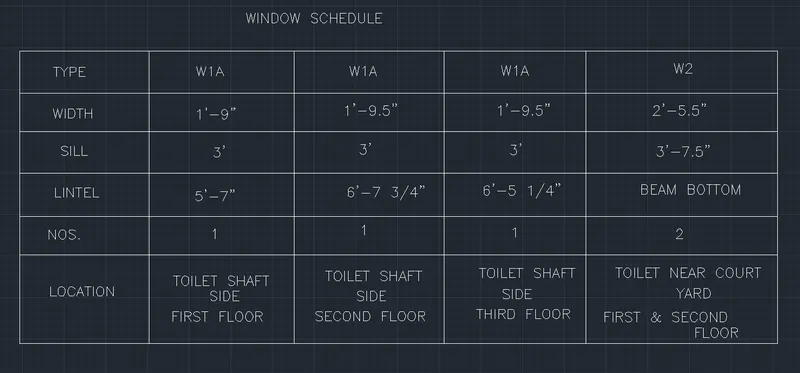
To create a window schedule as given in the figure using AutoCAD
Procedure:-
- Type "REC' in com m and box t o create a rectangle mi d press en ter.
- Click on dimensions in com m and box and specify the length of rectangle as 30" and width of rectangle as 12'.
■ Type "EX PLODE" in the command box and press enter.
■ Select the rectangle and press enter. Press "esc ".
- Type "O" for offset command and press enter.
- Specify the offset distance as 6' and press en,ter.
- Make the 5 columns inside the rectangle with the offset of 6' to each .
■ Type ·o" for offset command and press enter.
■ Specify the offset distance as 2 and press enter.
- Select the top horizontal line of rectangle and make 5 row taking offset inside the rectangle.
Type ST for text style and set font style as "roman .
- Take the height of the text as 8" and angle of the text as ''O".
- Now make the heading as window schedule.
- Copy the text created and edit the schedule table with required text.
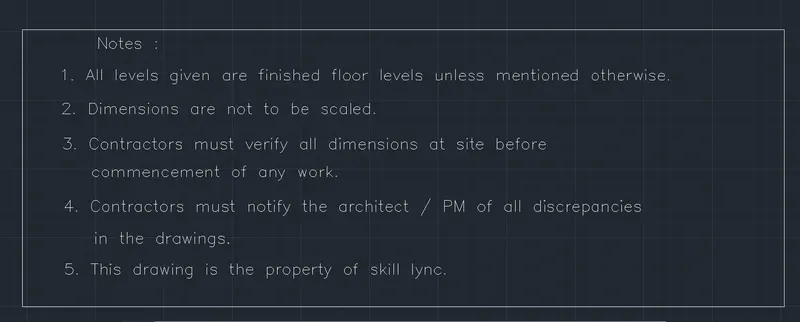
To create a drawing template as given in the figure using AutoCAD
Procedure:-
- Type "REC' in command box to create a rectangle and press en ter.
- Click on dimensions in command box and specify the length of rectangle as 80' and width of rectangle as 10'.
- Type "EX PLODE" in the command box and press enter.
■ Select the rectangle and press enter, Press "esc ",
■ Type ·o" for o ff set command mid press en ter.
- Specify the offset distance as 30' and press enter.
Make first column inside the rectangle with the offset of 30' from left vertical edge.
Specify the offset distance as 20· and press enter.
- Select the last offset line and make another column by taking
offset inside the rectangle.
■ Type "breakpoint" in command box and break the above horizontal line in two par t from first offseted line.
■ Type ·o" for offset command and press en ter.
■ Specify the offset distance as ·2 and p,ress enter.
- Make two row of 2nd and 3rd column by taking offset.
- Now by using offset command prepare the 3rd column of the table as per the question.
type -ST for text style and set font style as "roman
■ Now type the command DT
■ Take the height of the text as 8 " and angle o f the text as ''O".
■ Now make the heading as window schedule.
■ Copy the text created and edit the schedule table with required text.

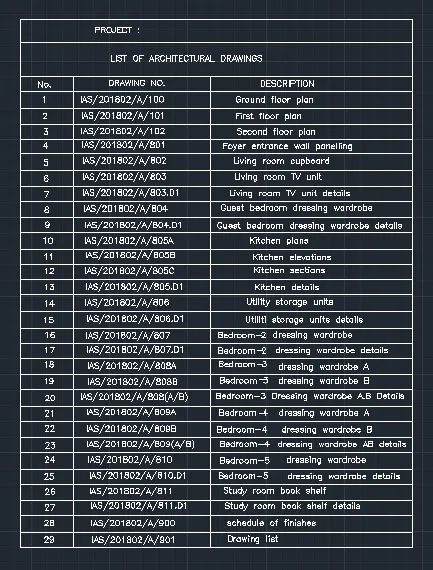
To create a drawing template as given in the figure using AutoCAD
Procedure:-
■ Ty p e TABLE" in command box and press enter.
■ Specify 29 Rows of table.
■ Specify 3 columns of table.
■ Specify 2 Rows of for title.
■ Specify 1 Row of table with data.
■ Click OK.
■ Now select t, he table by clicking On it.
■ Right click and select properties.
■ C,hange the dimensions of the table as per the requirement
Ty p e ST for text style and set font style as "roman.
■ Now type the command DT.
■ Take the height of the text as 8" and angle of the text as "O".
■ Now make the heading as window schedule.
■ Copy the text created and edit the schedule table with required text.
To create a beam detail as given in the figure using AutoCAD
- Type "REC' in command box to create a rectangle and press enter.
- Click on dimensions in command box and specify the length of rectangle as 9" and width of rectangle as 4".
- Type "EX PLODE" in the command box and press enter.
- Specify the offset distance as 2’ a n d press enter.
- Select the bottom side of the rectangle and make the offset of side inside the rectangle.
- Type "O" for offset command and press enter.
- Specify the offset distance as 1' and press enter.
- Select the offsetted side of the rectangle and make the offset of side inside the rectangle.
■ Create t he cross- section symbol given in the question and erase the previous line.
Type "HATCH" in the command box and press enter.
■ Select the hatch pattern and click centre box form end.
■ Change the Hatch- Scale as per requirement.
■ Type "HATCH" in the command box and press enter.
■ Select the hatch pattern and pick the internal point as top and bottom box.
Type "ST" for text style and set font style as "roman".
Now type the command DT
Take the height of the text as 8" and angle of the text as "O".
Go to the annotation bar and click on add leader.
Then type t he Text as given in the question.