Creating Bar Bending schedule, Different Door types, and Creation of standard drawing templates using AutoCad
1. Aim: to create template,inserting text and attributes.
Procedure:
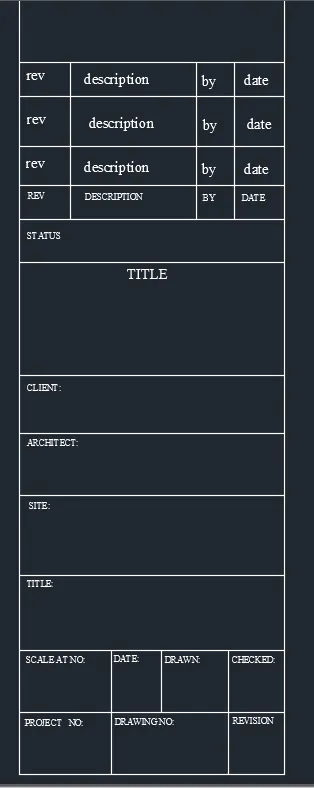
a) Custom 1_title block
- Create a rectangle of 66.63mm and 158mm.
- Divide the line for the text into columns.
- For rows take offset of 5,10,5,5,8,30,15,15,20,20,10,15mm.
- By multiline text,type rev,description,by date,date on the first row by text height 2.5 and style as Times New Roman.
- Again use mutiline text and type the required text in caps with text height 1.5 and style as Times New Roman.
- Now create the block using block command give the name as Custom 1_title block-select pick point and selecta point in the table-select the object-select the whole table including the text.
- Select convert to block option and give scale uniformly and tick allow exploding.
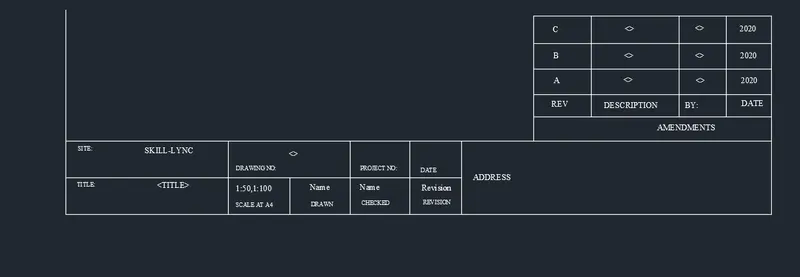
b) Custom 2_title block
- Draw a rectangle of 252 and 46mm.
- With lines divide the required rows and columns.
- Using multiline text insert the following height 2.5.
- Create a small rectangle at the right corner,explode it,create rows and columns.
- By attributes create the text inside it.
- Command "ATT"-attribute definition dialogue box appears.
- Create attributes similarly for the rest of the text.
- Now create the block using block command with name Custom 2_title block,select the whole titleblock and make it as a block.
- After creating it as block we can see that all attributes will change to their default values.
Result: Custom 1_title block and Custom 2_title block are created
\
2. Aim: to create doors for warehouse and placing it in blocks:
Procedure:
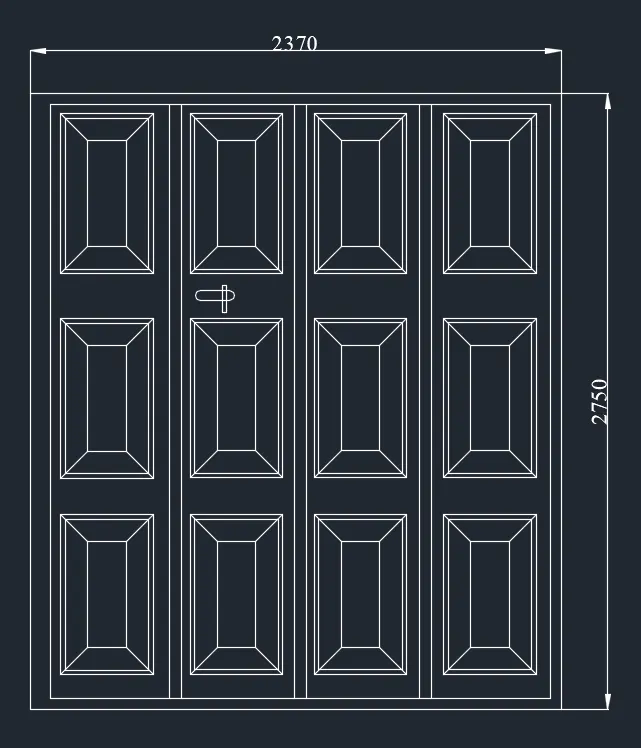
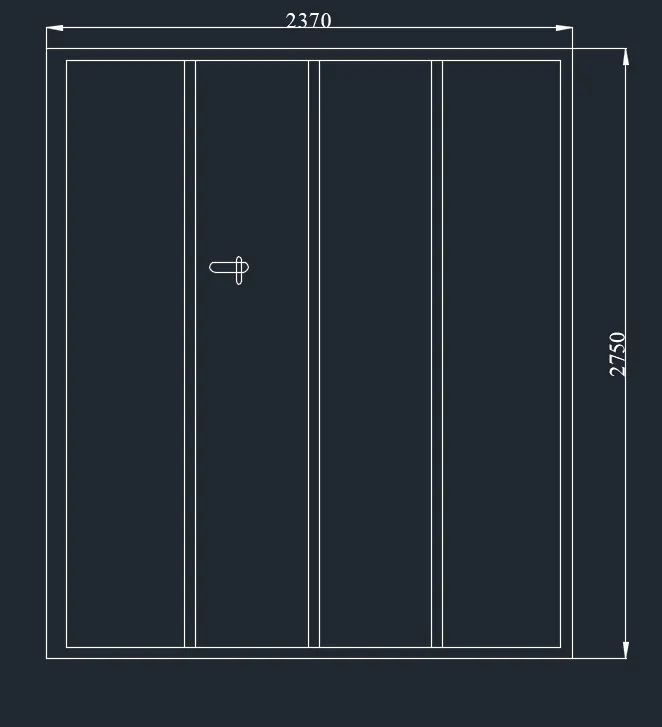
a) Door 1- 2330x2750mm
- Create a rectangle of size 2330x2750mm.
- Offset 50mm as a frame and 90mmfor the left side and explode the rectangle.
- Using divide command divide the top line segment into 4 segments.
- From the division point draw line vertically to divide it into shutters.
- Offset 25mm on both sides for the thickness and delete the centre line.
- Now create a rectangle to show the panels.
- Offset 20mm from the 1st rectangle and offset 100mm from the 2nd rectangle.
- Draw line joining the corners of the outside and inside rectangle.
- Create the panel as a block.
- Array the panels,taking rectangular array,rows 3 distance between them 900mm and columns 4 distance between them 567mm.
- Create the lock by rectangular command and fillet the corners with radius 5mm.
- Layer is created and all the objects are kept in different layers.
- Create the block using block command and give name as door 1,select corner point,select object,select the full object.
- Select scale uniformly and allow exploding.
b) Door-2330x2750mm
- Create a rectangle of size 2330x2750mm.
- Offset 50mm as frame and 90mm for the left side and explode the rectangle.
- By divide command divide the top line into 4 segments.
- From the division point draw line vertically to divide it into shutters.
- Offset 25mm on both sides for the thickness and delete the centre line.
- Layer is created and all the objects are kept in different layers.
- Create the block using block command and give name as door 2,select corner point,select object,select the full object.
- Select scale uniformly and allow exploding.
Result: the door blocks are created
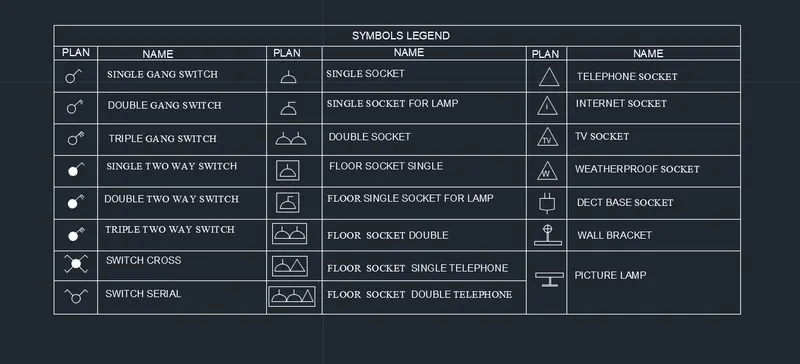
3. Aim: to create electrcial legend
a) Creating electrcial symbols:
i) Single gang switch: draw a circle of radius 64mm and with line draw an incline line vertical line and horizontal line perpendicular to the inclines as required.
ii) Double gang switch: Draw circle and draw two horizontal lines and a vertical incline line.
iii) Triple gang switch: Draw circle, 1 vertical line and three horizontal lines.
iv) Single two way switch: draw same as single gang switch and with donut command give internal dia as zero and for external diameter give 64mm.
v) Double two way switch: draw same as double gang swicth and create donut.
vi) Triple two way switch: draw same as triple gang create donut.
vii) Switch cross: create a circle and donut inside and with line command draw an incline vertical and perpendicular horizontal and mirror the line in both direction.
viii) Switch serial: copy the switch cross and delete two bottom lines,remove the donut also.
ix) Single socket: Create a circle,divide it into half and draw a line a line at the top.
x) Single socket for lamp:from the single socket,draw a horizontal line perpendicular to vertical.
xi) Double socket: draw the single socket and copy it to create and place it.
xii) Floor socket single: draw a rectangele surrounding single socket.
xiii) Floor single socket for lamp: draw a rectangle surrounding single socket for lamp.
xiv) Floor socket double: create two single socket and place a rectangle surrounding it.
xv) Floor socket single telephone: draw a single socket,a triangle and surrounded by a rectangle.
xvi) Floor socket double telephone: draw 2 single socket and a triangle surrounded by a rectangle.
xvii) Telephone socket: draw a triangle.
xviii) Internet socket: insert text "i" in the triangle.
xix) Tv socket: insert text"TV" in the triangle.
xx) Weatherproof socket: insert text"w" in the triangle.
xxi) Dect base section: draw a rectangle,delect the bottom grip point,select add vertex and then pull the vertext to create a bend and with lines draw the lines.
xxii) Wall bracket: with rectangular draw the base,create a circle,draw a line connecting the rectangle and circle,draw a cross line inside the circle.
xxiii) Picture lamp: Draw two rectangles connected bya line.
b) Creating them as block:
- Give command B and give name as single gang switch,pick a point,select object,tick scale uniformly and allow exploding options.
- Similarly define each one of them as block giving the respective names.
c) Creating and arranging them in layers:
- First create a rectangular table having 10 rows and 6 columns.
- Place each of the blocks in the respective rows and columns.
- To enter text with the block from the insert tab,select field,select object and finally select block.
- Place the text in the respective rows give text height as 100.
- Similarly place all the title inside the legends.
Result:
4. Aim: to draw the doors of residential project and create it as a block.
Procedure:
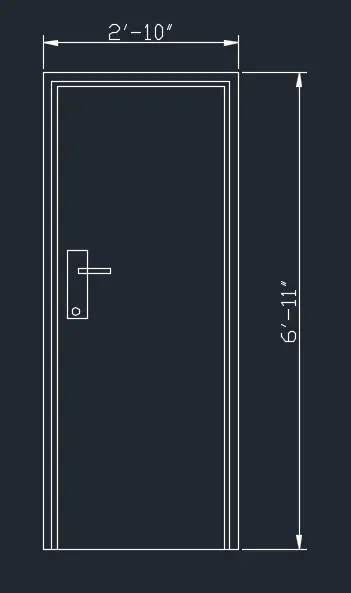
a) D1-2'10"x6'11"
- Draw a rectangle with dimension as 2'10"x6'11".
- Draw offset 1.5" for frame then 1" for shutter.
- Draw lock by two rectangle perpendicular to each other and fillet the corners with radius 0.1" circle.
- Write the text by multiline text"D1".
- Create it as a block "B" give name as type-D1- pick a corner point,select the object and then block is created.
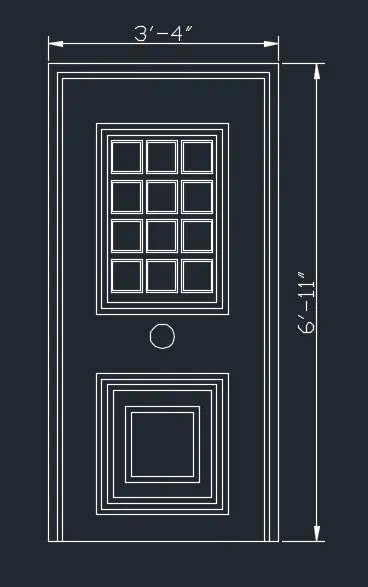
b) D2-3'4"x6'11"
- Draw a rectangle with dimension as 3'4"x6'11".
- Draw offset 1.5" for frame then 1" for shutter.
- Draw rectangle for panel 1'11" and 2'9" then offset 1" two times.
- Draw rectangle of 5.4"x5.7" and offset 0.3".
- Copy the 3 rectangle to 4 rows.
- For the second panel draw a rectangle o 1'11"X2'6" and offset 1" 3 times.
- Draw another rectangle inside it of 1'0.8"x1'1.10" and offset 1".
- Draw lock by circle in between the two panels.
- Write the text by multiline text "D2".
- Create it as block"B" give name as "type-D2" pick a corner point ,select object.
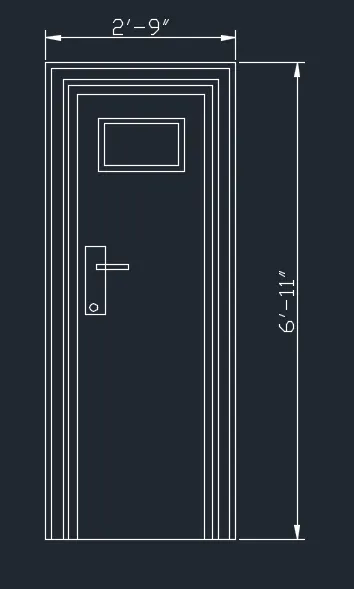
c) D3-2'9"x6'11"
- Draw a rectangle of 2'9"x6'11".
- Offset 1" for thickness,2" offsetfor frame and offset 1.5" as shutter thickness.
- Draw a rectangle at the top for ventilation 1'3"x9.3" and give offset 1" for thickness.
- Hatch the rectangle.
- Create it as a block-give name as type d3-pick point,select object,tick scale uniformly and explode all.
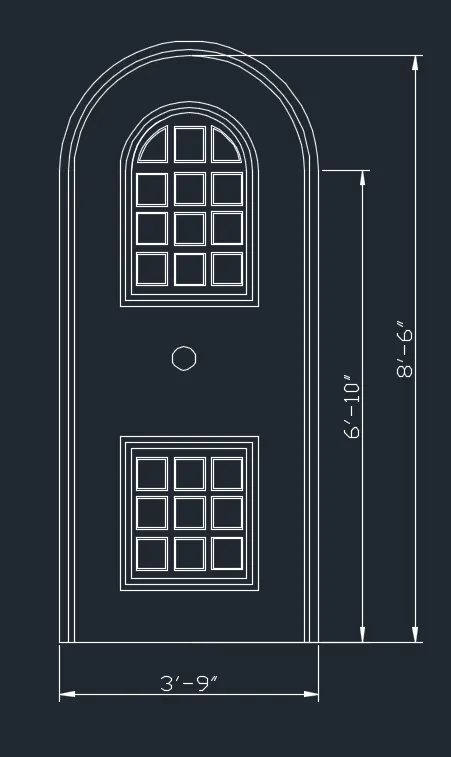
d) D4- 3'9"x8'7"
- Draw a rectangle of 3'9"x8'7".
- Explode it create an arc with 2 point method with both point as the endpoints.
- Offset the arc and the line with 1.5" and then offset 1".
- Offset 8" from arc and rectangle for panel and divide it into two.
- Take 1" offset 2 times to show thickness.
- Create the rectangle inside the panel.
- Make it as a block,name it as D4-pick a point and select object tick the uniform scale and explde all.
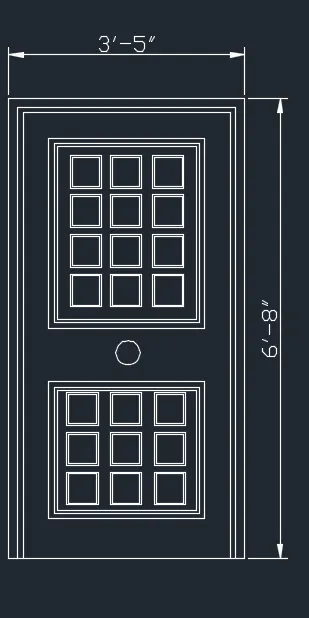
e) D5- 3'5"x6'8"
- Draw a rectangle of size 3'5"x6'8".
- Offset 1.5" for frame and 1" as shutter thickness.
- Create another rectangle with offset 4.4".
- Create another rectange on the bottom 2'2.9"x2'2.6".
- Offset 1" two times for both the rectangles.
- Create the rectangle inside for panels wit offset 0.5".
- Create it as block give name as type D5-pick point,select object,tick scale uniformly and explode all.
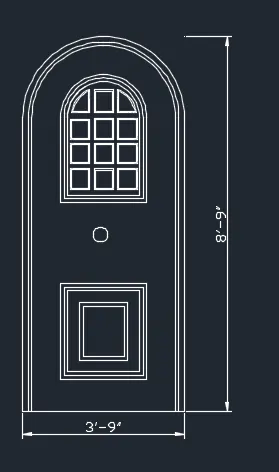
f) D6- 3'9"x8'9"
- Draw a rectangle of size 3'9"x8'9".
- Explode it and create an arc with 2 point method with borth point as the endpoints.
- Offset the arc and the line with 1.5" an then 1" for the frame.
- Offset 8" from arc and rectangle for panel divide it into two.
- Take offset 8" from arc and rectangle for panel and divide it into two.
- Take 1" offset 2 times to show the thickness on top figure abd bottom rectangle.
- Create rectangles inside the top panel,3 rows and 4 columns.
- For bottom panel offset the rectangles by 1" 3 times and 3.3"" and again 1".
- Make it a block,name as type D6,pick a point and select the object tick the dialogue box of uniform scale and explode all.
Result: the doors are created and are made into blocks.
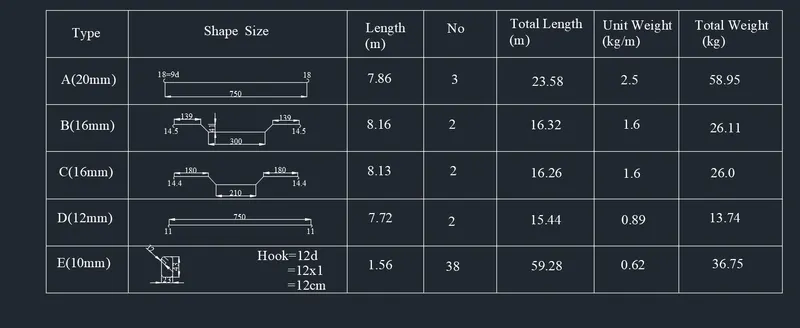
5. Aim: to create bar ending schedule and insert it as block.
Procedure:
a) Drawing each shape:
A-20mm
- Draw a line of 750cm for straight bar.
- Create arc for the bend.Create on one side and mirror it on another side.
B-16mm
- Draw a line of 300mm for straight bar.
- Draw vertical line of 41 cm and extend a horizontal line and draw a line inclined at 45 degree from the base of vertcial line upto horizontal line.
- Trim off the extra lines usong trim command.
- Copy the same on the other side.
- Draw a horizontal line of 139cm and copy it on other side.
- Draw bend with arc and mirror the same on the other side.
C-16mm
- Draw a line of 210cm.
- Draw vertical line of 41 cm and extend a horizontal line and draw a line inclined at 45 degree from the base of vertcial line upto horizontal line.
- Trim off the extra lines usong trim command.
- Copy the same on the other side.
- Draw a horizontal line of 180cm and copy it on other side.
- Draw bend with arc and mirror the same on the other side.
D-12mm
- Draw aline of 750cm for staright bar.
- Draw an arc downwards.
- Copy it on the other side.
E-10mm
- Draw a rectangle of 23cm and 43cm.
- Fillet the corner with fillet radius 5cm.
- Draw two line of 120cm.
b) Creating each of them as block:
- Command "B" give name as A-pick a point,select object,select delete,tick scale uniformly and explde all.
- Similarly create 5 blocks: A,B,C,D,E and insert each of the bars as blocks.
c) Inserting it in table:
- Create a table with rectangle and divide it into 6 rows and 7 columns.
- With multiline text enter type,shape size,length no,total length,unit weight,total weight.
- By insert command insert each of the block in respective columns.
Result: